Introducción
¿No sabes qué hacer con todas las tiras adhesivas de tu kit de reparación? ¡Has venido al lugar correcto!
Esta guía muestra cómo utilizar el kit de adhesivo para la tapa trasera de la serie Galaxy S con respaldos de vidrio (S7 y posteriores). También incluye instrucciones sobre cómo transferir e instalar varios componentes de la tapa trasera , como el bisel trasero y el sensor de huellas digitales.
Es posible que no necesites usar todas las tiras adhesivas del kit. Y si estás transfiriendo el sensor de huellas digitales, necesitarás cinta adhesiva de doble cara tipo Tesa
Para obtener una lista de tiras adhesivas para teléfonos Galaxy S,[[ enlace de piezas no válido ]].
Al aplicar estas tiras adhesivas, sigue estos consejos:
- Generalmente, las tiras adhesivas tienen un lado coloreado y un lado no coloreado (papel o plástico transparente). El lado no coloreado determina a qué superficie se debe aplicar primero la tira.
- Para facilitar la aplicación del adhesivo, puedes alinear una tira no expuesta a su posición deseada en el teléfono, luego pega un borde para sujetar la cinta en su lugar. Esto permitirá despegar los revestimientos de plástico y exponer el adhesivo sin perder la alineación.
Qué necesitas
-
-
Para instalar el adhesivo de la batería, sigue esta guía:
-
Para transferir e instalar el sensor de huellas digitales y la junta, comienza con el siguiente paso.
-
Para transferir e instalar el bisel trasera de la cámara, dirígete al paso 5.
-
Para instalar los adhesivos de la cubierta posterior, dirígete al paso 9.
-
Para instalar el adhesivo del perímetro de la tapa trasera, dirígete al paso 13.
-
-
-
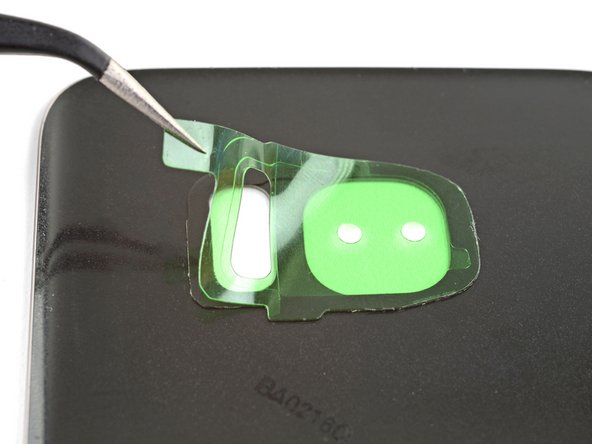
Calienta un iOpener y aplícalo al sensor de huellas digitales durante un minuto.
-
Utiliza una herramienta de apertura para hacer palanca suavemente el sensor de huellas digitales en el borde inferior, donde entra en contacto con la tapa trasera.
-
No hagas palanca en el borde superior, que es la unión de la junta de la huella digital.
-
-
-
Utiliza una herramienta de apertura para sacar el sensor de huellas digitales de la junta.
-
Retira el revestimiento plástico de color de la junta de reemplazo para exponer el adhesivo.
-
Alinea cuidadosamente y coloca el sensor de huellas digitales en el lado adhesivo de la junta.
-
Una vez alineado, presiona firmemente con el dedo para unir el adhesivo.
-
-
-
Para fijar el sensor de huellas digitales a la nueva tapa trasera, utiliza un adhesivo cortado a medida o forra el perímetro del sensor con cinta adhesiva de doble cara, como la cinta Tesa.
-
Alinea el sensor de huellas digitales en el recorte de la tapa trasera y presiona firmemente con el dedo para unir el adhesivo.
-
-
-
Calienta un iOpener y aplícalo al bisel trasero durante un minuto.
-
Comenzando desde el lado exterior de la tapa trasera, empuja el bisel de la cámara hacia dentro con un dedo para aflojar el bisel de su recorte.
-
Alternativamente, puedes hacer palanca alrededor del bisel con una herramienta de apertura para aflojarlo de la tapa trasera.
-
-
-
-
Despega el revestimiento de plástico transparente de la tira adhesiva del bisel para exponer el adhesivo.
-
Alinea cuidadosamente el adhesivo con el recorte de la tapa trasera.
-
Una vez alineado, presiona el adhesivo con el dedo.
-
Despega el revestimiento plástico de color del adhesivo para exponer su superficie.
-
-
-
Averigüa cómo la tira de soporte se alinea con las superficies haciendo coincidir los contornos de la tira adhesiva con el residuo de adhesivo y el marco del teléfono.
-
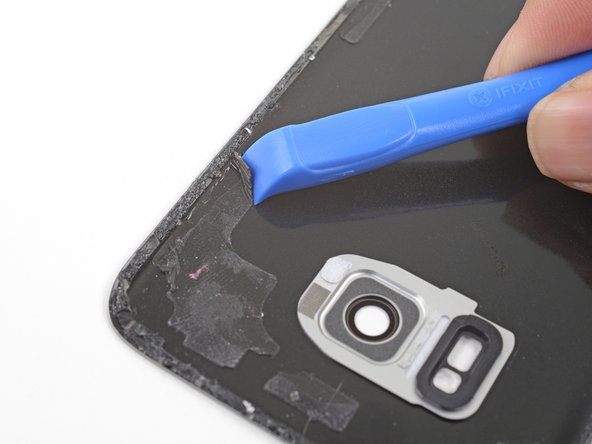
Utiliza una herramienta de apertura y alcohol isopropílico de alta concentración para eliminar todos los residuos de adhesivo del marco del teléfono.
-
Si tu estás reutilizando la tapa trasera, retira todos los residuos de adhesivo de la misma.
For my Galaxy S7, it appeared to me there were some minor placement inconsistencies (a millimeter or two) where the Back Cover Support adhesive pads (support strips) were on the backing sheet versus the actual phone. Difficult to know for sure since it is hard to tell where the original pads were after the back cover is pried off. I removed the clear backing to expose the strips and blocks, but placed the clear backing covering 80% of the phone as I transferred one portion of the unconnected adhesive strips at a time where they best appeared to be needed. This falls in the category of tweaking.
The adhesive sheet for the back cover was 100% accurate.
-
-
-
Retira el soporte transparente de la tira adhesiva de soporte para exponer el adhesivo.
-
Pon con cuidado el lado pegajoso de la tira hacia arriba en la parte superior del marco del teléfono, teniendo cuidado de no tocar la superficie pegajosa.
-
Alinea la tira adhesiva en el marco del teléfono de modo que los contornos del adhesivo coincidan con los del marco.
-
Si tienes dos tiras de soporte pequeñas, repite el proceso para ambas tiras.
This process of putting the colored plastic with adhesive onto the phone and then sandwiching the back panel on top seemed counter-intuitive so I decided to remove the colored plastic and place the adhesive + clear plastic onto the back of the phone’s guts.
DON’T BE ME!
Follow the instructions and save yourself close to an hour of hassle. The adhesive loves the colored plastic way more than the clear.
It actually worked!!!
-
-
-
Baja con cuidado la tapa trasera sobre las tiras de soporte expuestas. Esto asegura que el adhesivo se transfiera a la tapa trasera en su posición correcta.
I found it easier to lower the back cover onto the support strips using a suction cup. I felt like this gave me more control over placement and my fingers didn't get in the way on the edges.
-
-
-
Usa una herramienta de apertura y alcohol isopropílico de alta concentración para eliminar todos los residuos de adhesivo del marco del teléfono.
-
Si tu estás reutilizando la tapa trasera, retira todos los residuos de adhesivo de la misma.
Scrape and peel the adhesive, using goo gone only after systematically scraping the adhesive as much as possible. The goo gone should only be used to clean up residue once manual scraping has been completed, otherwise the adhesive will become tacky and only scrape off in microscopic layers at a time, which takes forever to remove.
-
-
-
Despega el revestimiento transparente de la tira adhesiva perimetral para exponer el adhesivo.
-
Sujeta la tira por sus lengüetas y alinea cuidadosamente un borde largo del adhesivo con el borde de la tapa trasera.
-
Coloca el adhesivo en la tapa trasera y presiónalo con los dedos sobre la tapa.
-
Despega el revestimiento de color de la tira adhesiva perimetral para exponer el adhesivo.
(Galaxy S7 kit): I peeled away the clear liner (Step 1), aligned it to the cover edge (Step 2) and pressed it down (Step 3).
When I peeled off the tabbed "coloured" liner (Step 4), it turned out to be two layers: a clear, tabbed one that came away and a green one consisting of a central part and a thin, outer strip that still covered the adhesive.
This thin strip had been partially lifted by the removal of the clear tabbed layer, so I started to remove it all. As I slowly and carefully pulled it, it tried to lift the adhesive strip itself off the cover so I held that down with the tweezer points. That still left the main green part in the centre of the case, but that was easily removed.
However, when I turned the back cover over I saw that where the adhesive strip had lifted slightly it had detached some of the cover's coloured film, leaving it buckled and a bit of a mess.
When I tried to pull away the cover strip, the adhesive stuck to it. I also have no idea why the clear liner and green liner are attached to each other.
The pictures don’t match what is received for the Galaxy S8+. It’s also not clear where to attach the perimeter adhesive. On the lip of the back cover or just inside the well area. In addition, after exposing the adhesive (after removing the clear side), no matter how weel you pre-align the position, you can’t count on the adhesive to stick to whichever method questioned above, without some of it not releasing cleanly from the colored backing. Yes. firm pressure was applied before moving a little further down. At times the adhesive stuck so strongly to the colored backing, it stretched the adhesive out of shape.
I have repaired hundreds of laptops and all in ones, so I understand there are subtleties in a repair, and I found it quite confusing replacing the battery and fingerprint sensor and other necessary parts related to doing that repair with the either inaccurate, outdated, or lack of detail provided (but much needed) in this guide.
If you're like most people and the original back glass (S8) cracked upon removal, and you've ordered and received a plastic replacement from iFixit, remove the adhesive that comes on the replacement plastic back panel, and use the adhesive in this kit. The back panel adhesive in this kit is THICC and seems like it would create a much better seal than what comes preinstalled on the replacement back panel.
-
-
-
Para sellar el teléfono, alinea y coloca la tapa trasera en el marco del teléfono.
-
Aplica presión en el perímetro del teléfono con los dedos.
-
Coloca algunos libros en la parte superior de la tapa trasera durante media hora para ayudar a la unión del adhesivo.
-
Alternativamente, puede utilizar grapas de sujeción de pantalla alrededor del perímetro de tu dispositivo para fijar el nuevo adhesivo.
-


Cancelar: No complete esta guía.
124 personas más completaron esta guía.
Un agradecimiento especial a estos traductores:
100%


Estos traductores nos están ayudando a reparar el mundo! ¿Quieres contribuir?
Empezar a traducir ›


14 comentarios
The flex cable for the fingerprint sensor is so short and delicate that it’s fiendishly difficult to locate and snap in. You only have a very narrow gap between the back cover and the phone, it wants to jump out of position if you misalign at all, and you can’t reach under there with normal size fingers. Not only that, it’s done with the rear cover adhesive in place so if that touches, it sticks.
I got it snapped on, and the flex cable broke at the same moment. So, no fingerprint sensor for me. Also, the new back cover arrived broken. If it was usable, the way to do it IMHO is to attach the flex cable first, then push the fingerprint sensor assembly on to the new back cover adhesive (it goes on from behind), then close the back cover.
Hey William,
If you bought the back cover from iFixit, please contact our support team here and we will get a replacement sorted out for you!
P.S. I got the battery and cover because the old cover was warped and separated, figured may as well replace the battery in a 2-year-old phone. Turns out, the battery was swollen and huge and it had pushed the back cover open. Not a good situation. So if your back cover is coming off, suspect that battery.
P.P.S. The fingerprint sensor flex cable connector probably could be manipulated into position with the tweezers from the tool kit and pressed down into place with the plastic screwdriver thingy, Just hover the back cover over it with your third hand (or a helper).
Will the phone still be water-resistant after this repair?
Hi Shai,
The phone won’t be as water resistant compared to when it is brand new. However, this is true even if you didn’t repair the phone—adhesive seals break down and lose water resistance over time.
Do you have custom-cut adhesive strips for Samsung galaxy s9+? Can’t find it in store.
Hi Michael,
We are currently in the process of sourcing the adhesive. Please check back in the future!
where i can buy the adhesive
It’s a little confusing going through the battery removal for the Samsung S10+ and then being sent to the Samsung S10 installation process instead of the Samsung S10+ install. Although moderately intuitive, it would be nice to have a specific article for a specific phone that identifies the actual process with the physical parts involved since The S10 and the S10+ are not the same back covers and the same parts involved.
Additionally, the inner wireless connector plate NEEDS to be connected to validate a connection otherwise the battery will not power the phone. This is a Requirement on the S10+.
I need to do the front gasket...is there an article for the front, I'm replacing my screen. Also, my child lost the earpiece mesh, is there something else I can use? Thanks
I got the S9 battery kit and all of the precut adhesive pieces had been cut backwards. The stiff green/blue plastic was on the wrong side. I had to remove the adhesive pieces entirely and try to use the clear plastic backing as the transfer agent instead of the stiffer, cut plastic pieces. I eventually did get it installed but it took a lot longer than planned.