Introducción
Abrir un disco duro externo implica desmontar la carcasa externa y recoger el disco duro desnudo que hay en su interior. A partir de ahí, puedes utilizar la unidad en tu servidor doméstico, NAS o PC. Este procedimiento muestra cómo extraer el disco duro manteniendo la carcasa intacta.
El uso de discos duros externos es una buena forma de conseguir mucho almacenamiento a un mejor precio. Muchos discos duros externos utilizan discos duros de calidad de servidor que cuestan casi el doble si los compras por separado sin la carcasa externa.
Esta guía demuestra el desmontaje de un disco duro externo WD Elements de 12TB de Western Digital, modelo WDBWLG0120HBK-NESN, pero el procedimiento puede aplicarse a cualquier disco externo WD Elements de 3,5".
Nota:''' Antes de desprender el disco externo, asegúrate de arrancarlo y realizar un escaneo profundo en busca de sectores defectuosos utilizando un programa como HD Tune Pro o Stablebit Scanner. Si se detecta algún error, devuelve la unidad al distribuidor o al fabricante.
Qué necesitas
-
-
La cubierta externa de la carcasa se fija al marco ventilado con cuatro clips de plástico desde el interior. Anota tu ubicación antes de pasar al siguiente paso.
-
-
-
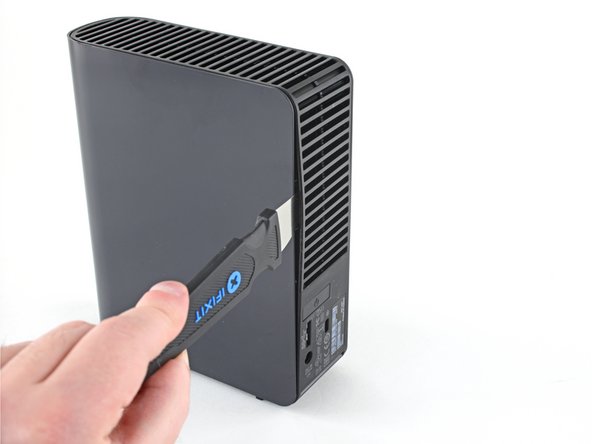
Inserta un Jimmy en el reborde entre el marco y la cubierta en un lado de la unidad, aproximadamente a mitad de camino entre la parte superior y la inferior.
-
-
-
Con el Jimmy metido entre el marco y la tapa, haga palanca en el marco hacia fuera para liberar el clip inferior.
-
-
-
Desliza el Jimmy hacia arriba a lo largo del reborde y haz palanca hacia fuera para liberar el clip de plástico superior.
-
-
-
Repite los pasos 2-4 en el otro lado de la carcasa.
-
-
-
-
Desliza la guía de luz LED fuera de la ranura de LED en la placa controladora de la unidad.
-
-
-
Empuja con las manos los cuatro tacos de goma de las esquinas para separar el disco duro del bastidor.
Wtf. How? This doesn’t work.
Ok, got it, but these directions are terrible. You don’t want to push the blocks out, like the illustration and directions say, because they literally can’t be pushed out. They need to be lifted up while the plastic shell is manipulated until the drive is loosened.
Thanks, Feddy!
-
-
-
Usa un destornillador Phillips para retirar el tornillo de 8.5 mm de longitud que sujeta el soporte metálico de la placa controladora pequeña al disco duro.
-
Remueve el soporte de metal.
-
-
-
Usa un destornillador Phillips para retirar el tornillo de 8.5 mm de largo que fija la placa controladora al disco duro.
-
Desliza la placa controladora hacia fuera del extremo del disco duro para retirarla.
-


Asegúrate de conservar la carcasa -así como todas las piezas y tornillos que la acompañan- hasta que la garantía haya expirado. Después, llévalos a un centro de reciclaje certificado. También puedes ofrecerlos a la gente de r/DataHoarder para que los reutilicen.
Para volver a montar la unidad y la carcasa, sigue estas instrucciones en orden inverso.
Cancelar: No complete esta guía.
52 personas más completaron esta guía.
Un agradecimiento especial a estos traductores:
100%

¡ Mariana Roca nos está ayudando a reparar el mundo! ¿Quieres contribuir?
Empezar a traducir ›

15 comentarios
I have a question. Is it possible to take a similar drive but smaller capacity like this about and turn it into a portable drive from it having to have a power supply?
It is not possible. The problem is that a 3.5” disk drive (as used in the Elements drive) needs 12 V as well as 5 V, and they need more power than a USB socket can typically deliver. 2.5” disk drives operate from just a 5 V supply, and, having smaller disks inside, they use less power to start up, so they can be run completely through USB.
Hi Craig! My PC sees it as Local Disc (E:) and wants to format it. Can’t do that! Is there a workaround? This was due to a power surge and I think it was just the adaptor power supply that got damaged. Running W10Home21H1 on Lenovo DESKTOP-699CIMO. Intel(R) Core(TM) i7-4790 CPU @ 3.60GHz 3.60 GHz 16,0GB 64bits Any ideas would be greatly appreciated! Cheers, Marco
On Step 14, you see there are no screws to take the HDD cover off. How do you take the cover off the HDD to get inside?
lol + other characters to allow comment
I have a WD element 4T and it will not power up. New cable and power adapter. It was stabilized in one spot for over a year, powered up just to store my movies. Plug it up after two weeks of none use and would not power up, no light inside. What can be done? My other storage drives work fine. By the way, you have the best directions on the web.
I just wrote you about WD Element, it is a 5.0TB Sata/64MB Cache, WD50EZRZ
WDBlue PC Hard Drive. It will not power up. I wonder if I can get a new USB controller board for it? I am only interested in getting information off of the hard drive. Can an "WEme USB 3.0 to SATA Converter Adapter for 2.5 3.5 Inch Hard Drive Disk SSD HDD" work to power it up to retrieve the Data?
Hey Tim, yeah so if you already tried a new power adapter, then it could be a bad controller board. If the drive is already shucked (or you don't mind shucking it), then you can get a SATA to USB adapter to see if the drive will boot up. That will at least rule out the USB controller board.
Very informative explenation wih clear pictures that show EXACLY in which direction to move the tool to safely detach the casing from the clips without breaking them, much better than most YouTube video's.
Only, I've used two old bank cards. That is i.m.o. much safer than using a metal knife or "Jimmy". With two plastic credit- or bank cards or two guitar picks it's almost impossible to damage the case.
Thank you for the guide!
I found that I had a 3 TB Toshiba hdd lying around which I put in one of WD Elements enclosures I was about to recycle. Now I have a fully stacked NAS as well as an external hdd :)
And I'm keeping a controller board + wall wart to be used as simple usb-to-sata device.
Hi.
Is possible on this box, change the HDD. For example. I have WD Elements to 4Tb and have another ( Seagate ) 12Tb and I thinking to change the HDD 4Tb for 12Tb using the same case.
Is possible?
Thanks a lot
Did it successfully with fairly limited experience of taking electronics apart (other than joycons a few times), didn't even break any clips. Worked fine for me installing it in a PC without taping over anything.
Can I remove the drive and install in a new enclosure? My WD 8tb no longer mounts on my mac. I think it's probably the usb port or whatever communicates with the port.