Saltar al contenido principal

Bose Soundlink Revolve Bottom Circuit Board Replacement

Qué necesitas

  1. Bose Soundlink Revolve Bottom Circuit Board Replacement, Bottom Circuit Board Access: paso 1, imagen 1 de 2 Bose Soundlink Revolve Bottom Circuit Board Replacement, Bottom Circuit Board Access: paso 1, imagen 2 de 2
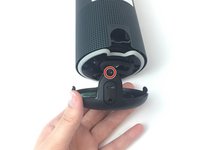
    • Flip speaker over so that the bottom is facing up.

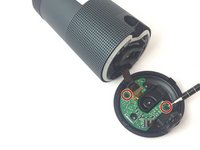
    • Using the blue spudger, lift the gray foam up and slowly peel it off with your hand.

  2. Bose Soundlink Revolve Bottom Circuit Board Replacement: paso 2, imagen 1 de 3 Bose Soundlink Revolve Bottom Circuit Board Replacement: paso 2, imagen 2 de 3 Bose Soundlink Revolve Bottom Circuit Board Replacement: paso 2, imagen 3 de 3
    • Using the screwdriver, unscrew three screws.

    • Detach the bottom cover from the rest of the speaker by pulling the two in opposite directions.

  3. Bose Soundlink Revolve Bottom Circuit Board Replacement: paso 3, imagen 1 de 2 Bose Soundlink Revolve Bottom Circuit Board Replacement: paso 3, imagen 2 de 2
    • Remove the screw that is above the charging port.

  4. Bose Soundlink Revolve Bottom Circuit Board Replacement: paso 4, imagen 1 de 2 Bose Soundlink Revolve Bottom Circuit Board Replacement: paso 4, imagen 2 de 2
    • Remove the two screws connecting the motherboard to the bottom cover of the speaker.

    • Remove the bottom cover.

  5. Bose Soundlink Revolve Bottom Circuit Board Replacement, AUX/USB Port: paso 5, imagen 1 de 3 Bose Soundlink Revolve Bottom Circuit Board Replacement, AUX/USB Port: paso 5, imagen 2 de 3 Bose Soundlink Revolve Bottom Circuit Board Replacement, AUX/USB Port: paso 5, imagen 3 de 3
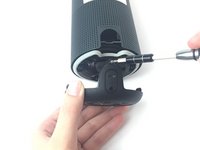
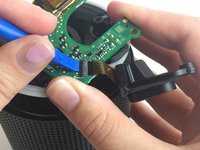
    • Using the blue plastic opening tool, pry up the small black clamp connecting the AUX/USB port to the lower circuit board.

    • Remove the AUX/USB port from the device.

  6. Bose Soundlink Revolve Bottom Circuit Board Replacement, Bottom Circuit Board: paso 6, imagen 1 de 1
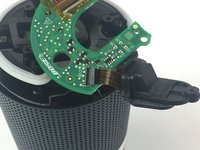
    • Remove the yellow tape over the location where the ribbon from the central speaker meets the bottom circuit board.

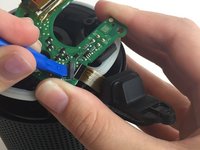
    • Use the blue plastic opening tool to pry up the black latch holding down the ribbon.

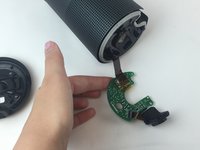
    • Remove the motherboard from the device.

Conclusión

To reassemble your device, follow these instructions in reverse order.

6 personas más completaron esta guía.

Brian Butner

Miembro Desde 09/27/17

840 Reputación

3 Guías creadas

Equipo

USF Tampa, Team S6-G2, Remmell Fall 2017 Miembro de USF Tampa, Team S6-G2, Remmell Fall 2017

USFT-REMMELL-F17S6G2

4 Miembros

4 Guías creadas

42 comentarios

I need the ribbon because it is damage, can you sell one to me?

My email is ttegil@hotmail.com can you send me the way I can buy it.

Kind regards

Gilberto - Contestar

Hello do toi fond thé ribbon because i have thé same problème .

M'y email adresse thualromain44.rt@gmail.com

Thanks you

romain thual -

Hi I need bottom circuit board for bose revolve , could you sale it for me. mail: seawolf1974@mail.ru , delivery to Spain

kindly regards

seawolf1974 - Contestar

I need bottom circuit board for Bose revolve, can I get it available in Nigeria, @sullivaniheme@gmail.com

Sullivan - Contestar

Hey there, I also require the bottom circuit board for my Bose Revolve sam.rowlands@hotmail.com

Sam - Contestar

Agregar Comentario

Ver Estadísticas:

Ultimas 24 horas: 12

Ultimos 7 días: 36

Ultimos 30 días: 134

Todo El Tiempo: 14,012