Esta versión puede contener ediciones incorrectas. Cambiar a la última instantánea verificada.
Qué necesitas
-
-
Quita la tapa de goma de la batería y retira los cuatro tornillos circulares de 6.0 mm con un destornillador Torx T8.
-
-
Este paso está sin traducir. Ayuda a traducirlo
-
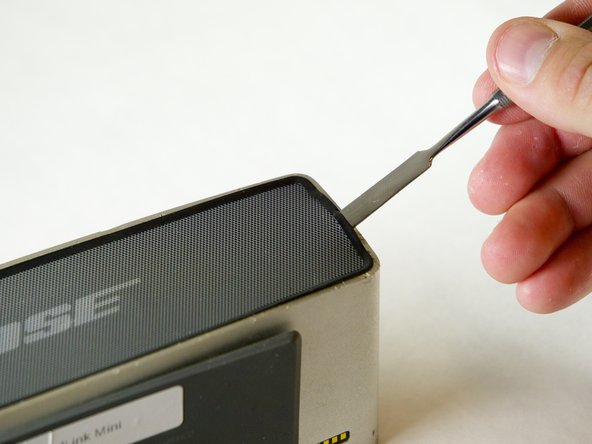
Insert the Metal Spudger between the rubber edge on the grille and the aluminum casing.
-
-
Este paso está sin traducir. Ayuda a traducirlo
-
Slowly pry up the grille until the two tabs shown pop out.
-
-
Este paso está sin traducir. Ayuda a traducirlo
-
The grille is attached to the speaker with double sided sticky tape. To remove the grill gently pull upward while keeping tension to the right.
-
-
-
Este paso está sin traducir. Ayuda a traducirlo
-
Remove the four 15.0 mm screws on the left and the four 9.0 mm screws on the right using the T8 Torx Screwdriver.
-
-
Este paso está sin traducir. Ayuda a traducirlo
-
Remove the circuit board by pushing it with your index finger in the direction shown while using a nylon or metal spudger to lift it up and out of place.
-
-
Este paso está sin traducir. Ayuda a traducirlo
-
Carefully pull on the battery cover until the rubber tab slides out of the aluminum casing.
-
-
Este paso está sin traducir. Ayuda a traducirlo
-
Remove the sponge (save for later replacement) and gently flip the black tab 90 degrees to release the connectors grip on the ribbon cable. Remove the ribbon cable from the connector.
-
-
Este paso está sin traducir. Ayuda a traducirlo
-
When removing the plastic divider be careful not to damage the wire strip sliding through it.
-
-
Este paso está sin traducir. Ayuda a traducirlo
-
Reach through the battery compartment hole and unplug the power strip shown.
-
-
Este paso está sin traducir. Ayuda a traducirlo
-
Remove both circuit boards by wiggling them up and out of the casing.
-
Unplug the speaker wires connected and fully remove both circuit boards.
-
-
Este paso está sin traducir. Ayuda a traducirlo
-
Unhook the speaker wires clipped onto the button switch circuit board.
-
-
Este paso está sin traducir. Ayuda a traducirlo
-
Use a nylon or metal spudger to slightly lift up on the button switch circuit board.
-
Pull the button switch circuit board straight out from the casing.
-


Cancelar: No complete esta guía.
16 personas más completaron esta guía.
Equipo

Cal Poly, Team 1-23, Maness Fall 2015 Miembro de Cal Poly, Team 1-23, Maness Fall 2015
CPSU-MANESS-F15S1G23
4 Miembros
21 Guías creadas
12 comentarios
Hello
Where I can buy circuit
Yes were can we get the replacement part? ?
Hi sonny,
did you find this part ? (the first circuit board)
Hi
Can you get the relacement part for the mini II or is it the same - and if
- where and how to order for delivery to Europe?
Kindly can you tell me is th bose Soundlink mini first generation has an update or not, because it started no charge and the ember ligy keep flashing and some times reed color , I bought a new battery but still the same now it’s playing up