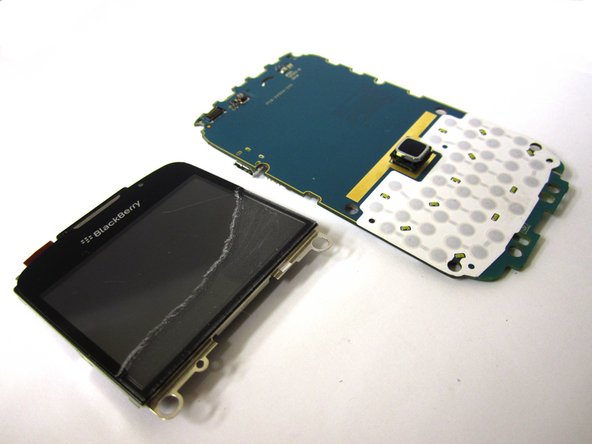
Saltar al contenido principal

Blackberry Curve 9300 Screen Replacement

Qué necesitas

  1. Blackberry Curve 9300 Screen Replacement, Battery: paso 1, imagen 1 de 1
    • Place your Blackberry face down in front of you.

  2. Blackberry Curve 9300 Screen Replacement: paso 2, imagen 1 de 1
    • Locate the indent on the bottom of the back cover.

    • Use your fingernail to lift and remove the back cover.

  3. Blackberry Curve 9300 Screen Replacement: paso 3, imagen 1 de 1
    • From the top, use your fingernail to lift and remove the battery.

  4. Blackberry Curve 9300 Screen Replacement, Keyboard: paso 4, imagen 1 de 1
    • Use the T6 Torx screwdriver to unscrew the two 5mm screws highlighted.

  5. Blackberry Curve 9300 Screen Replacement: paso 5, imagen 1 de 2 Blackberry Curve 9300 Screen Replacement: paso 5, imagen 2 de 2
    • Place the phone face up and use tweezers to securely grip and lift the screen upwards.

  6. Blackberry Curve 9300 Screen Replacement: paso 6, imagen 1 de 1
    • Use a plastic opening tool to lift the bottom edge of the front cover.

  7. Blackberry Curve 9300 Screen Replacement: paso 7, imagen 1 de 1
    • Use your nails to unclip the sides of the frame from the phone.

  8. Blackberry Curve 9300 Screen Replacement: paso 8, imagen 1 de 1
    • Lift and remove the frame.

  9. Blackberry Curve 9300 Screen Replacement: paso 9, imagen 1 de 1
    • Lift and remove the keyboard.

  10. Blackberry Curve 9300 Screen Replacement, Screen: paso 10, imagen 1 de 1
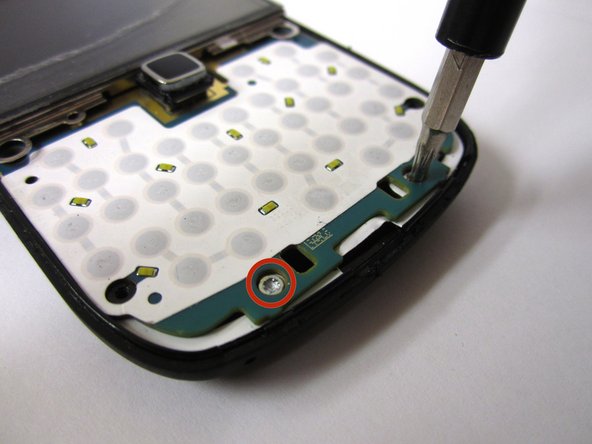
    • Locate and remove the two 5mm screws on top of keyboard base using the T6 Torx screwdriver

  11. Blackberry Curve 9300 Screen Replacement: paso 11, imagen 1 de 1
    • Carefully pull the keyboard base up and away from the phone.

    • Disconnect the keyboard base from the phone completely.

  12. Blackberry Curve 9300 Screen Replacement: paso 12, imagen 1 de 3 Blackberry Curve 9300 Screen Replacement: paso 12, imagen 2 de 3 Blackberry Curve 9300 Screen Replacement: paso 12, imagen 3 de 3
    • Locate and remove the four 5mm screws on the top and bottom of the phone with a T6 Torx screwdriver

  13. Blackberry Curve 9300 Screen Replacement: paso 13, imagen 1 de 2 Blackberry Curve 9300 Screen Replacement: paso 13, imagen 2 de 2
    • Use a plastic opening tool to find the crease below the screen.

    • Insert where shown and use the tool to unclip the two sides of screen from body.

    • The opening tool goes approximately midway between the top and bottom edge of the screen.

  14. Blackberry Curve 9300 Screen Replacement: paso 14, imagen 1 de 2 Blackberry Curve 9300 Screen Replacement: paso 14, imagen 2 de 2
    • From the back of the phone, use a finger to push the front piece of the phone away from the back piece.

  15. Blackberry Curve 9300 Screen Replacement: paso 15, imagen 1 de 3 Blackberry Curve 9300 Screen Replacement: paso 15, imagen 2 de 3 Blackberry Curve 9300 Screen Replacement: paso 15, imagen 3 de 3
    • Use a plastic opening tool to detach the ribbon cable from the top left corner of the screen, and separate the screen from the motherboard.

Conclusión

To reassemble your device, follow these instructions in reverse order.

9 personas más completaron esta guía.

Alek Squires

Miembro Desde 09/30/13

431 Reputación

2 Guías creadas

Equipo

Cal Poly, Team 14-7, Forte Fall 2013 Miembro de Cal Poly, Team 14-7, Forte Fall 2013

CPSU-FORTE-F13S14G7

5 Miembros

5 Guías creadas

Un comentario

would appreciate new ldc part # and order info! - - !

Donald Burgo - Contestar

Agregar Comentario

Ver Estadísticas:

Ultimas 24 horas: 0

Ultimos 7 días: 3

Ultimos 30 días: 6

Todo El Tiempo: 4,719