Esta versión puede contener ediciones incorrectas. Cambie a la última instantánea verificada.
Qué necesitas
-
Este paso está sin traducir. Ayuda a traducirlo
-
Insert a plastic opening tool into the small notch on the rear cover of the phone.
-
Pry the rear cover up from the phone.
-
-
Este paso está sin traducir. Ayuda a traducirlo
-
Locate the slit between the top of the battery and the casing.
-
Gently apply pressure on the top of the battery to trigger the spring release.
-
-
Este paso está sin traducir. Ayuda a traducirlo
-
Remove the two Torx T6 screws to the left and right of the battery.
-
-
-
Este paso está sin traducir. Ayuda a traducirlo
-
Using hairdryer or heat gun, warm the front panel to soften the adhesive beneath.
-
Starting from one side, use a plastic opening tool to pry up the screen cover.
-
Once one side is loose, gently peel up the entire cover.
-
-
Este paso está sin traducir. Ayuda a traducirlo
-
Insert the plastic opening tool in the seam along the side of the device.
-
Slide the tool along the length of the seam, applying moderate force with the plastic opening tool.
-
Carefully remove the faceplate.
-
-
Este paso está sin traducir. Ayuda a traducirlo
-
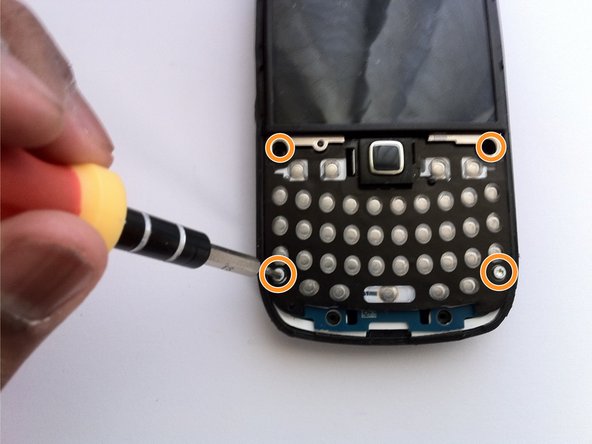
Remove four T6 Torx screws from the front of the phone.
-
Using tweezers, remove the keyboard buttons from the phone.
-
-
Este paso está sin traducir. Ayuda a traducirlo
-
Remove the two T6 Torx screws securing the small plastic bracket at the bottom of the phone.
-
Remove the four T6 Torx screws from the corners of the keyboard.
-
-
Este paso está sin traducir. Ayuda a traducirlo
-
Using a plastic opening tool, gently pry the motherboard assembly from the device's frame.
-


Cancelar: No complete esta guía.
32 personas más completaron esta guía.
Equipo

Cal Poly, Team 9-62, Walters Spring 2011 Miembro de Cal Poly, Team 9-62, Walters Spring 2011
CPSU-WALTERS-S11S9G62
5 Miembros
5 Guías creadas