Saltar al contenido principal

BLU Studio 7.0 II Battery Replacement

Qué necesitas

  1. BLU Studio 7.0 II Battery Replacement, Back Cover: paso 1, imagen 1 de 1
    • Locate the seam between the black and silver pieces of the phone.

    • Insert a plastic opening tool into the seam and firmly pry the black back piece away from the silver front piece.

    • To create the initial separation for the plastic opening tool, you may need to use either a spudger or metal spudger. If you use a metal spudger, be aware this can damage your phone if you aren't careful.

  2. BLU Studio 7.0 II Battery Replacement: paso 2, imagen 1 de 1
    • Work your way around the edge of phone, firmly prying the pieces apart.

  3. BLU Studio 7.0 II Battery Replacement: paso 3, imagen 1 de 2 BLU Studio 7.0 II Battery Replacement: paso 3, imagen 2 de 2
    • Once the back has been removed, you can snap the new one into place by pressing firmly around the edges with your fingers.

  4. BLU Studio 7.0 II Battery Replacement, Battery Connection: paso 4, imagen 1 de 2 BLU Studio 7.0 II Battery Replacement, Battery Connection: paso 4, imagen 2 de 2
    • Using the PH00 screw driver, remove the two 3mm screws.

    • These screws may be covered by small, round black stickers. Remove the stickers to continue.

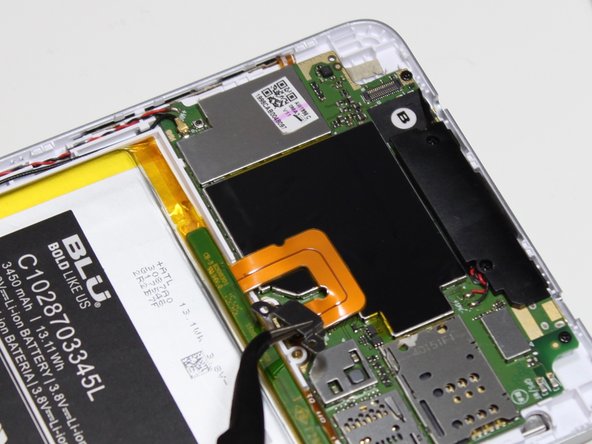
    • Remove the metal clip that connects the battery ribbon to the motherboard by lifting up. Precision tweezers work best for this part.

    • Be sure to only grab the metal clip with the tweezers, not the connector underneath.

  5. BLU Studio 7.0 II Battery Replacement: paso 5, imagen 1 de 1
    • Disconnect the battery connector using a plastic opening tool or the flat end of a spudger.

  6. BLU Studio 7.0 II Battery Replacement, Battery: paso 6, imagen 1 de 2 BLU Studio 7.0 II Battery Replacement, Battery: paso 6, imagen 2 de 2
    • Using the black spudger, carefully but firmly pry the battery out of the housing.

    • There are two strips of adhesive on the left and right sides of the battery securing it to the housing. You may need some force to pull the battery out.

Conclusión

To reassemble your device, follow these instructions in reverse order.

Una persona más ha completado esta guía.

Abby

Miembro Desde 05/14/16

852 Reputación

5 Guías creadas

Equipo

Metro State, Team 1-2, Carpenter SU 2016 Miembro de Metro State, Team 1-2, Carpenter SU 2016

MSU-CARPENTER-SU16S1G2

4 Miembros

6 Guías creadas

0 comentarios

Agregar Comentario

Ver Estadísticas:

Ultimas 24 horas: 0

Ultimos 7 días: 2

Ultimos 30 días: 12

Todo El Tiempo: 2,490