Saltar al contenido principal

BLU Studio 5.0 II Rear Camera Replacement

Qué necesitas

  1. BLU Studio 5.0 II Rear Camera Replacement, Battery: paso 1, imagen 1 de 1
    • Turn off your phone before disassembling the device.

    • Locate the small opening on the bottom corner of the back case.

  2. BLU Studio 5.0 II Rear Camera Replacement: paso 2, imagen 1 de 2 BLU Studio 5.0 II Rear Camera Replacement: paso 2, imagen 2 de 2
    • Use your finger to open the back case by slowly pulling it on the open slot.

    • Once the case is lifted on the corner, slide your finger along the edge of the phone to remove the rest of the case.

  3. BLU Studio 5.0 II Rear Camera Replacement: paso 3, imagen 1 de 3 BLU Studio 5.0 II Rear Camera Replacement: paso 3, imagen 2 de 3 BLU Studio 5.0 II Rear Camera Replacement: paso 3, imagen 3 de 3
    • Locate the opening slot at the bottom of the battery.

    • Use your finger to lift the battery and remove it from the case.

  4. BLU Studio 5.0 II Rear Camera Replacement, Back Case: paso 4, imagen 1 de 1
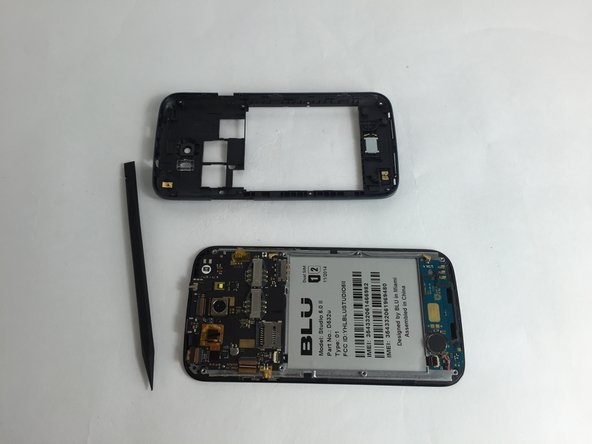
    • Locate the four 3mm screws on each side of the back panel.

    • Use a Phillips #00 screwdriver to remove the eight screws.

  5. BLU Studio 5.0 II Rear Camera Replacement: paso 5, imagen 1 de 3 BLU Studio 5.0 II Rear Camera Replacement: paso 5, imagen 2 de 3 BLU Studio 5.0 II Rear Camera Replacement: paso 5, imagen 3 de 3
    • Carefully use a spudger to start opening the back case by inserting it between the black and blue lines on the side of the phone.

    • With the help of your fingers, continue to remove the back case by sliding it through the opening.

  6. BLU Studio 5.0 II Rear Camera Replacement, Rear Camera: paso 6, imagen 1 de 3 BLU Studio 5.0 II Rear Camera Replacement, Rear Camera: paso 6, imagen 2 de 3 BLU Studio 5.0 II Rear Camera Replacement, Rear Camera: paso 6, imagen 3 de 3
    Herramienta utilizada en este paso:
    Tweezers
    $4.99
    Comprar
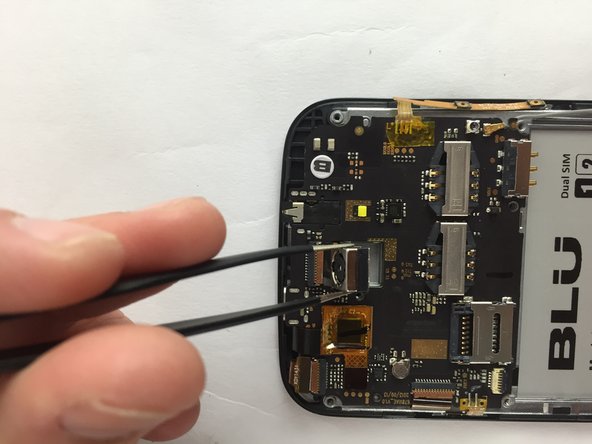
    • Locate the camera, which is centered on the upper part of the motherboard.

    • Use tweezers to lift the camera slowly.

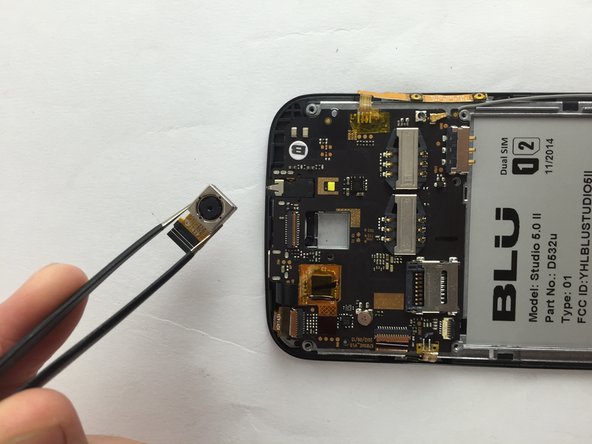
    • Carefully pull the camera out of the motherboard.

Conclusión

To reassemble your device, follow these instructions in reverse order.

Ricardo Sarabia

Miembro Desde 02/09/16

1,069 Reputación

6 Guías creadas

Equipo

USF Tampa, Team 7-5, Cheng Spring 2016 Miembro de USF Tampa, Team 7-5, Cheng Spring 2016

USFT-CHENG-S16S7G5

3 Miembros

7 Guías creadas

0 comentarios

Agregar Comentario

Ver Estadísticas:

Ultimas 24 horas: 0

Ultimos 7 días: 3

Ultimos 30 días: 7

Todo El Tiempo: 343