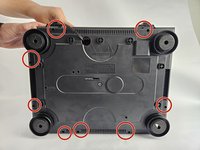
Saltar al contenido principal

Audio-Technica AT-LP120-USB Outer Shell Replacement

Qué necesitas

  1. Audio-Technica AT-LP120-USB Outer Shell Replacement, Outer Shell: paso 1, imagen 1 de 3 Audio-Technica AT-LP120-USB Outer Shell Replacement, Outer Shell: paso 1, imagen 2 de 3 Audio-Technica AT-LP120-USB Outer Shell Replacement, Outer Shell: paso 1, imagen 3 de 3
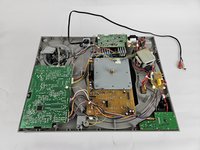
    • Remove the inner steel plate that spins on the turntable.

    • Carefully lift up the plate.

    • Place it near your device out of the way.

  2. Audio-Technica AT-LP120-USB Outer Shell Replacement: paso 2, imagen 1 de 1
    • Remove the power cord in the back of the device.

  3. Audio-Technica AT-LP120-USB Outer Shell Replacement: paso 3, imagen 1 de 1
    • Ensure that the Tone Arm clamp is in place.

  4. Audio-Technica AT-LP120-USB Outer Shell Replacement: paso 4, imagen 1 de 2 Audio-Technica AT-LP120-USB Outer Shell Replacement: paso 4, imagen 2 de 2
    • Use a Phillips #2 screwdriver to remove the eight 2 mm screws holding the back casing into place.

    • Carefully remove the back casing from the device to expose the interior.

Conclusión

To reassemble your device, follow these instructions in reverse order.

Una persona más ha completado esta guía.

David

Miembro Desde 10/31/24

253 Reputación

2 Guías creadas

Equipo

Cuesta, Team 20-3, Krynen Fall 2024 Miembro de Cuesta, Team 20-3, Krynen Fall 2024

CUESTA-KRYNEN-F24S20G3

Miembros de 5

6 Guías creadas

0 comentarios

Agregar Comentario

Ver Estadísticas:

Ultimas 24 horas: 0

Ultimos 7 días: 0

Ultimos 30 días: 10

Todo El Tiempo: 41