Introducción
Usa esta guía para reemplazar la tarjeta madre en tu Asus Zen AiO Pro Z240IC para solucionar problemas en el arranque. No se necesita conocimiento previo. Todo lo que necesitas es un desarmador cabeza Phillips y herramientas de apertura de plástico.
Qué necesitas
-
-
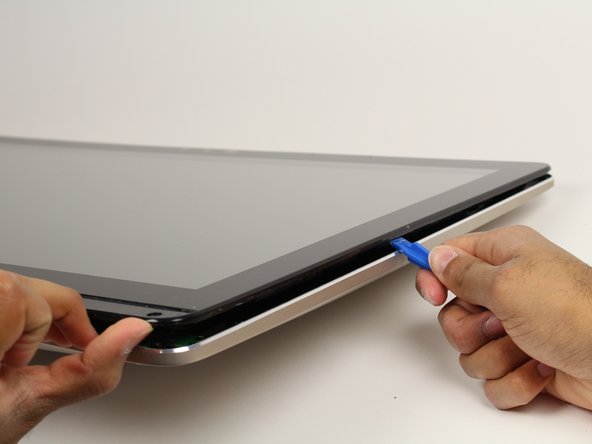
Usa la herramienta de apertura plástica para hacer palanca en la banda plástica negra en la parte inferior de la pantalla moviendo la herramienta entre la banda y la pantalla.
-
Pasa la herramienta de apertura lentamente a lo largo de la base de la pantalla, despegando la cinta plástica negra, hasta llegar al otro lado de la pantall.
-
-
-
Coloca la computadora en su parte trasera, mirando hacia arriba.
-
Introduce la herramienta de apertura plástica entre la pantalla y el bisel de la carcasa de aluminio de la computadora.
-
Mueve la herramienta a lo largo del borde entero de la pantalla con un movimiento de palanca de arriba a abajo para aflojar la pantalla de su carcasa. No levantes completamente la pantalla de la computadora aún.
-
-
-
Levanta la pantalla por el borde inferior cerca de 6 pulgadas. Mantenla abierta con una mano.
-
Mira dentro de la computadora y localiza cinco (5) cables que conectan los componentes embebidos de la pantalla (cámara, micrófono, etc.) a la otra parte de la computadora.
Same here my model just had 4 cables.
-
-
-
-
Usa un dedo para levantar las pestañas de bloqueo plásticas que mantienen los tres (3) cables planos restantes.
-
Retira los cables de sus terminales deslizándolos hacia afuera de sus conectores.
When re-connecting take great care to ensure the ribbon cables are square and flat - I had to take mine apart again to re-seat one as the screen was blank - worked fine once re-seated properly.
-
-
-
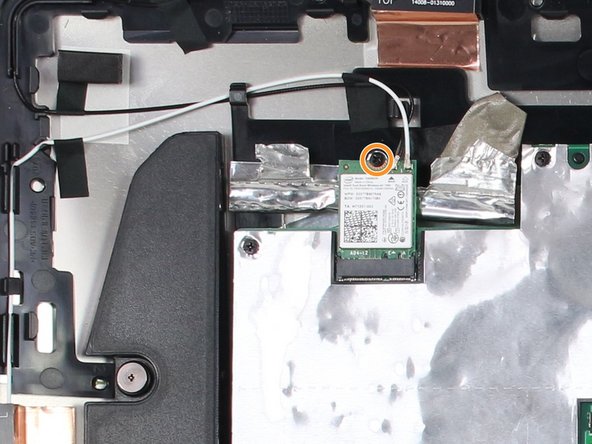
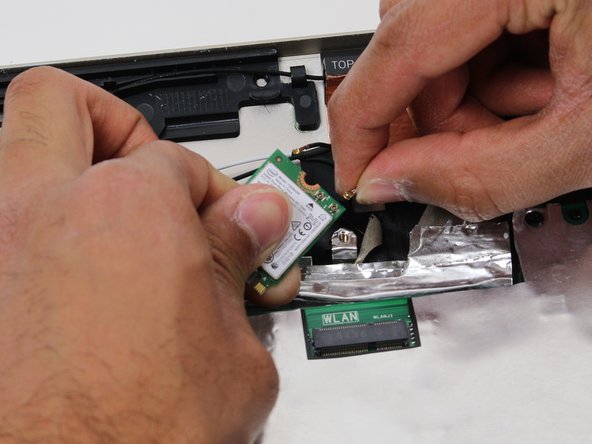
Localiza la tarjeta WLAN en la esquina superior izquierda de la computadora.
-
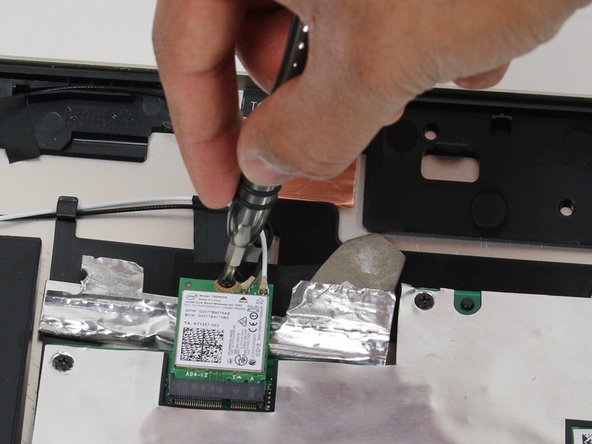
Usa un desarmador Phillips #1 para retirar el tornillo de 3.2 mm en la parte superior de la tarjeta WLAN.
-
-
-
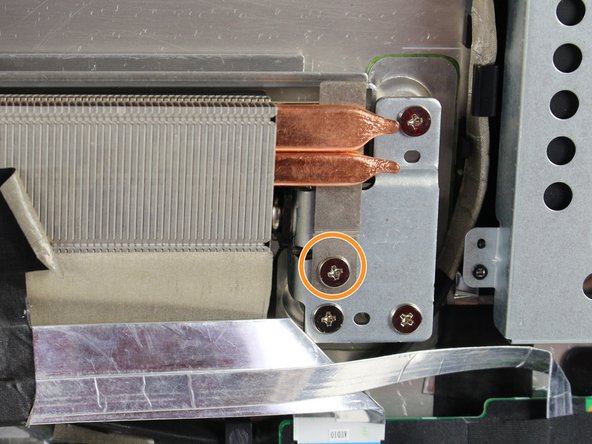
Usa un desarmador Phillips #0 para remover los tres (3) tornillos de 4.8 mm de la unidad del ventilador.
-
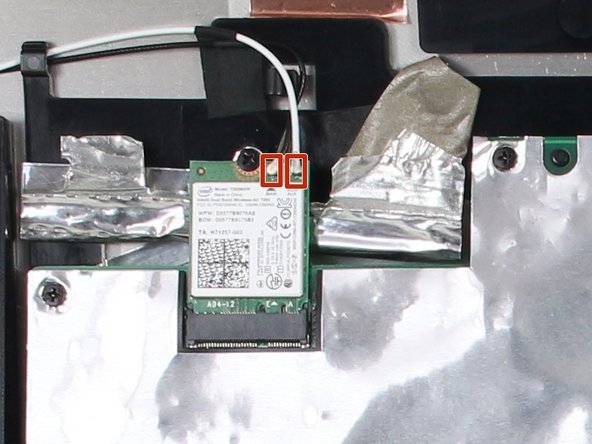
Retira el cable que conecta el ventilador a la tarjeta madre jalando el cable fuera de su socket.
-
-
-
Retira los seis (6) cables planos levantando las pestañas de bloqueo plásticas y después saca los cables fuera de sus sockets.
-


Para reensamblar tu dispositivo, sigue estas instrucciones en orden inverso.
Para reensamblar tu dispositivo, sigue estas instrucciones en orden inverso.
Cancelar: No complete esta guía.
4 personas más completaron esta guía.
Un agradecimiento especial a estos traductores:
100%

¡ Fernando Salazar Garcia nos está ayudando a reparar el mundo! ¿Quieres contribuir?
Empezar a traducir ›
Equipo

Cal Poly, Team S4-G1, Livingston Fall 2017 Miembro de Cal Poly, Team S4-G1, Livingston Fall 2017
CPSU-LIVINGSTON-F17S4G1
5 Miembros
25 Guías creadas
7 comentarios
I have been trying and failing to reset the BIOS completely as for some reason i have misslayed the password i set when i first purchsed it, i cannot boot to the OS without it. i have already tried removing the battery and leaving over night to try and reset but that has also failed. is there anyway i can remove the password? or how the locate the cmos jumpers which for the life of me i cannot find.
MY piece of crap Z240IC decided not to start yesterday. Beyond 1 year warranty (barely), and can’t find a replacement working motherboard to swap with. The power supply (cord) went out 6 months ago. I believe when this happened, something may have damaged one of the circuits, as the machine has slowly shown issues of failing parts. I can’t believe I spent so much on this “iMac Killer” and yet it never lived up to it’s proclaimed reputation, nor is it built to last. It looks like we’re all pretty screwed here.
David Mills you can buy one at http://www.buy-motherboard.co.uk/laptop-....
In the step 14 (2º image), near the SATA connector, is that a slot for NVME SSD? because I saw a slot for M Key
Can anyone help?
I purchased a replacement motherboard which is the same revision as mine v 1.4 and have installed this according to the procedure shown in this guide. The motherboard powers on, the fan spins as it should but there is no display showing. I have tried reinstalling the RAM and re-booting but no luck . The display still does not show.
Does you have any suggestions? I am at a loss at the moment.
On my machine, it was positively impossible to use a plastic opening tool, or even a razor to get under the plastic strip - even after heating up with a heat gun. However, I found another method that will also help prevent damage to the plastic strip: in pictures for Steps 2 and 3, you can see that under the plastic strip, next to some of the screws there are square holes in the plastic body. I was able to shape a sturdy paper clip into an “L” shape, and feed it through the right-most exhaust vent at the bottom to insert into this square hole from below. From there, you can use the paper clip to try to push the plastic strip up from below. It still required some heat from the heat gun, but eventually I was able to push the plastic strip up enough to be able to slip a razor blade under it.
Alexander V Trofimuk - Contestar
I too was unable to do this with the plastic tools, but used a small flat screwdriver to ply up the corned on the bottom curved corner and plastic tools form there - just left a small blemish on the plastic besel, but I can live with that.
Andy Monaghan - Contestar