Saltar al contenido principal

Asus X200CA Battery Replacement

Qué necesitas

  1. Asus X200CA Battery Replacement, Keyboard: paso 1, imagen 1 de 2 Asus X200CA Battery Replacement, Keyboard: paso 1, imagen 2 de 2
    • Remove the 8 black 4.7mm screws securing the keyboard to the bottom cover.

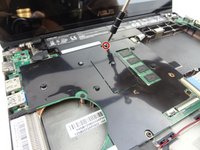
    • Remove the black 14.5mm screw from the center of the bottom cover.

  2. Asus X200CA Battery Replacement: paso 2, imagen 1 de 1
    • Wedge a metal spudger between the keyboard and bottom cover and slide it around the perimeter until all edges separate.

  3. Asus X200CA Battery Replacement: paso 3, imagen 1 de 1
    • Pull apart the keyboard and the bottom cover using your hands.

    • The keyboard and trackpad cables are still connected to the mainboard via a ZIF connector. Carefully disconnect them before completely removing the keyboard to prevent damage to the board or cables.

  4. Asus X200CA Battery Replacement, Battery: paso 4, imagen 1 de 2 Asus X200CA Battery Replacement, Battery: paso 4, imagen 2 de 2
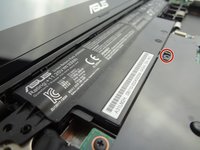
    • Use a Phillips #00 screwdriver to remove the black 4.7mm screw holding the battery in place.

  5. Asus X200CA Battery Replacement: paso 5, imagen 1 de 1
    • Lift the battery by the tab you removed the screw from.

    • Replace with the new battery, if necessary.

Conclusión

To reassemble your device, follow these instructions in reverse order.

11 personas más completaron esta guía.

Equipo

USF Tampa, Team S1-G2, Leahy Fall 2017 Miembro de USF Tampa, Team S1-G2, Leahy Fall 2017

USFT-LEAHY-F17S1G2

4 Miembros

5 Guías creadas

0 comentarios

Agregar Comentario

Ver Estadísticas:

Ultimas 24 horas: 0

Ultimos 7 días: 5

Ultimos 30 días: 32

Todo El Tiempo: 6,860