Saltar al contenido principal

Asus VivoTab RT TF600T Motherboard Replacement

Qué necesitas

  1. Asus VivoTab RT TF600T Motherboard Replacement, Motherboard: paso 1, imagen 1 de 3 Asus VivoTab RT TF600T Motherboard Replacement, Motherboard: paso 1, imagen 2 de 3 Asus VivoTab RT TF600T Motherboard Replacement, Motherboard: paso 1, imagen 3 de 3
    • Make sure the tablet is turned off.

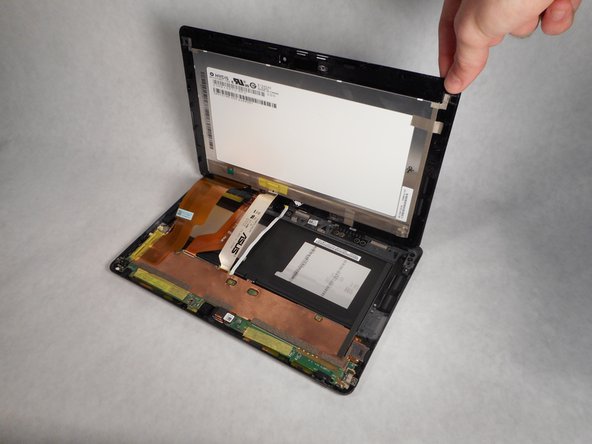
    • Remove the tablet from the attached keyboard.

    • To remove the keyboard, simply depress the switch on the left side of the screen and pull the tablet portion off.

  2. Asus VivoTab RT TF600T Motherboard Replacement: paso 2, imagen 1 de 3 Asus VivoTab RT TF600T Motherboard Replacement: paso 2, imagen 2 de 3 Asus VivoTab RT TF600T Motherboard Replacement: paso 2, imagen 3 de 3
    • Rotate the device 180°, and use a PH000 screwdriver to remove the two 1.59 mm screws at the bottom.

  3. Asus VivoTab RT TF600T Motherboard Replacement: paso 3, imagen 1 de 2 Asus VivoTab RT TF600T Motherboard Replacement: paso 3, imagen 2 de 2
    • Insert a plastic opening tool into the bottom right corner, and gently start to pry off the screen.

    • Once the screen begins to separate from the body of the device, start working the tool around the outer edges until the entire screen becomes detached.

  4. Asus VivoTab RT TF600T Motherboard Replacement: paso 4, imagen 1 de 2 Asus VivoTab RT TF600T Motherboard Replacement: paso 4, imagen 2 de 2
    • Now that the frame is separated, lift the screen assembly partially away from the motherboard.

    • The screen assembly is still connected to the motherboard. Use a small stack of books or other sturdy object to prop the screen up while you continue to work on freeing the cables.

  5. Asus VivoTab RT TF600T Motherboard Replacement: paso 5, imagen 1 de 2 Asus VivoTab RT TF600T Motherboard Replacement: paso 5, imagen 2 de 2
    • Before disconnecting the display cables, turn off the switch labeled DIP; this switch is used to de-energize the system.

    • The battery is connected to the motherboard. To avoid any short circuiting of the device, you must place the switch labeled DIP to OFF.

  6. Asus VivoTab RT TF600T Motherboard Replacement: paso 6, imagen 1 de 3 Asus VivoTab RT TF600T Motherboard Replacement: paso 6, imagen 2 de 3 Asus VivoTab RT TF600T Motherboard Replacement: paso 6, imagen 3 de 3
    • Remove the yellow tape that secures the digitizer and LCD screen ZIF connectors.

  7. Asus VivoTab RT TF600T Motherboard Replacement: paso 7, imagen 1 de 1
    • After removing the yellow tape, use a plastic opening tool to lift the two digitizer ZIF connector tabs; pull the ribbon cable free.

  8. Asus VivoTab RT TF600T Motherboard Replacement: paso 8, imagen 1 de 1
    • Use a plastic opening too to lift the LCD screen ZIF connector; pull the ribbon cable free.

  9. Asus VivoTab RT TF600T Motherboard Replacement: paso 9, imagen 1 de 1
    • Lift the screen upwards to remove.

  10. Asus VivoTab RT TF600T Motherboard Replacement: paso 10, imagen 1 de 1
    • Remove the two 0.79mm screws from the charging port with the Phillips #00 screwdriver.

  11. Asus VivoTab RT TF600T Motherboard Replacement: paso 11, imagen 1 de 2 Asus VivoTab RT TF600T Motherboard Replacement: paso 11, imagen 2 de 2
    • Place the plastic opening tool behind the charging port, closest to the outer edge of the device.

    • Gently pry the charging port away from the frame.

  12. Asus VivoTab RT TF600T Motherboard Replacement: paso 12, imagen 1 de 2 Asus VivoTab RT TF600T Motherboard Replacement: paso 12, imagen 2 de 2
    • Remove the eleven 0.79 mm PH000 screws from the motherboard.

  13. Asus VivoTab RT TF600T Motherboard Replacement: paso 13, imagen 1 de 2 Asus VivoTab RT TF600T Motherboard Replacement: paso 13, imagen 2 de 2
    • Use a nylon spudger to help carefully pry the motherboard from the back panel.

    • Once the motherboard is relieved from the glue, use your hand to lift the motherboard up and to the opposite end of the back panel.

  14. Asus VivoTab RT TF600T Motherboard Replacement: paso 14, imagen 1 de 3 Asus VivoTab RT TF600T Motherboard Replacement: paso 14, imagen 2 de 3 Asus VivoTab RT TF600T Motherboard Replacement: paso 14, imagen 3 de 3
    • Use a plastic opening tool to lift and release the battery ZIF connector; gently pull the ribbon cable free.

    • Remove the motherboard.

Conclusión

To reassemble your device, follow these instructions in reverse order.

Richard

Miembro Desde 02/07/17

29,886 Reputación

11 Guías creadas

Equipo

iFixit Miembro de iFixit

Staff

135 Miembros

16,718 Guías creadas

0 comentarios

Agregar Comentario

Ver Estadísticas:

Ultimas 24 horas: 0

Ultimos 7 días: 0

Ultimos 30 días: 7

Todo El Tiempo: 831