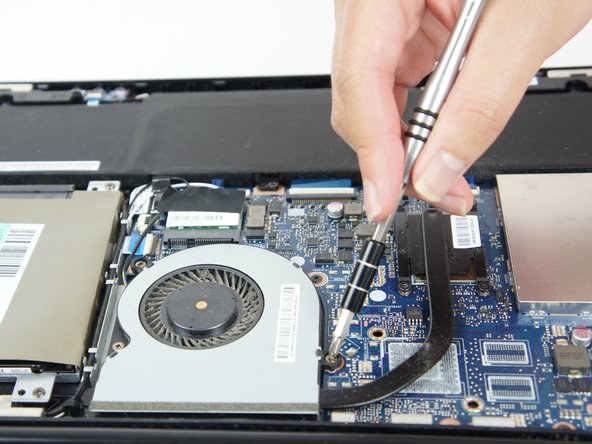
Saltar al contenido principal

Asus VivoBook Q302LA-BHI3T09 Fan Replacement

Qué necesitas

  1. Asus VivoBook Q302LA-BHI3T09 Fan Replacement, Fan: paso 1, imagen 1 de 2 Asus VivoBook Q302LA-BHI3T09 Fan Replacement, Fan: paso 1, imagen 2 de 2
    • Before doing a repair or replacement make sure the laptop is fully shut off.

    • Using the JIS #0 Screwdriver, unscrew the ten 10 mm screws that hold the back casing in place.

  2. Asus VivoBook Q302LA-BHI3T09 Fan Replacement: paso 2, imagen 1 de 2 Asus VivoBook Q302LA-BHI3T09 Fan Replacement: paso 2, imagen 2 de 2
    • Pry open the back casing using the opening tool along the side crevice.

    • Try to use the opening tool at multiple points. Lifting the back casing abruptly could damage the laptop.

  3. Asus VivoBook Q302LA-BHI3T09 Fan Replacement: paso 3, imagen 1 de 3 Asus VivoBook Q302LA-BHI3T09 Fan Replacement: paso 3, imagen 2 de 3 Asus VivoBook Q302LA-BHI3T09 Fan Replacement: paso 3, imagen 3 de 3
    • Remove the following screws that mount the fan and heatsink to the motherboard:

    • Three 3.0 mm screws for the fan

    • Four 2.0 mm screws for the heatsink

    • The bottom of the heatsink will contain thermal paste. Avoid making contact with this as any dirt or oils can reduce the effectiveness of the cooler.

Conclusión

To reassemble your device, follow these instructions in reverse order.

Equipo

USF Tampa, Team S5-G5, Eyestone Spring 2018 Miembro de USF Tampa, Team S5-G5, Eyestone Spring 2018

USFT-EYESTONE-S18S5G5

4 Miembros

5 Guías creadas

0 comentarios

Agregar Comentario

Ver Estadísticas:

Ultimas 24 horas: 0

Ultimos 7 días: 5

Ultimos 30 días: 10

Todo El Tiempo: 165