Saltar al contenido principal

Asus VivoBook E203MA-TBCL432B Power Button Replacement

Qué necesitas

  1. Asus VivoBook E203MA-TBCL432B Power Button Replacement, Back Panel: paso 1, imagen 1 de 1
    • Position the laptop so that the bottom panel is facing upwards, the hinge is away from you, and the ASUS logo is against the table.

    • It will be easier to replace the battery if the laptop is closed.

  2. Asus VivoBook E203MA-TBCL432B Power Button Replacement: paso 2, imagen 1 de 3 Asus VivoBook E203MA-TBCL432B Power Button Replacement: paso 2, imagen 2 de 3 Asus VivoBook E203MA-TBCL432B Power Button Replacement: paso 2, imagen 3 de 3
    • Use a Phillips #0 screwdriver to remove the eight 5 mm screws on the back panel.

    • Remove the two 7 mm Phillips #0 screws.

    • The 8 screws marked in red are all of the same length, 5 mm, and should not be interchanged with the two longer 7 mm screws marked in orange.

  3. Asus VivoBook E203MA-TBCL432B Power Button Replacement: paso 3, imagen 1 de 3 Asus VivoBook E203MA-TBCL432B Power Button Replacement: paso 3, imagen 2 de 3 Asus VivoBook E203MA-TBCL432B Power Button Replacement: paso 3, imagen 3 de 3
    • Insert the iFixit opening tool in between the back panel and the rest of the laptop.

    • With the iFixit opening tool, lift the panel from the laptop body. Work your way around the device creating separation with the tool.

    • Once there is enough separation between the back panel and the device, gently pull off the back panel with your hands and completely remove it.

    • Make sure to use a plastic tool, not a metal one, so that you don't scratch the panel.

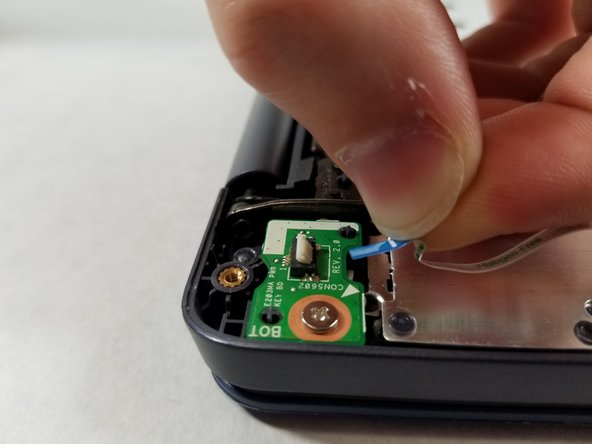
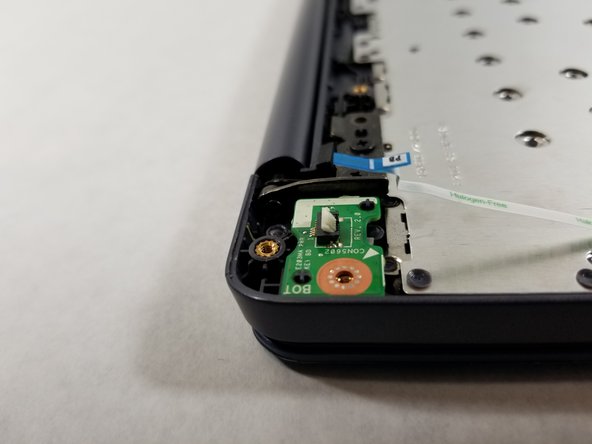
  4. Asus VivoBook E203MA-TBCL432B Power Button Replacement, Power Button: paso 4, imagen 1 de 2 Asus VivoBook E203MA-TBCL432B Power Button Replacement, Power Button: paso 4, imagen 2 de 2
    • Remove the single connector by first pulling back the white tab and then pulling the connector out with the blue tab.

  5. Asus VivoBook E203MA-TBCL432B Power Button Replacement: paso 5, imagen 1 de 2 Asus VivoBook E203MA-TBCL432B Power Button Replacement: paso 5, imagen 2 de 2
    • Remove the single 2 mm screw with a Phillips #0 screwdriver.

  6. Asus VivoBook E203MA-TBCL432B Power Button Replacement: paso 6, imagen 1 de 1
    • Now that the power button component is free, lift it up and out of the laptop.

Conclusión

To reassemble your device, follow these instructions in reverse order.

Equipo

0 comentarios

Agregar Comentario

Ver Estadísticas:

Ultimas 24 horas: 0

Ultimos 7 días: 3

Ultimos 30 días: 7

Todo El Tiempo: 883