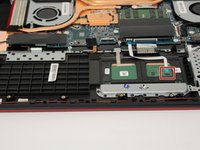
Saltar al contenido principal

Asus TUF Gaming FX705G Track Pad Replacement

Qué necesitas

  1. Asus TUF Gaming FX705G Track Pad Replacement, Back Cover: paso 1, imagen 1 de 2 Asus TUF Gaming FX705G Track Pad Replacement, Back Cover: paso 1, imagen 2 de 2
    • Remove the eleven Phillips #0 screws that secure the back cover.

  2. Asus TUF Gaming FX705G Track Pad Replacement: paso 2, imagen 1 de 2 Asus TUF Gaming FX705G Track Pad Replacement: paso 2, imagen 2 de 2
    • Use the iFixit opening tool to lift the back cover's seam, then insert the spudger parallel to the back cover and lift gently upward.

    • You will hear pops as the back cover releases.

  3. Asus TUF Gaming FX705G Track Pad Replacement, Battery: paso 3, imagen 1 de 2 Asus TUF Gaming FX705G Track Pad Replacement, Battery: paso 3, imagen 2 de 2
    • Remove the three Phillips #00 screws from the battery housing.

  4. Asus TUF Gaming FX705G Track Pad Replacement: paso 4, imagen 1 de 2 Asus TUF Gaming FX705G Track Pad Replacement: paso 4, imagen 2 de 2
    • Disconnect the wire from the motherboard, and lift the battery from its housing.

  5. Asus TUF Gaming FX705G Track Pad Replacement, Track pad: paso 5, imagen 1 de 2 Asus TUF Gaming FX705G Track Pad Replacement, Track pad: paso 5, imagen 2 de 2
    • Take the ribbon wire out of the track pad.

  6. Asus TUF Gaming FX705G Track Pad Replacement: paso 6, imagen 1 de 2 Asus TUF Gaming FX705G Track Pad Replacement: paso 6, imagen 2 de 2
    • Use a Phillips #00 screwdriver to remove the two screws holding the track pad in place.

  7. Asus TUF Gaming FX705G Track Pad Replacement: paso 7, imagen 1 de 2 Asus TUF Gaming FX705G Track Pad Replacement: paso 7, imagen 2 de 2
    • Take the ground wire ribbon and pry it off of the motherboard housing with tweezers.

  8. Asus TUF Gaming FX705G Track Pad Replacement: paso 8, imagen 1 de 3 Asus TUF Gaming FX705G Track Pad Replacement: paso 8, imagen 2 de 3 Asus TUF Gaming FX705G Track Pad Replacement: paso 8, imagen 3 de 3
    • Use the iFixit opening tool to pry the track pad up slightly at the top and pull the latch at the top to free the track pad.

    • Slide the track pad up and out of the housing unit.

Conclusión

To reassemble your device, follow these instructions in reverse order.

Una persona más ha completado esta guía.

0 comentarios

Agregar Comentario

Ver Estadísticas:

Ultimas 24 horas: 1

Ultimos 7 días: 8

Ultimos 30 días: 18

Todo El Tiempo: 1,847