Introducción
Should your Asus ROG Strix GL702VM-BHI7N09 Gaming Laptop suffer from short battery life or outright battery failure this guide may be used to replace it.
The battery enables the laptop to be used without its charger cord. Battery failure prevents the laptop from functioning without its charger. Replacing the battery will restore this capability.
No advanced skills are needed for this procedure.
Qué necesitas
-
-
Flip the laptop over to the back panel, with the serial numbers facing up.
-
Using a Phillips #1 screwdriver, remove the ten 12 mm screws from the back panel.
-
-
-
Wedge the sharp edge of the plastic opening tool into the seam between the back panel and the rest of the laptop, then gently pry the panel up.
-
Continue breaking the seals by sliding the plastic opening tool around the entire laptop under the seam until the back panel is free.
-
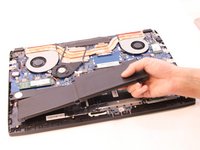
Once you have broken all the seals, carefully lift the panel off.
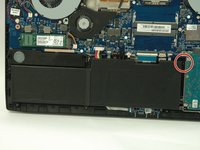
To make sure you don’t damage your board it’s necessary to unplug the main battery
-
-
-
-
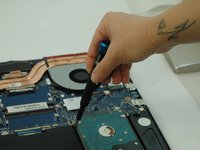
Unplug the battery from the motherboard.
It’s not always a simple matter of pulling. Some connectors have clips that engage and you can break the connector pulling it without pressing on the release points… It would be helpful if you had a video showing the various types of connectors you might run into and demonstrated the proper way to disconnect them.
VERY IMPORTANT:
The battery connection on the motherboard has a small metal sheath that slides back, which will allow you to remove the connector without breaking anything. The metal piece slides back and forth to secure the battery connector, so to remove and insert the new battery, the metal sliding piece has to be slid back, then you can gently remove the connector without breaking the plastic part attached to the motherboard. Mine didn't move that much, maybe a millimeter or so, just enough to give clearance to remove the connector from the interlocked plastic parts.
-


To reassemble your device, follow these instructions in reverse order.
To reassemble your device, follow these instructions in reverse order.
Cancelar: No complete esta guía.
6 personas más completaron esta guía.

Equipo

Idaho State University, Team S1-G5, Watkins Fall 2019 Miembro de Idaho State University, Team S1-G5, Watkins Fall 2019
ISU-WATKINS-F19S1G5
Miembros de 4
2 Guías creadas
Un comentario
Cheers mate! Worked like a %#*@. Built lots of PCs in my time but this is the first time I’ve taken a laptop apart. I should mention: there are 4 screws holding the battery in rather than the 1 you mention in this guide.