Saltar al contenido principal

Asus ROG G750JH-DB71 Disassembly

Qué necesitas

  1. Asus ROG G750JH-DB71 Disassembly, Battery: paso 1, imagen 1 de 2 Asus ROG G750JH-DB71 Disassembly, Battery: paso 1, imagen 2 de 2
    • Ensure the laptop is powered off and unplugged before beginning.

    • Flip the laptop over so the bottom case is facing up.

  2. Asus ROG G750JH-DB71 Disassembly: paso 2, imagen 1 de 3 Asus ROG G750JH-DB71 Disassembly: paso 2, imagen 2 de 3 Asus ROG G750JH-DB71 Disassembly: paso 2, imagen 3 de 3
    • Push the switch near the front of the laptop to release the battery from the computer.

    • Pull the battery out and away from the center of the computer.

  3. Asus ROG G750JH-DB71 Disassembly, Asus ROG G750JH-DB71: paso 3, imagen 1 de 3 Asus ROG G750JH-DB71 Disassembly, Asus ROG G750JH-DB71: paso 3, imagen 2 de 3 Asus ROG G750JH-DB71 Disassembly, Asus ROG G750JH-DB71: paso 3, imagen 3 de 3
    • Use a spudger or your finger to lift up the plastic cover on the bottom of the laptop.

    • Under the plastic cover is a captive screw; unscrew it using a Phillips #00 screwdriver.

  4. Asus ROG G750JH-DB71 Disassembly: paso 4, imagen 1 de 2 Asus ROG G750JH-DB71 Disassembly: paso 4, imagen 2 de 2
    • Remove the cover.

    • If your goal is to replace/remove only the hard drive, you don't have to complete the following disassembly steps and can go on to the hard drive replacement guide.

  5. Asus ROG G750JH-DB71 Disassembly: paso 5, imagen 1 de 3 Asus ROG G750JH-DB71 Disassembly: paso 5, imagen 2 de 3 Asus ROG G750JH-DB71 Disassembly: paso 5, imagen 3 de 3
    • Remove the hard drive by unscrewing the 4.4 mm Phillips #00 screws.

    • Remove all of the plastic caps around the edges using a pick or flathead screwdriver, and remove the screws underneath them. (one 13 mm Phillips #00, six 8 mm Phillips #00)

    • Remove the remaining screws underneath the cover . (six 8mm Phillips #00, three 1 mm Phillips #00)

  6. Asus ROG G750JH-DB71 Disassembly: paso 6, imagen 1 de 3 Asus ROG G750JH-DB71 Disassembly: paso 6, imagen 2 de 3 Asus ROG G750JH-DB71 Disassembly: paso 6, imagen 3 de 3
    • You will find a metal tab holding the CD Rom in place. Push on the tab with a flathead screwdriver or an iFixit tool to remove the CD Rom. It is located below a previously removed screw.

    • Do not pull the CD rom out from the side before pushing the metal tab as it will only damage the cover.

    • Remove the three (4 mm Phillips #00) screws that were previously covered by the CD rom.

  7. Asus ROG G750JH-DB71 Disassembly: paso 7, imagen 1 de 3 Asus ROG G750JH-DB71 Disassembly: paso 7, imagen 2 de 3 Asus ROG G750JH-DB71 Disassembly: paso 7, imagen 3 de 3
    • Once the screws are out and the CD rom is removed, the back cover can be taken off by hand.

    • Disconnect the speaker cables located in picture 1 and 2.

    • Remove two 8 mm Phillips #00 screws on each corner shown in picture 3.

  8. Asus ROG G750JH-DB71 Disassembly: paso 8, imagen 1 de 3 Asus ROG G750JH-DB71 Disassembly: paso 8, imagen 2 de 3 Asus ROG G750JH-DB71 Disassembly: paso 8, imagen 3 de 3
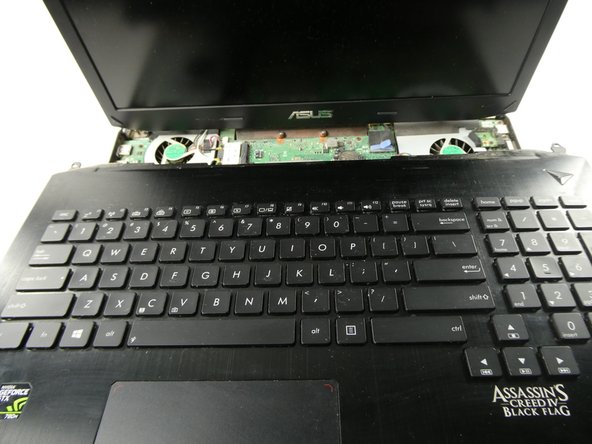
    • Pry the keyboard gently using the iFixit prying tool.

    • Make sure to unhook the cables and wires from the keyboard gently in Picture 3.

  9. Asus ROG G750JH-DB71 Disassembly: paso 9, imagen 1 de 2 Asus ROG G750JH-DB71 Disassembly: paso 9, imagen 2 de 2
    • Now you can pull the keyboard off but make sure to do so carefully without damaging or scuffing any components.

    • Pull up and out at an angle to avoid damaging the internals of the laptop.

Conclusión

To reassemble your device, follow these instructions in reverse order.

James Mills

Miembro Desde 10/25/22

471 Reputación

4 Guías creadas

Equipo

UMass Dartmouth, Team 5-5, Sinclaire Fall 2022 Miembro de UMass Dartmouth, Team 5-5, Sinclaire Fall 2022

UMASSD-SINCLAIRE-F22S5G5

4 Miembros

6 Guías creadas

0 comentarios

Agregar Comentario

Ver Estadísticas:

Ultimas 24 horas: 2

Ultimos 7 días: 24

Ultimos 30 días: 43

Todo El Tiempo: 436