Saltar al contenido principal

Asus PadFone S Front Facing Camera Replacement

Qué necesitas

  1. Asus PadFone S Front Facing Camera Replacement, Remove the Back Panel: paso 1, imagen 1 de 1
    • Place your thumb in the charging port and pry the back cover off of the phone.

  2. Asus PadFone S Front Facing Camera Replacement, Remove the Back Panel: paso 2, imagen 1 de 2 Asus PadFone S Front Facing Camera Replacement, Remove the Back Panel: paso 2, imagen 2 de 2
    • Remove all screws using the T5 Torx screwdriver

    • Lift the back panel off the phone.

  3. Asus PadFone S Front Facing Camera Replacement, Remove the Battery: paso 3, imagen 1 de 2 Asus PadFone S Front Facing Camera Replacement, Remove the Battery: paso 3, imagen 2 de 2
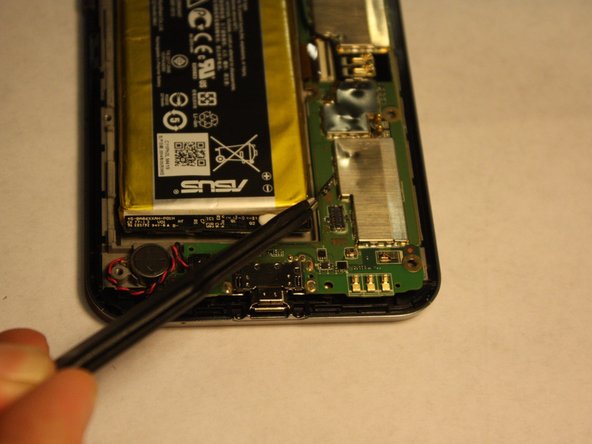
    • Disconnect the battery from the logic board using tweezers

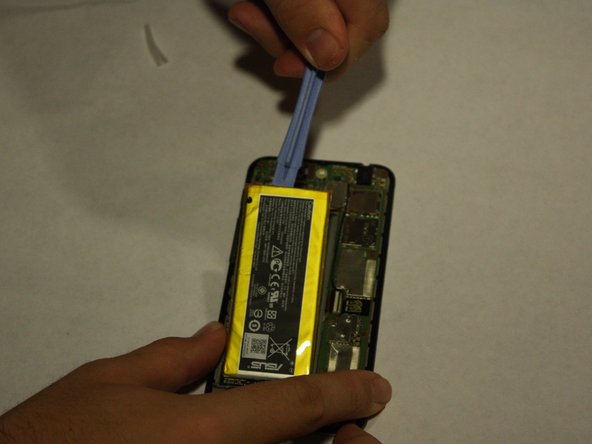
    • Using the plastic opening tools, lift the battery up from its slot

    • Apply consistent, steady force to lift the battery from its slot. Be careful not to damage the battery while removing it.

  4. Asus PadFone S Front Facing Camera Replacement, Front Facing Camera: paso 4, imagen 1 de 3 Asus PadFone S Front Facing Camera Replacement, Front Facing Camera: paso 4, imagen 2 de 3 Asus PadFone S Front Facing Camera Replacement, Front Facing Camera: paso 4, imagen 3 de 3
    • Once the Battery has been successfully removed, move on to the step 2.

  5. Asus PadFone S Front Facing Camera Replacement, Start of Logic Board Removal: paso 5, imagen 1 de 2 Asus PadFone S Front Facing Camera Replacement, Start of Logic Board Removal: paso 5, imagen 2 de 2
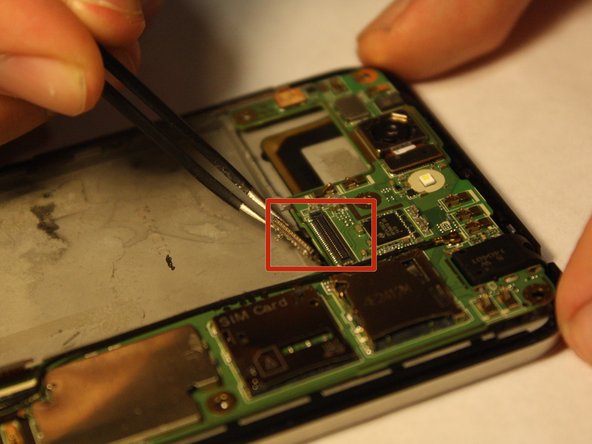
    • Disconnect the marked strips from the logic board using the tweezers.

    • Applying too much force may damage the strips/connectors.

    • Remember to remove speaker connection located at the bottom left hand corner.

  6. Asus PadFone S Front Facing Camera Replacement, Logic Board Removal - Continued: paso 6, imagen 1 de 2 Asus PadFone S Front Facing Camera Replacement, Logic Board Removal - Continued: paso 6, imagen 2 de 2
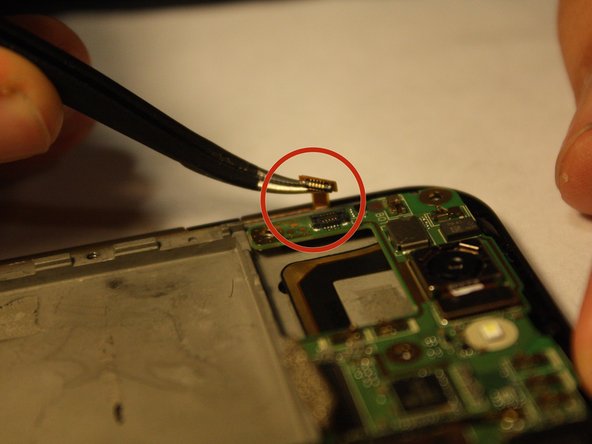
    • Disconnect the other two strips that connect the logic board to the phone.

    • Applying too much force may damage the strips/connectors.

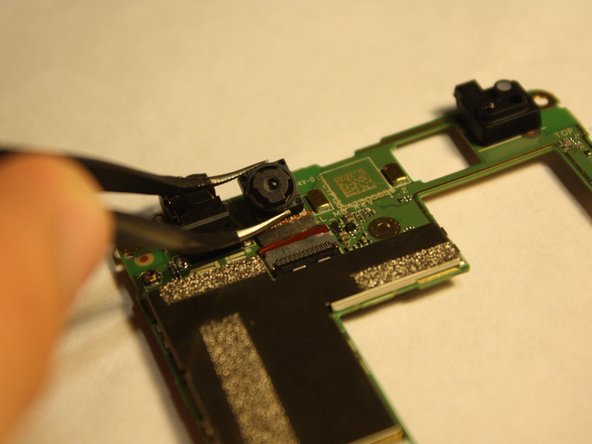
  7. Asus PadFone S Front Facing Camera Replacement, Remove The Camera: paso 7, imagen 1 de 2 Asus PadFone S Front Facing Camera Replacement, Remove The Camera: paso 7, imagen 2 de 2
    • Turn over the logic board to locate the front camera.

    • Grasp the sides of the camera with the tweezers and carefully remove the camera from the logic board.

    • Applying to much force will damage the connective strip.

Conclusión

To reassemble your device, follow these instructions in reverse order.

Una persona más ha completado esta guía.

Equipo

UMass Dartmouth, Team 6-1, Vijaybhaskar Fall 2014 Miembro de UMass Dartmouth, Team 6-1, Vijaybhaskar Fall 2014

UMASSD-VIJAYBHASKAR-F14S6G1

3 Miembros

10 Guías creadas

0 comentarios

Agregar Comentario

Ver Estadísticas:

Ultimas 24 horas: 0

Ultimos 7 días: 0

Ultimos 30 días: 2

Todo El Tiempo: 1,493