Saltar al contenido principal

Asus GL551JW-AH71 Wi-Fi Card Replacement

Qué necesitas

  1. Asus GL551JW-AH71 Wi-Fi Card Replacement, Battery: paso 1, imagen 1 de 1
    • Close the device and lay it upside down.

    • Unplug the device and make sure the device is powered off before removing the battery.

  2. Asus GL551JW-AH71 Wi-Fi Card Replacement: paso 2, imagen 1 de 2 Asus GL551JW-AH71 Wi-Fi Card Replacement: paso 2, imagen 2 de 2
    • Move the battery eject button to the right. The battery will be ejected.

  3. Asus GL551JW-AH71 Wi-Fi Card Replacement: paso 3, imagen 1 de 2 Asus GL551JW-AH71 Wi-Fi Card Replacement: paso 3, imagen 2 de 2
    • Grab the battery and remove it from the device.

  4. Asus GL551JW-AH71 Wi-Fi Card Replacement, Wi-Fi Card: paso 4, imagen 1 de 2 Asus GL551JW-AH71 Wi-Fi Card Replacement, Wi-Fi Card: paso 4, imagen 2 de 2
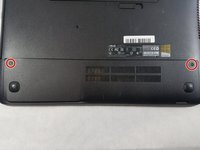
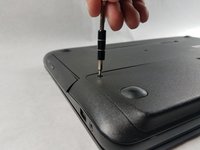
    • Using a Phillips #000 screwdriver, remove the two 16mm screws securing the access panel to the laptop.

  5. Asus GL551JW-AH71 Wi-Fi Card Replacement: paso 5, imagen 1 de 1
    • Gently remove the cover once the screws are removed.

  6. Asus GL551JW-AH71 Wi-Fi Card Replacement: paso 6, imagen 1 de 1
    • Locate the Wi-Fi card and detach both coaxial cables that are connected to the card.

    • The pictures in this step do not show a Wi-Fi card. The location where the Wi-Fi card would be located is indicated by the red rectangle.

  7. Asus GL551JW-AH71 Wi-Fi Card Replacement: paso 7, imagen 1 de 1
    • Grasp the Wi-Fi card gently and remove it carefully.

    • The pictures in this step do not show a Wi-Fi card, since it is missing from this particular device.

Conclusión

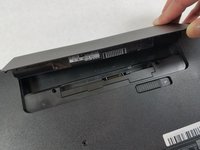
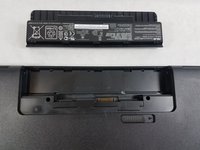
To reassemble your device, follow these instructions in reverse order.

2 personas más completaron esta guía.

William Kelley

Miembro Desde 03/20/19

1,035 Reputación

7 Guías creadas

Equipo

0 comentarios

Agregar Comentario

Ver Estadísticas:

Ultimas 24 horas: 0

Ultimos 7 días: 5

Ultimos 30 días: 17

Todo El Tiempo: 910