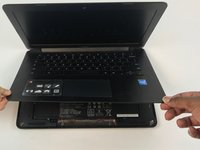
Saltar al contenido principal

Asus Chromebook C300MA-DB01 Battery Replacement

Qué necesitas

  1. Asus Chromebook C300MA-DB01 Battery Replacement, Back Cover: paso 1, imagen 1 de 1
    • Place device bottom-side up.

  2. Asus Chromebook C300MA-DB01 Battery Replacement: paso 2, imagen 1 de 1
    • Remove the three 6.0 mm Philips screws from the center of the case with the #2 screwdriver bit.

    • Remove the eight 9.0 mm Philips screws along the perimeter of the case with the #2 screwdriver bit.

  3. Asus Chromebook C300MA-DB01 Battery Replacement: paso 3, imagen 1 de 1
    • Using a plastic opening tool, separate the bottom case at the seam.

    • Prying open a laptop requires a lot of force but use caution so as to avoid breaking the fragile connectors.

  4. Asus Chromebook C300MA-DB01 Battery Replacement: paso 4, imagen 1 de 2 Asus Chromebook C300MA-DB01 Battery Replacement: paso 4, imagen 2 de 2
    • Lift the keyboard panel away from the components at its hinges, which are located at the back of the laptop.

  5. Asus Chromebook C300MA-DB01 Battery Replacement, Battery: paso 5, imagen 1 de 1
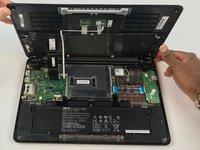
    • Remove the six 6.0mm Philips screws, using the 64 bit driver from around the battery.

  6. Asus Chromebook C300MA-DB01 Battery Replacement: paso 6, imagen 1 de 1
    • Unplug the wire using the plastic opening tool that connects the battery with the board.

  7. Asus Chromebook C300MA-DB01 Battery Replacement: paso 7, imagen 1 de 1
    • Lift the battery out of the laptop

Conclusión

To reassemble your device, follow these instructions in reverse order.

Una persona más ha completado esta guía.

wyatt boyatt

Miembro Desde 09/25/17

541 Reputación

5 Guías creadas

Equipo

USF Tampa, Team S4-G3, Eyestone Fall 2017 Miembro de USF Tampa, Team S4-G3, Eyestone Fall 2017

USFT-EYESTONE-F17S4G3

3 Miembros

12 Guías creadas

0 comentarios

Agregar Comentario

Ver Estadísticas:

Ultimas 24 horas: 0

Ultimos 7 días: 6

Ultimos 30 días: 13

Todo El Tiempo: 2,246