Introducción
When replacing the Asus Chromebook C213SA-YS02 battery, it is necessary to be careful when prying up the keyboard and back-plate. There are plastic hinges that keep the device together that can be snapped if one is not careful. The battery, in any device, wears down after a couple of years, causing battery life to decrease dramatically as time goes on. Replacing a battery is a more affordable solution than going out and buying a new laptop and it is less cumbersome than keeping the laptop plugged in to charge.
Before one does this though, check to see what background apps, processes, and other device functions may be lowering the battery performance, for that may be the problem and the battery itself may not need to be changed.
Qué necesitas
-
-
Power off the device by pressing and holding the power button on the side of the device.
-
Remove the power cable from the back of the device (if applicable).
-
-
Herramienta utilizada en este paso:Tweezers$4.99
-
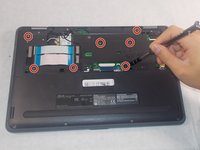
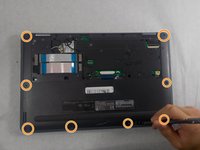
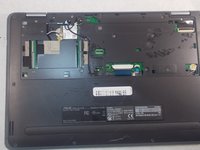
Remove the seven black 4mm Phillips screws underneath the back cover.
-
Remove the eight black 7mm Phillips #00 screws along the edge of the device.
-
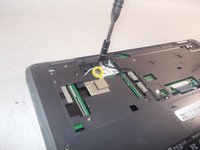
Remove the single silver 2mm Phillips #00 screw from the top of the Wi-Fi card.
-
Carefully pull the white and black wires out of the card using tweezers.
-
Remove the Wi-Fi card.
-
-
-
-
Disconnect the black camera cable between the keyboard cable and the two blue ribbons which have been disconnected.
-
Using the tweezers, grab the wire end of the cable and carefully pull it away from the connection port.
-
Loosely place the disconnected cable away from the connection port.
-
-
-
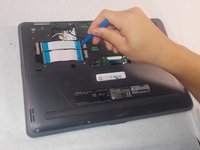
Flip the device over and open up the LCD screen.
-
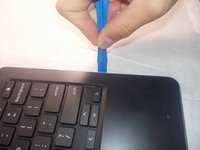
Using the iFixit opening tool, gently place the tool in between the back-plate and the keyboard and lift up.
-
Slide the tool around the outside of the keyboard and lift up the tool while moving it around the boundary of the keyboard.
-
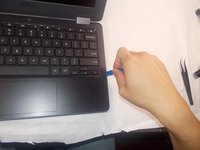
Pull the keyboard away from the back-plate. Be careful the keyboard cable is not caught on the back-plate while performing this maneuver.
-
-
-
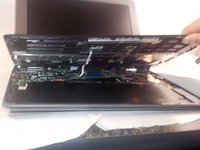
Remove the battery cable from the connection port using the iFixit opening tool to push the white tabs on either end of the male adapter.
-
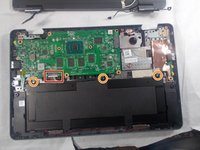
Remove the three 4mm Phillips #00 stainless steel screws.
-
Remove the battery.
-


To reassemble your device, follow these instructions in reverse order.
To reassemble your device, follow these instructions in reverse order.
Cancelar: No complete esta guía.
4 personas más completaron esta guía.
Equipo

UMass Dartmouth, Team S4-G7, Saloman Fall 2019 Miembro de UMass Dartmouth, Team S4-G7, Saloman Fall 2019
UMASSD-SALOMAN-F19S4G7
Miembros de 4
4 Guías creadas