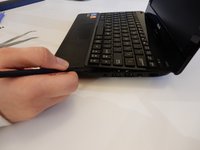
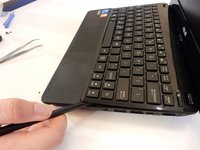
Saltar al contenido principal

Asus 1015E-DS03 Keyboard Replacement

Qué necesitas

  1. Asus 1015E-DS03 Keyboard Replacement, Battery: paso 1, imagen 1 de 1
    • Hold the laptop using both hands with the battery facing upwards.

  2. Asus 1015E-DS03 Keyboard Replacement: paso 2, imagen 1 de 1
    • Push the two tabs located below the battery in towards each other using your thumbs.

  3. Asus 1015E-DS03 Keyboard Replacement: paso 3, imagen 1 de 1
    • Push the battery upwards and out of the laptop as shown.

  4. Asus 1015E-DS03 Keyboard Replacement: paso 4, imagen 1 de 1
    • Continue to push the battery upwards until it is completely separated from the laptop as shown.

  5. Asus 1015E-DS03 Keyboard Replacement, Keyboard: paso 5, imagen 1 de 1
    • Once the battery is removed, unscrew the highlighted 3mm screws (4) using a #0 Phillps head screwdriver.

    • Be very careful not to lose the screws, these four screws are very small.

  6. Asus 1015E-DS03 Keyboard Replacement: paso 6, imagen 1 de 2 Asus 1015E-DS03 Keyboard Replacement: paso 6, imagen 2 de 2
    • After all four screws are removed, flip the laptop over with the keyboard facing up.

    • Use a spudger to pry up where the keyboard is attached to the laptop on all sides until it is detached from the laptop.

    • It is normal to hear cracking noises when prying off the keyboard.

    • After keyboard is detached from laptop, there is a ribbon cable still attached to the motherboard. See next step before completely removing keyboard.

  7. Asus 1015E-DS03 Keyboard Replacement: paso 7, imagen 1 de 1
    • After the keyboard is detached, the ribbon cable which connects the keyboard to the laptop's motherboard is exposed.

    • Be careful not to tear or rip the ribbon cable.

  8. Asus 1015E-DS03 Keyboard Replacement: paso 8, imagen 1 de 1
    • Using the spudger push the white clips upwards that are holding the cable.

  9. Asus 1015E-DS03 Keyboard Replacement: paso 9, imagen 1 de 2 Asus 1015E-DS03 Keyboard Replacement: paso 9, imagen 2 de 2
    • Gently pull the strip out of the square slot.

Conclusión

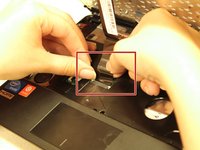
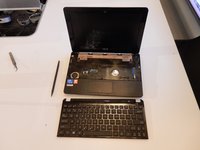
To reassemble your device, follow these instructions in reverse order.

2 personas más completaron esta guía.

Joe Capriola

Miembro Desde 03/21/16

428 Reputación

3 Guías creadas

Equipo

Clemson, Team 7-4, Benson Spring 2016 Miembro de Clemson, Team 7-4, Benson Spring 2016

CLEM-BENSON-S16S7G4

5 Miembros

7 Guías creadas

0 comentarios

Agregar Comentario

Ver Estadísticas:

Ultimas 24 horas: 0

Ultimos 7 días: 0

Ultimos 30 días: 5

Todo El Tiempo: 965