Introducción
La placa base sirve como carcasa inferior del dispositivo. Proporciona seguridad estructural y protección para los componentes internos. Si la placa base está dañada, puede poner en riesgo el hardware interno y debe reemplazarse. La cubierta de goma se mantiene en su lugar mediante un adhesivo y lleva algún tiempo quitarla.
Qué necesitas
-
-
Voltea el dispositivo para revelar la sección de goma de la placa posterior. Con un spudger de metal, introduzca con cuidado la punta roma en el espacio entre la placa posterior de aluminio y la goma, separando las dos piezas.
-
Dependiendo de la temperatura del aire y de qué tan fijado esté el adhesivo, es posible que debas dedicar algún tiempo a calentar la placa posterior con una placa caliente (a temperatura baja) o un secador de pelo.
-
-
-
-
Retira los diez tornillos de 3 mm con un destornillador Phillips n.º 00.
The two screws in the top center of this picture should not be removed at this time. They are locating pins on the hard drive.
Correct - the four screws top centre with glue over then do not need to come out. They are only locating posts for the HDD.
Tony Meredith - 2018-06-26
CONFIRMED. Thank you very much for the screws which should not be removed. You guys are right.
-
-
-
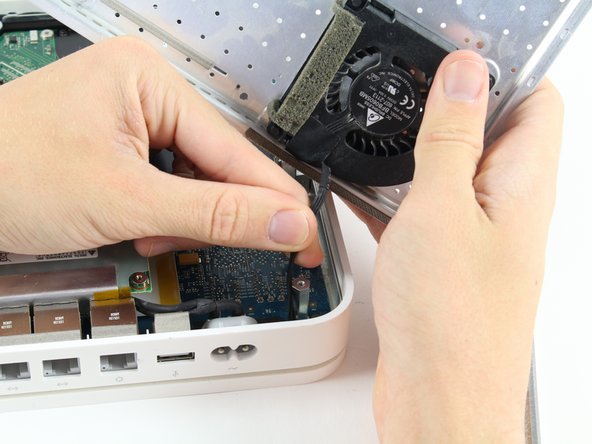
El ventilador fijado a la placa posterior está conectado a la placa lógica. Se debe desconectar un pequeño cable para retirar completamente la placa posterior.
-
Tira de la base del cable cerca de la placa lógica y el conector se desprenderá.
Be careful you do not rip the locating connector off the circuit board like I did.
-


Para volver a ensamblar tu dispositivo, sigue estas instrucciones en orden inverso.
Para volver a ensamblar tu dispositivo, sigue estas instrucciones en orden inverso.
Cancelar: No complete esta guía.
9 personas más completaron esta guía.
Un agradecimiento especial a estos traductores:
100%

¡ Francisco Javier Saiz Esteban nos está ayudando a reparar el mundo! ¿Quieres contribuir?
Empezar a traducir ›
Equipo

Cal Poly, Team 4-2, Livingston Fall 2016 Miembro de Cal Poly, Team 4-2, Livingston Fall 2016
CPSU-LIVINGSTON-F16S4G2
4 Miembros
17 Guías creadas
The epoxy cementing the rubber pad to the aluminum base is a lot stronger than the rubber itself. The rubber is likely to tear as you remove it; I had to use a putty knife to clear the screws. It's worth hanging onto the branding near the Ethernet ports, for future identification (model number, serial number, Ethernet ID, AirPort ID); you can fashion a replacement pad out of neoprene rubber.
adlerpe - Contestar
Mine completely ripped I have no back cover now its in multiple pieces…. mine was giving off way to much heat and hard drive errors so I decided to replace hard drive and fan wish me luck BUT if yours is overheating do not expect to get back off without ripping the rubber to
William - Contestar
Using a fan to heat the plate up was helpful
Michael Zimmermann - Contestar
I wish I read Michael Zimmermann’s suggestion before I tore the first half into about 15 pieces! On the second half I used a hair dryer to heat the rubber. With enough heat and a very slow steady pull on the rubber it came of as a single piece :-)
mfred2 - Contestar
Do I need to put back on the rubber? will it overheat if I don’t?
Strider - Contestar
It is almost impossible to keep the bottom rubber covering intact in one piece. The rubber is covering the whole base section and it won’t be a problem without it I guess. This is not an epoxy because it is still gummy and sticky. This is like the adhesive used on the double side tapes. Goo Gone worked well to remove those residues.
Kenn Sakurai - Contestar
The rubber cap like bottom can be replaced with easy to cut in shape cork sheet will do. Just rip off the thin strip where the serial number for the ID and other info that might be needed later. Have it glued or put on a clear tape and put it on the side of the white plastic sidewall will do.
Kenn Sakurai - Contestar
With age, the rubber becomes brittle. It is best to heat it up with a hair dryer before trying to gently peel it off.
SirDeck - Contestar
Mine was probably about 10 years old at this point. I used a clothes iron (flatiron) set on medium heat ("permanent press"), and a piece of "parchment paper" from the kitchen between iron and rubber. After 30 seconds or so, the glue was softened enough that I could lift off the rubber, a little at a time using a putty knife. It all came off in one piece, with essentially all the glue still attached to the rubber. My thanks to the person (forgot the name, it was on one of the "drive replacement" articles for one of the other model Time Capsules) who suggested the iron.
Paul Koning - Contestar