Esta versión puede contener ediciones incorrectas. Cambie a la última instantánea verificada.
Qué necesitas
-
Este paso está sin traducir. Ayuda a traducirlo
-
First start by peeling off the outer rubbery covering on the bottom of the device.
-
-
Este paso está sin traducir. Ayuda a traducirlo
-
After removing the rubber covering, unscrew the five 4.9mm Phillips screws in the holes of the plastic casing.
-
-
Este paso está sin traducir. Ayuda a traducirlo
-
After unscrewing all five screws, remove the plastic casing. The back should now look like the picture shown.
-
-
-
Este paso está sin traducir. Ayuda a traducirlo
-
The inner metal casing is latched inside the outer white plastic shell, so insert a pry tool underneath the metal casing and pry it apart from the shell.
-
It should make a click when it comes apart.
-
-
Este paso está sin traducir. Ayuda a traducirlo
-
Remove the outer casing.
-
The exposed logic board should look like this.
-
-
Este paso está sin traducir. Ayuda a traducirlo
-
Remove the metal casing by gently prying the logic board away with you hands.
-
This should be pretty easy, you already removed the screws holding these pieces together.
-
-
Este paso está sin traducir. Ayuda a traducirlo
-
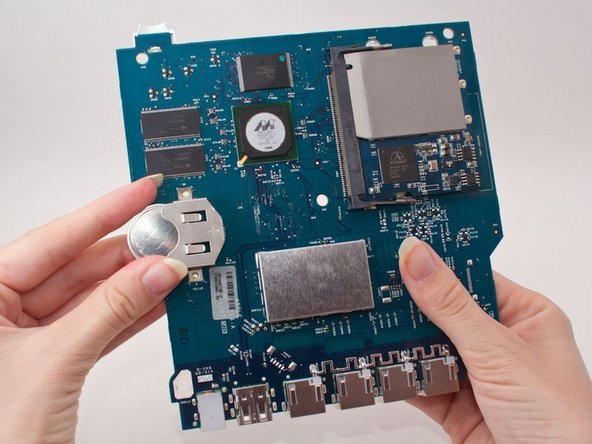
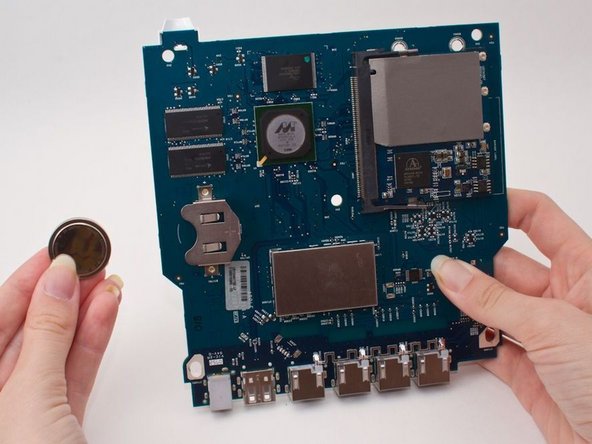
Remove the battery by gently "shoving" it out with the plastic tool.
-


Cancelar: No complete esta guía.
7 personas más completaron esta guía.
Equipo

Cal Poly, Team 5-2, Forte Spring 2012 Miembro de Cal Poly, Team 5-2, Forte Spring 2012
CPSU-FORTE-S12S5G2
5 Miembros
12 Guías creadas
5 comentarios
Hi! How to know i need to change battery? What the symptoms of dead battery? My Airport Extreme worked well 6 years, and now its have the problems, missing pings, can it be symptom of dead battery?
I have an A1354 and it powers up just fine. The problem is that it keeps dropping connection to airport utility on my mac every 5 seconds or so. I came here looking for a potential diagnosis/repair. I didn’t know about the battery. Could that be an issue? It has never been replaced.