Saltar al contenido principal

Amazon Echo Dot 5th Generation Ribbon Cable Replacement

Qué necesitas

  1. Amazon Echo Dot 5th Generation Ribbon Cable Replacement, Motherboard: paso 1, imagen 1 de 2 Amazon Echo Dot 5th Generation Ribbon Cable Replacement, Motherboard: paso 1, imagen 2 de 2
    • Using a spudger, remove the rubber footing around the base of the Echo Dot. This will reveal the four T8 1.25 cm Torx screws.

  2. Amazon Echo Dot 5th Generation Ribbon Cable Replacement: paso 2, imagen 1 de 1
    • Once removed, the Echo Dot is now able to be split in two.

    • The ribbon cable connecting the microphone to the CPU PCB is now exposed, be careful not to tear it. The lower case will have the LED diffuser along the bottom, while the upper case will contain the rest of the internals.

  3. Amazon Echo Dot 5th Generation Ribbon Cable Replacement: paso 3, imagen 1 de 3 Amazon Echo Dot 5th Generation Ribbon Cable Replacement: paso 3, imagen 2 de 3 Amazon Echo Dot 5th Generation Ribbon Cable Replacement: paso 3, imagen 3 de 3
    • Remove the CPU PCB by removing the 4 T6 0.75cm Torx screws.

    • Once removed, unclip the plastic retainer on the CPU PCB and slide the ribbon cable out. This will reveal the speaker’s metal housing.

  4. Amazon Echo Dot 5th Generation Ribbon Cable Replacement, Ribbon Cable: paso 4, imagen 1 de 1
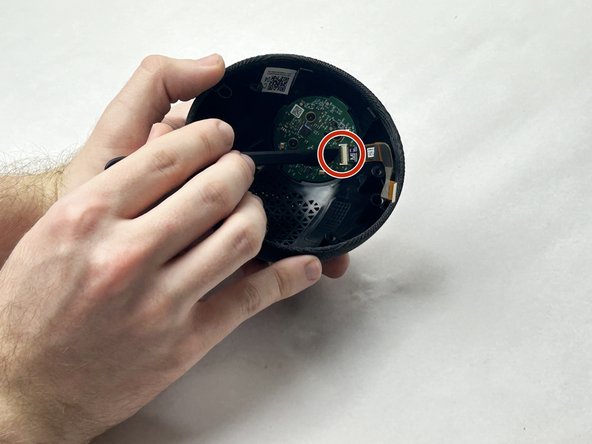
    • Now, use a plastic prying tool to remove the ribbon cable from the speaker housing.

  5. Amazon Echo Dot 5th Generation Ribbon Cable Replacement: paso 5, imagen 1 de 1
    • Using the Torx T8 bit, remove the four 1.25 cm screws around the edges of the speaker housing, and lift the housing off of the top case, revealing the switch PCB.

  6. Amazon Echo Dot 5th Generation Ribbon Cable Replacement: paso 6, imagen 1 de 3 Amazon Echo Dot 5th Generation Ribbon Cable Replacement: paso 6, imagen 2 de 3 Amazon Echo Dot 5th Generation Ribbon Cable Replacement: paso 6, imagen 3 de 3
    • Use a plastic spudger to undo the adhesive attaching the ribbon cable to the top case. Then, flip the tab on the switch PCB, and slide out the ribbon cable.

Conclusión

To reassemble your device, follow these instructions in reverse order.

Jack Salmonson

Miembro Desde 10/30/23

169 Reputación

2 Guías creadas

Equipo

UMass Dartmouth, Team 3-4, Konn Fall 2023 Miembro de UMass Dartmouth, Team 3-4, Konn Fall 2023

UMASSD-KONN-F23S3G4

4 Miembros

5 Guías creadas

0 comentarios

Agregar Comentario

Ver Estadísticas:

Ultimas 24 horas: 1

Ultimos 7 días: 2

Ultimos 30 días: 9

Todo El Tiempo: 83