Saltar al contenido principal

Altec Lansing VersA Smart Motherboard Replacement

Qué necesitas

  1. Altec Lansing VersA Smart Motherboard Replacement, External Panels: paso 1, imagen 1 de 1
    • Remove external rubber cover.

  2. Altec Lansing VersA Smart Motherboard Replacement: paso 2, imagen 1 de 2 Altec Lansing VersA Smart Motherboard Replacement: paso 2, imagen 2 de 2
    • Use blue plastic opening tool to remove the external speaker face by placing it in the slight opening at the bottom.

    • Use a lever motion, push the tool down, lifting the speaker face.

    • Use fingers to grip and remove speaker face.

    • Repeat on reverse side to remove the second speaker face.

  3. Altec Lansing VersA Smart Motherboard Replacement: paso 3, imagen 1 de 2 Altec Lansing VersA Smart Motherboard Replacement: paso 3, imagen 2 de 2
    • Orient speaker so volume buttons are facing away from you, and Bluetooth and power buttons are on the left-hand side.

    • Remove the seven 14mm screws using the Phillips #1 screwdriver.

  4. Altec Lansing VersA Smart Motherboard Replacement: paso 4, imagen 1 de 1
    • Reorient speaker so Bluetooth and power buttons are now on the right-hand side.

    • Separate the two panels along the crease.

    • Blue plastic opening tool may be needed to separate panels.

    • Remove the panel with no buttons to expose internal area of the device.

    • Motherboard and all internal components are under this panel.

  5. Altec Lansing VersA Smart Motherboard Replacement, Motherboard: paso 5, imagen 1 de 1
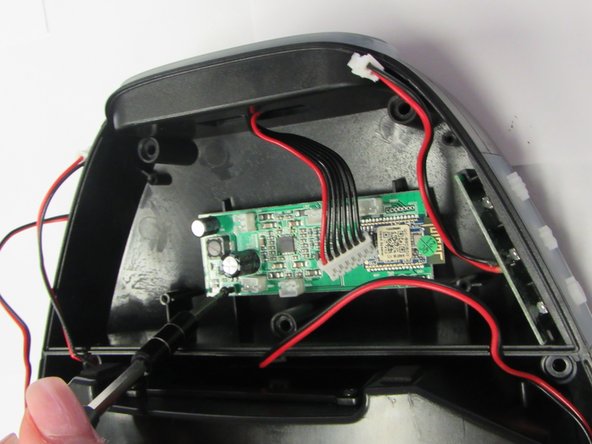
    • Remove the five wiring attachments (for the volume board, bluetooth board, speakers, and microUSB) from their connection to the motherboard by pulling slightly.

  6. Altec Lansing VersA Smart Motherboard Replacement: paso 6, imagen 1 de 2 Altec Lansing VersA Smart Motherboard Replacement: paso 6, imagen 2 de 2
    • Remove the two 9mm screws holding the motherboard in place using the Torx T5 screwdriver.

  7. Altec Lansing VersA Smart Motherboard Replacement: paso 7, imagen 1 de 1
    • Remove the motherboard.

Conclusión

To reassemble your device, follow these instructions in reverse order.

Una persona más ha completado esta guía.

Un comentario

Where can you buy replacement PCBS for ALTEC products?

Kelly Raile - Contestar

Agregar Comentario

Ver Estadísticas:

Ultimas 24 horas: 0

Ultimos 7 días: 0

Ultimos 30 días: 3

Todo El Tiempo: 319