Saltar al contenido principal

Esta versión puede contener ediciones incorrectas. Cambie a la última instantánea verificada.

Qué necesitas

  1. Este paso está sin traducir. Ayuda a traducirlo

    : paso 1, imagen 1 de 1
    • Please power off the computer and deplete the battery before attempting the following step.

  2. Este paso está sin traducir. Ayuda a traducirlo

    : paso 2, imagen 1 de 2 : paso 2, imagen 2 de 2
    • Press down on the battery latch and slide it to the left.

    • Lift the battery out once it pops out.

  3. Este paso está sin traducir. Ayuda a traducirlo

    : paso 3, imagen 1 de 3 : paso 3, imagen 2 de 3 : paso 3, imagen 3 de 3
    • Remove the two 2mm Phillips #0 screws from the recesses on the left and right side of the processor fan.

  4. Este paso está sin traducir. Ayuda a traducirlo

    : paso 4, imagen 1 de 2 : paso 4, imagen 2 de 2
    • Turn the laptop top side up and fully open the display.

    • The center control panel is between the display and the keyboard. Fully opening the display ensures that there is enough room to pry and lift the center control panel.

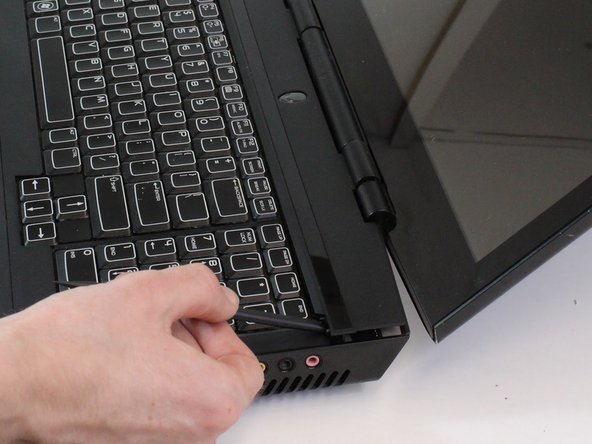
    • Pry the center control panel up from its left and right edges with the Spudger.

    • The center control panel may require a decent amount of force to pry free. Do not immediately lift the panel from the laptop once it has been pried free. A cable is connected from the laptop to the center control panel.

  5. Este paso está sin traducir. Ayuda a traducirlo

    : paso 5, imagen 1 de 2 : paso 5, imagen 2 de 2
    • Lift the center control panel from the laptop.

    • Tilt the center control panel away from the display carefully.

    • Lift the latch open to remove the cable connecting from the laptop to the center control panel.

  6. Este paso está sin traducir. Ayuda a traducirlo

    : paso 6, imagen 1 de 1
    • Remove the five 3mm Phillips #0 screws.

  7. Este paso está sin traducir. Ayuda a traducirlo

    : paso 7, imagen 1 de 3 : paso 7, imagen 2 de 3 : paso 7, imagen 3 de 3
    • There two cables connected from the underside of the keyboard to the laptop.

    • Slide and lift the keyboard towards the display to unhook it from the laptop.

    • Tilt the keyboard away from the display carefully.

  8. Este paso está sin traducir. Ayuda a traducirlo

    : paso 8, imagen 1 de 2 : paso 8, imagen 2 de 2
    • Flip open the two latches that connect the wide keyboard cable and thin light cable to the laptop.

    • Lift the keyboard off the laptop and set aside.

    • Don't be alarmed if the cables are already disconnected. Simply lifting the keyboard from the laptop may cause the cables to disconnect because the latches require very little force to open.

Linea de Meta

Una persona más ha completado esta guía.

Grant Dolmat

Miembro Desde 09/17/18

328 Reputación

2 Guías creadas

Equipo

CSU Fullerton, Team S2-G2, Bruce Fall 2018 Miembro de CSU Fullerton, Team S2-G2, Bruce Fall 2018

CSUF-BRUCE-F18S2G2

4 Miembros

8 Guías creadas

0 comentarios

Agregar Comentario

Ver Estadísticas:

Ultimas 24 horas: 2

Ultimos 7 días: 5

Ultimos 30 días: 13

Todo El Tiempo: 1,341