Saltar al contenido principal

Alienware 17 R2 Keyboard Replacement

Qué necesitas

  1. Alienware 17 R2 Keyboard Replacement, Close the Display: paso 2, imagen 1 de 1
    • Close the display and turn the computer over.

    • Make sure PC is turned off!

  2. Alienware 17 R2 Keyboard Replacement, Loosen Screws: paso 3, imagen 1 de 1
    • Loosen the captive screws that secure the base panel to the computer base.

  3. Alienware 17 R2 Keyboard Replacement, Releasing Tabs: paso 4, imagen 1 de 1
    • Using a plastic scribe, gently release the tabs that secure the base panel to the computer base.

  4. Alienware 17 R2 Keyboard Replacement, Remove Base Panel: paso 5, imagen 1 de 1
    • Slide and remove the base panel from the computer base.

  5. Alienware 17 R2 Keyboard Replacement, Disconnect Battery Cable: paso 6, imagen 1 de 1
    • Disconnect the Battery cable from the system board.

    • Turn the computer over.

    • Press and hold power button for 5 seconds to ground the system board.

  6. Alienware 17 R2 Keyboard Replacement, Battery Cable: paso 9, imagen 1 de 1
    • Connect the battery cable to the system board.

  7. Alienware 17 R2 Keyboard Replacement, Tighten Screws: paso 10, imagen 1 de 1
    • Tighten the captive screws that secure the base panel to the computer base.

    • WARNING : Before working inside your computer, read the safety information that shipped with your computer and follow the steps in Before Working Inside Your Computer. After working inside your computer, follow the instructions in After Working Inside Your Computer.

    • Make sure the base panel is removed.

    • Make sure palm rest is removed.

    • Lift the latches and disconnect the touch-pad cable and the status-light cable from the power-button board.

  8. Alienware 17 R2 Keyboard Replacement, Peel off the Cables: paso 12, imagen 1 de 1
    • Note the touch-pad cable and status-light cable routing and peel off the cables from the keyboard bracket.

  9. Alienware 17 R2 Keyboard Replacement, Screw Removal: paso 13, imagen 1 de 1
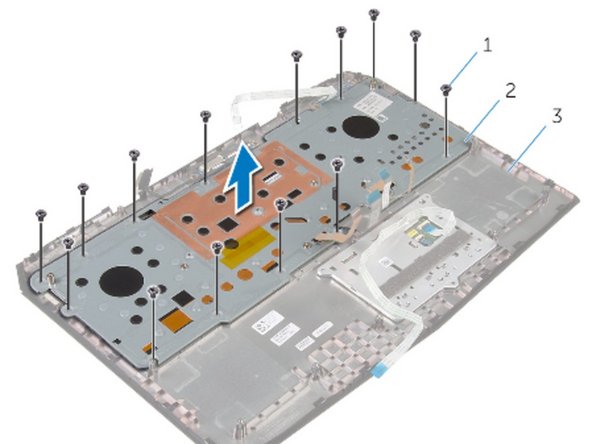
    • Remove the screws that secure the keyboard bracket to the palm-rest assembly.

    • Slide the keyboard cable, keyboard-backlight cable, macro-keys cable and macro-keys backlight cable through the slot on the keyboard bracket.

  10. Alienware 17 R2 Keyboard Replacement, Lifting the Keyboard Bracket: paso 15, imagen 1 de 1
    • Lift the keyboard bracket off the palm-rest assembly.

  11. Alienware 17 R2 Keyboard Replacement: paso 16, imagen 1 de 1
    • Remove the screws that secure the keyboard to the palm rest assembly.

  12. Alienware 17 R2 Keyboard Replacement, Releasing the Tabs: paso 17, imagen 1 de 1
    • Release the tabs that secure the keyboard to the palm-rest assembly.

  13. Alienware 17 R2 Keyboard Replacement, Lifting the Keyboard: paso 18, imagen 1 de 1
    • Slide and lift the keyboard along with the cables off the palm-rest assembly.

    • Slide the new keyboard under the tabs on the palm-rest assembly.

  14. Alienware 17 R2 Keyboard Replacement, Screw Alignment: paso 20, imagen 1 de 1
    • Align the screw holes on the keyboard with the screw holes on the palm-rest assembly.

    • Replace the screws that secure the keyboard to the palm-rest assembly.

    • Route the keyboard cable, keyboard-backlight cable, marco-keys cable and marco-keys backlight cable through the slots on the keyboard bracket.

    • Align the screw holes on the keyboard bracket with the screw holes on the palm-rest assembly.

  15. Alienware 17 R2 Keyboard Replacement, Replace the Screws: paso 24, imagen 1 de 1
    • Replace the screws that secure the keyboard bracket to the palm-rest assembly.

    • Adhere the touch-pad cable and status-light cable to the keyboard bracket.

    • Slide the touch-pad cable and the status-light cable into their respective connectors on the power-button board and press down the latches to secure the cables.

Conclusión

To reassemble your device, follow these instructions in reverse order.

Terrence15

Miembro Desde 12/18/17

79,121 Reputación

441 Guías creadas

Equipo

RampUP America, Inc. Miembro de RampUP America, Inc.

Community

42 Miembros

1,985 Guías creadas

Un comentario

I find it concerning that this guide has you disconnect and reconnect the battery prior to doing anything with the keyboard.

Sean Hanson - Contestar

Agregar Comentario

Ver Estadísticas:

Ultimas 24 horas: 2

Ultimos 7 días: 10

Ultimos 30 días: 21

Todo El Tiempo: 2,014