Saltar al contenido principal

Air Hog Smash Bots Radio Receiver Replacement

Qué necesitas

  1. Air Hog Smash Bots Radio Receiver Replacement, Batteries: paso 1, imagen 1 de 1
    • Using the Phillips #0 screwdriver to remove the 8 mm screw.

  2. Air Hog Smash Bots Radio Receiver Replacement: paso 2, imagen 1 de 1
    • Lift and slide the batter cover away from the tab holding it in place at the bottom.

  3. Air Hog Smash Bots Radio Receiver Replacement: paso 3, imagen 1 de 1
    • Remove the 3 AAA batteries.

  4. Air Hog Smash Bots Radio Receiver Replacement, External Casing: paso 4, imagen 1 de 2 Air Hog Smash Bots Radio Receiver Replacement, External Casing: paso 4, imagen 2 de 2
    • Using a Phillip #0 screwdriver to remove the eight 8 mm screws.

  5. Air Hog Smash Bots Radio Receiver Replacement: paso 5, imagen 1 de 2 Air Hog Smash Bots Radio Receiver Replacement: paso 5, imagen 2 de 2
    • Remove the upper armor of the Smash Bot.

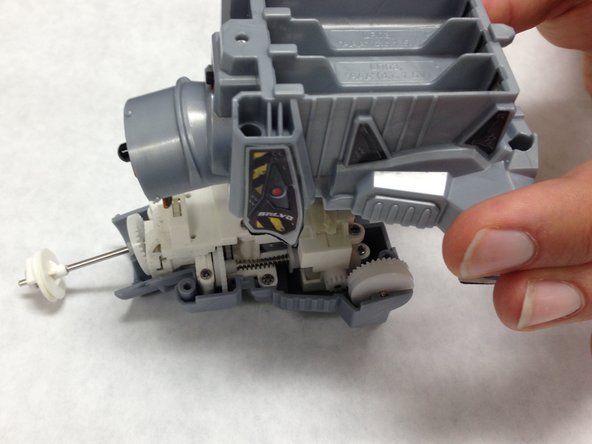
  6. Air Hog Smash Bots Radio Receiver Replacement: paso 6, imagen 1 de 1
    • Hold the upper body and slide out the bottom half of the Smash Bot.

    • The motor extends from the lower-body into the upper-body. Be careful to not damage the motor.

  7. Air Hog Smash Bots Radio Receiver Replacement: paso 7, imagen 1 de 1
    • Peel back the four decal stickers that hold the front and back of the bot together.

  8. Air Hog Smash Bots Radio Receiver Replacement: paso 8, imagen 1 de 2 Air Hog Smash Bots Radio Receiver Replacement: paso 8, imagen 2 de 2
    • Use the plastic opening tool to pry the front and back of the lower body apart.

    • Carefully remove the back of the bot from the front.

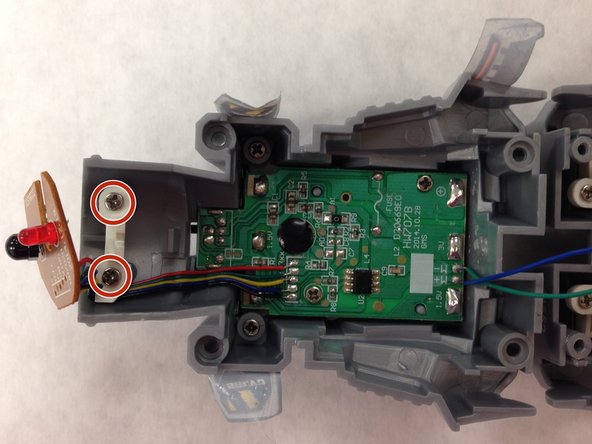
  9. Air Hog Smash Bots Radio Receiver Replacement, Radio Receiver: paso 9, imagen 1 de 2 Air Hog Smash Bots Radio Receiver Replacement, Radio Receiver: paso 9, imagen 2 de 2
    • Use the Phillips 0 screwdriver to remove two 4.75mm screws.

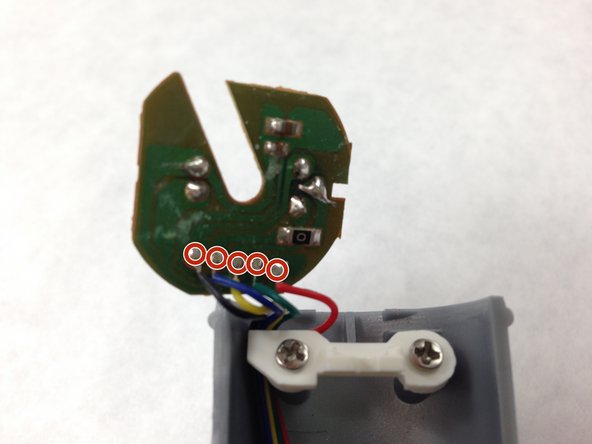
  10. Air Hog Smash Bots Radio Receiver Replacement: paso 10, imagen 1 de 2 Air Hog Smash Bots Radio Receiver Replacement: paso 10, imagen 2 de 2
    • Use the soldering workstation to remove the five wires. Directions on how to solder can be found here.

Conclusión

To reassemble your device, follow these instructions in reverse order.

Una persona más ha completado esta guía.

Equipo

IUPUI, Team 1-1, Baechle Spring 2016 Miembro de IUPUI, Team 1-1, Baechle Spring 2016

IUPUI-BAECHLE-S16S1G1

4 Miembros

14 Guías creadas

0 comentarios

Agregar Comentario

Ver Estadísticas:

Ultimas 24 horas: 0

Ultimos 7 días: 2

Ultimos 30 días: 2

Todo El Tiempo: 276