Saltar al contenido principal

Acer Spin 5 SP515-51GN-807G Wireless (WiFi) Card Replacement

Qué necesitas

  1. Acer Spin 5 SP515-51GN-807G Wireless (WiFi) Card Replacement, Battery: paso 1, imagen 1 de 3 Acer Spin 5 SP515-51GN-807G Wireless (WiFi) Card Replacement, Battery: paso 1, imagen 2 de 3 Acer Spin 5 SP515-51GN-807G Wireless (WiFi) Card Replacement, Battery: paso 1, imagen 3 de 3
    • Using tweezers, remove the piece of black tape over the battery cable connector.

  2. Acer Spin 5 SP515-51GN-807G Wireless (WiFi) Card Replacement: paso 2, imagen 1 de 3 Acer Spin 5 SP515-51GN-807G Wireless (WiFi) Card Replacement: paso 2, imagen 2 de 3 Acer Spin 5 SP515-51GN-807G Wireless (WiFi) Card Replacement: paso 2, imagen 3 de 3
    • Remove the piece of black tape that covers the battery.

  3. Acer Spin 5 SP515-51GN-807G Wireless (WiFi) Card Replacement: paso 3, imagen 1 de 2 Acer Spin 5 SP515-51GN-807G Wireless (WiFi) Card Replacement: paso 3, imagen 2 de 2
    • Grip the battery cable on both sides with your fingertips and gently pull it away from the port.

    • If needed, use the plastic opening tool to remove the cord from its port.

  4. Acer Spin 5 SP515-51GN-807G Wireless (WiFi) Card Replacement: paso 4, imagen 1 de 3 Acer Spin 5 SP515-51GN-807G Wireless (WiFi) Card Replacement: paso 4, imagen 2 de 3 Acer Spin 5 SP515-51GN-807G Wireless (WiFi) Card Replacement: paso 4, imagen 3 de 3
    • Remove the two 3.5 mm screws that secure the battery using a Phillips #00 screwdriver (PH00 bit).

  5. Acer Spin 5 SP515-51GN-807G Wireless (WiFi) Card Replacement: paso 5, imagen 1 de 2 Acer Spin 5 SP515-51GN-807G Wireless (WiFi) Card Replacement: paso 5, imagen 2 de 2
    • Carefully place your fingers under the plastic lip where the screws were removed.

    • Lift upwards to remove the battery.

    • Do not bend or puncture the lithium ion battery as it poses a fire hazard.

  6. Acer Spin 5 SP515-51GN-807G Wireless (WiFi) Card Replacement, Wireless (WiFi) Card: paso 6, imagen 1 de 3 Acer Spin 5 SP515-51GN-807G Wireless (WiFi) Card Replacement, Wireless (WiFi) Card: paso 6, imagen 2 de 3 Acer Spin 5 SP515-51GN-807G Wireless (WiFi) Card Replacement, Wireless (WiFi) Card: paso 6, imagen 3 de 3
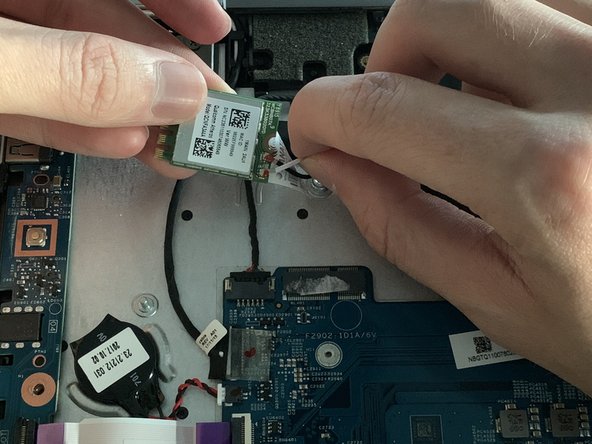
    • Using tweezers, remove the sticker that covers the connection between the wireless card and motherboard.

  7. Acer Spin 5 SP515-51GN-807G Wireless (WiFi) Card Replacement: paso 7, imagen 1 de 2 Acer Spin 5 SP515-51GN-807G Wireless (WiFi) Card Replacement: paso 7, imagen 2 de 2
    • Remove the 6.5 mm screw that secures the wireless card using a Phillips #00 screwdriver (PH00 bit).

  8. Acer Spin 5 SP515-51GN-807G Wireless (WiFi) Card Replacement: paso 8, imagen 1 de 2 Acer Spin 5 SP515-51GN-807G Wireless (WiFi) Card Replacement: paso 8, imagen 2 de 2
    • Gently pull the wireless card away from the motherboard.

  9. Acer Spin 5 SP515-51GN-807G Wireless (WiFi) Card Replacement: paso 9, imagen 1 de 3 Acer Spin 5 SP515-51GN-807G Wireless (WiFi) Card Replacement: paso 9, imagen 2 de 3 Acer Spin 5 SP515-51GN-807G Wireless (WiFi) Card Replacement: paso 9, imagen 3 de 3
    • Using your fingers, carefully pull the white wire upwards, removing it from the terminal of the wireless card.

  10. Acer Spin 5 SP515-51GN-807G Wireless (WiFi) Card Replacement: paso 10, imagen 1 de 2 Acer Spin 5 SP515-51GN-807G Wireless (WiFi) Card Replacement: paso 10, imagen 2 de 2
    • Repeat the previous step but this time for the black wire.

  11. Acer Spin 5 SP515-51GN-807G Wireless (WiFi) Card Replacement: paso 11, imagen 1 de 2 Acer Spin 5 SP515-51GN-807G Wireless (WiFi) Card Replacement: paso 11, imagen 2 de 2
    • Remove the wireless (WiFi) card from the laptop.

Conclusión

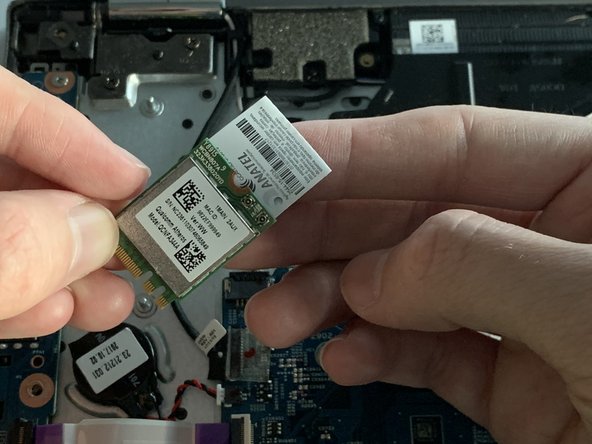
To reassemble your device, follow these instructions in reverse order.

0 comentarios

Agregar Comentario

Ver Estadísticas:

Ultimas 24 horas: 4

Ultimos 7 días: 6

Ultimos 30 días: 22

Todo El Tiempo: 1,457