Saltar al contenido principal

Acer Spin 5 SP515-51GN-807G Side Port and Button Replacement

Qué necesitas

  1. Acer Spin 5 SP515-51GN-807G Side Port and Button Replacement, Back Cover: paso 1, imagen 1 de 1
    • Remove the eleven 6.5 mm screws that secure the back case using a Phillips #1 screwdriver.

  2. Acer Spin 5 SP515-51GN-807G Side Port and Button Replacement: paso 2, imagen 1 de 3 Acer Spin 5 SP515-51GN-807G Side Port and Button Replacement: paso 2, imagen 2 de 3 Acer Spin 5 SP515-51GN-807G Side Port and Button Replacement: paso 2, imagen 3 de 3
    • Use a plastic opening tool to gently pry open the back cover.

  3. Acer Spin 5 SP515-51GN-807G Side Port and Button Replacement: paso 3, imagen 1 de 1
    • Gently remove the back cover from the device.

  4. Acer Spin 5 SP515-51GN-807G Side Port and Button Replacement, Battery: paso 4, imagen 1 de 3 Acer Spin 5 SP515-51GN-807G Side Port and Button Replacement, Battery: paso 4, imagen 2 de 3 Acer Spin 5 SP515-51GN-807G Side Port and Button Replacement, Battery: paso 4, imagen 3 de 3
    • Using tweezers, remove the piece of black tape over the battery cable connector.

  5. Acer Spin 5 SP515-51GN-807G Side Port and Button Replacement: paso 5, imagen 1 de 3 Acer Spin 5 SP515-51GN-807G Side Port and Button Replacement: paso 5, imagen 2 de 3 Acer Spin 5 SP515-51GN-807G Side Port and Button Replacement: paso 5, imagen 3 de 3
    • Remove the piece of black tape that covers the battery.

  6. Acer Spin 5 SP515-51GN-807G Side Port and Button Replacement: paso 6, imagen 1 de 2 Acer Spin 5 SP515-51GN-807G Side Port and Button Replacement: paso 6, imagen 2 de 2
    • Grip the battery cable on both sides with your fingertips and gently pull it away from the port.

    • If needed, use the plastic opening tool to remove the cord from its port.

  7. Acer Spin 5 SP515-51GN-807G Side Port and Button Replacement: paso 7, imagen 1 de 3 Acer Spin 5 SP515-51GN-807G Side Port and Button Replacement: paso 7, imagen 2 de 3 Acer Spin 5 SP515-51GN-807G Side Port and Button Replacement: paso 7, imagen 3 de 3
    • Remove the two 3.5 mm screws that secure the battery using a Phillips #00 screwdriver (PH00 bit).

  8. Acer Spin 5 SP515-51GN-807G Side Port and Button Replacement: paso 8, imagen 1 de 2 Acer Spin 5 SP515-51GN-807G Side Port and Button Replacement: paso 8, imagen 2 de 2
    • Carefully place your fingers under the plastic lip where the screws were removed.

    • Lift upwards to remove the battery.

    • Do not bend or puncture the lithium ion battery as it poses a fire hazard.

  9. Acer Spin 5 SP515-51GN-807G Side Port and Button Replacement, Side Ports and Buttons: paso 9, imagen 1 de 3 Acer Spin 5 SP515-51GN-807G Side Port and Button Replacement, Side Ports and Buttons: paso 9, imagen 2 de 3 Acer Spin 5 SP515-51GN-807G Side Port and Button Replacement, Side Ports and Buttons: paso 9, imagen 3 de 3
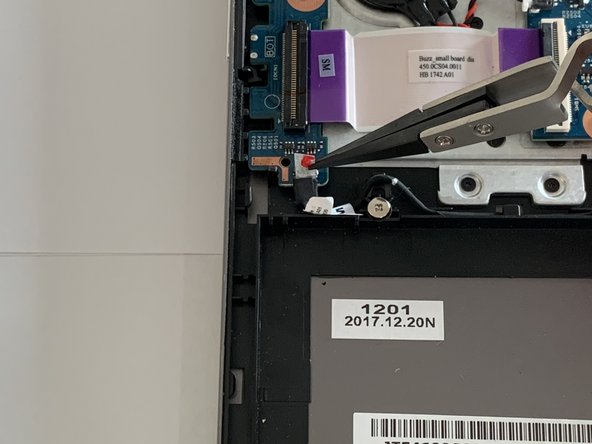
    • Using tweezers, carefully grip the sensor cable by the white and red tab.

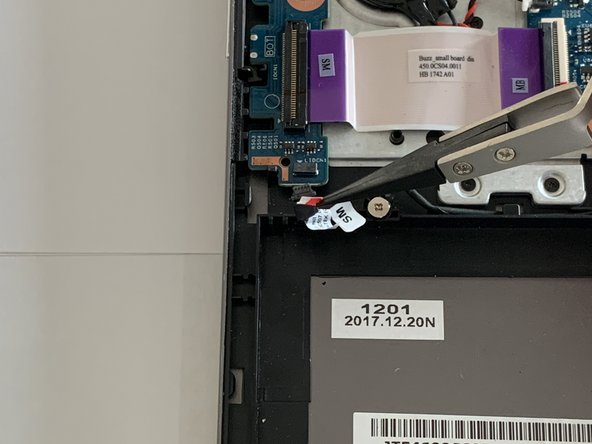
    • Using gentle pressure, remove the cable from its connection by pulling outward.

  10. Acer Spin 5 SP515-51GN-807G Side Port and Button Replacement: paso 10, imagen 1 de 3 Acer Spin 5 SP515-51GN-807G Side Port and Button Replacement: paso 10, imagen 2 de 3 Acer Spin 5 SP515-51GN-807G Side Port and Button Replacement: paso 10, imagen 3 de 3
    • Place your fingernail underneath the locking black tab of the ZIF connector on the USB/Side Port Board and pry it upwards to release the cable.

  11. Acer Spin 5 SP515-51GN-807G Side Port and Button Replacement: paso 11, imagen 1 de 2 Acer Spin 5 SP515-51GN-807G Side Port and Button Replacement: paso 11, imagen 2 de 2
    • Remove the ribbon interconnect cable from the connector.

  12. Acer Spin 5 SP515-51GN-807G Side Port and Button Replacement: paso 12, imagen 1 de 2 Acer Spin 5 SP515-51GN-807G Side Port and Button Replacement: paso 12, imagen 2 de 2
    • Remove the two 3.5mm screws that secure the side ports using a Phillips #00 screwdriver (PH00 bit).

  13. Acer Spin 5 SP515-51GN-807G Side Port and Button Replacement: paso 13, imagen 1 de 3 Acer Spin 5 SP515-51GN-807G Side Port and Button Replacement: paso 13, imagen 2 de 3 Acer Spin 5 SP515-51GN-807G Side Port and Button Replacement: paso 13, imagen 3 de 3
    • Using tweezers, gently grip the middle of the board that contains the side ports and carefully pull out to remove it.

Conclusión

To reassemble your device, follow these instructions in reverse order.

0 comentarios

Agregar Comentario

Ver Estadísticas:

Ultimas 24 horas: 0

Ultimos 7 días: 1

Ultimos 30 días: 5

Todo El Tiempo: 1,324