Saltar al contenido principal

Acer Spin 3 SP315-51-757C Keyboard Replacement

Qué necesitas

  1. Acer Spin 3 SP315-51-757C Keyboard Replacement, Back Panel: paso 1, imagen 1 de 2 Acer Spin 3 SP315-51-757C Keyboard Replacement, Back Panel: paso 1, imagen 2 de 2
    • Remove eleven Phillips #0 screws from the back panel.

  2. Acer Spin 3 SP315-51-757C Keyboard Replacement: paso 2, imagen 1 de 3 Acer Spin 3 SP315-51-757C Keyboard Replacement: paso 2, imagen 2 de 3 Acer Spin 3 SP315-51-757C Keyboard Replacement: paso 2, imagen 3 de 3
    • Using an opening tool, pry open the back panel, starting at the silver screen hinges.

    • You may need to apply more force than usual. If you don't find any success at the hinges, you can try to start at another area that looks easier to open.

    • You can also use some plastic opening picks to help hold parts of the panel open while you work on other sides.

  3. Acer Spin 3 SP315-51-757C Keyboard Replacement: paso 3, imagen 1 de 1
    • Lift the back panel off of the laptop.

  4. Acer Spin 3 SP315-51-757C Keyboard Replacement, Battery: paso 4, imagen 1 de 2 Acer Spin 3 SP315-51-757C Keyboard Replacement, Battery: paso 4, imagen 2 de 2
    • Remove the two Phillips #0 screws holding the battery inside the laptop case.

  5. Acer Spin 3 SP315-51-757C Keyboard Replacement: paso 5, imagen 1 de 3 Acer Spin 3 SP315-51-757C Keyboard Replacement: paso 5, imagen 2 de 3 Acer Spin 3 SP315-51-757C Keyboard Replacement: paso 5, imagen 3 de 3
    Herramienta utilizada en este paso:
    Tweezers
    $4.99
    Comprar
    • Using either your hands or a pair of tweezers, carefully pull the battery's cable out of its motherboard port.

  6. Acer Spin 3 SP315-51-757C Keyboard Replacement: paso 6, imagen 1 de 1
    • Using your hands, lift up on the battery from its slot, and carefully slide it away from you before fully lifting it out of the case.

  7. Acer Spin 3 SP315-51-757C Keyboard Replacement, Hard Drive: paso 7, imagen 1 de 2 Acer Spin 3 SP315-51-757C Keyboard Replacement, Hard Drive: paso 7, imagen 2 de 2
    • Loosen the single Phillips #0 screw holding the hard drive in place.

  8. Acer Spin 3 SP315-51-757C Keyboard Replacement: paso 8, imagen 1 de 2 Acer Spin 3 SP315-51-757C Keyboard Replacement: paso 8, imagen 2 de 2
    • Gently lift the closer side of the hard drive out of its slot.

    • Make sure not to pull too hard on the cables plugged into the motherboard.

  9. Acer Spin 3 SP315-51-757C Keyboard Replacement: paso 9, imagen 1 de 1
    • Carefully unplug the cable connected to the side of the hard drive.

  10. Acer Spin 3 SP315-51-757C Keyboard Replacement: paso 10, imagen 1 de 2 Acer Spin 3 SP315-51-757C Keyboard Replacement: paso 10, imagen 2 de 2
    • Remove each rubber edge from the hard drive, and reassemble with a new hard drive.

  11. Acer Spin 3 SP315-51-757C Keyboard Replacement, Charger Port: paso 11, imagen 1 de 1
    Herramienta utilizada en este paso:
    Tweezers
    $4.99
    Comprar
    • The charger port's inner cable may be covered by a manufacturer sticker, which can be easily removed.

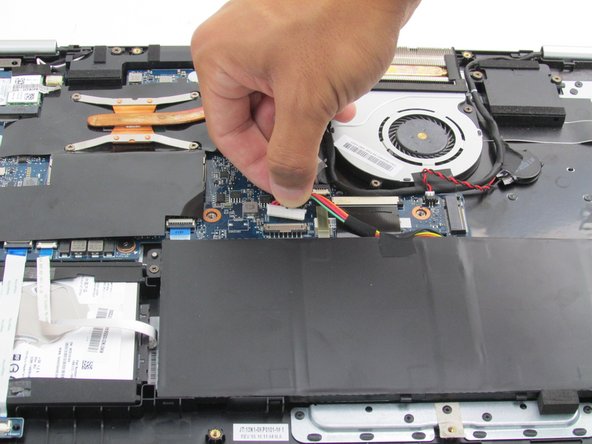
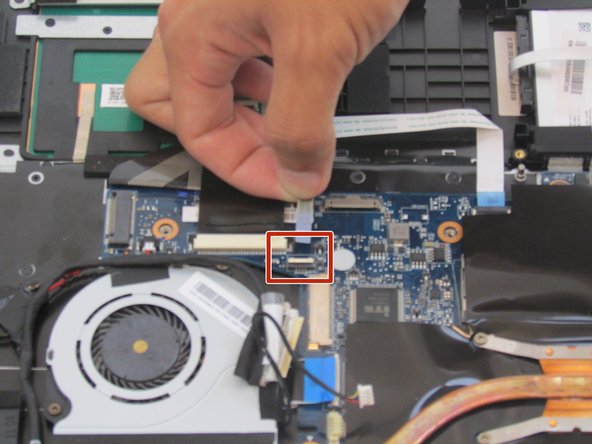
    • Using your nails or tweezers, unplug the charger port cable from the motherboard.

  12. Acer Spin 3 SP315-51-757C Keyboard Replacement: paso 12, imagen 1 de 1
    • Gently lift the charger port out of its slot in the laptop casing.

  13. Acer Spin 3 SP315-51-757C Keyboard Replacement, Motherboard: paso 13, imagen 1 de 2 Acer Spin 3 SP315-51-757C Keyboard Replacement, Motherboard: paso 13, imagen 2 de 2
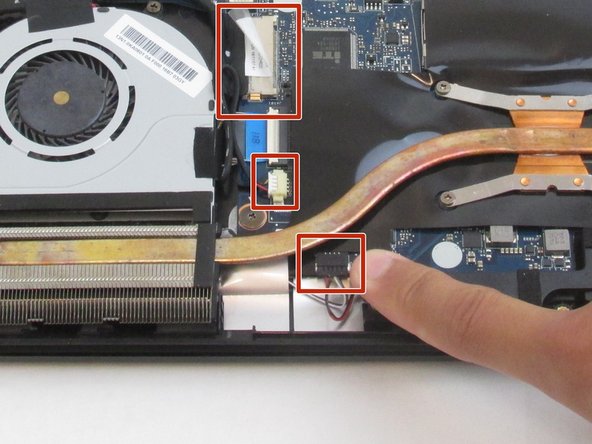
    • Lift the three black tabs to release the cable connectors.

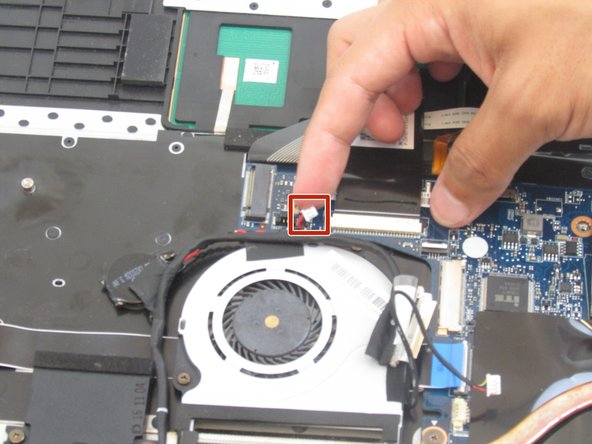
    • After the tabs are lifted, the white cables with blue ends can be pulled out of their slots.

  14. Acer Spin 3 SP315-51-757C Keyboard Replacement: paso 14, imagen 1 de 3 Acer Spin 3 SP315-51-757C Keyboard Replacement: paso 14, imagen 2 de 3 Acer Spin 3 SP315-51-757C Keyboard Replacement: paso 14, imagen 3 de 3
    • Remove the cables near the fan by pulling them carefully out of their slots.

  15. Acer Spin 3 SP315-51-757C Keyboard Replacement: paso 15, imagen 1 de 3 Acer Spin 3 SP315-51-757C Keyboard Replacement: paso 15, imagen 2 de 3 Acer Spin 3 SP315-51-757C Keyboard Replacement: paso 15, imagen 3 de 3
    • Remove the single Phillips #0 screw.

    • Unplug the speaker cable.

    • Unplug the secondary speaker cable.

  16. Acer Spin 3 SP315-51-757C Keyboard Replacement: paso 16, imagen 1 de 3 Acer Spin 3 SP315-51-757C Keyboard Replacement: paso 16, imagen 2 de 3 Acer Spin 3 SP315-51-757C Keyboard Replacement: paso 16, imagen 3 de 3
    • Remove the three Phillips #0 screws attached to the motherboard.

  17. Acer Spin 3 SP315-51-757C Keyboard Replacement: paso 17, imagen 1 de 2 Acer Spin 3 SP315-51-757C Keyboard Replacement: paso 17, imagen 2 de 2
    • Use a Phillips #0 screwdriver to remove four screws from the heat sink.

    • Carefully slide the motherboard from under the heat sink (it is easiest to slide the motherboard to the right).

  18. Acer Spin 3 SP315-51-757C Keyboard Replacement, Keyboard: paso 18, imagen 1 de 1
    • Remove the plastic rivets individually using a spudger.

  19. Acer Spin 3 SP315-51-757C Keyboard Replacement: paso 19, imagen 1 de 1
    • Swipe a spudger underneath keyboard to unlock it from its frame.

  20. Acer Spin 3 SP315-51-757C Keyboard Replacement: paso 20, imagen 1 de 1
    • Use the spudger to pry the keyboard up and away from the laptop.

Conclusión

To reassemble your device, follow these instructions in reverse order.

Devan Vaghela

Miembro Desde 02/08/24

97 Reputación

1 Guía escrita

0 comentarios

Agregar Comentario

Ver Estadísticas:

Ultimas 24 horas: 4

Ultimos 7 días: 6

Ultimos 30 días: 11

Todo El Tiempo: 25