Saltar al contenido principal

Acer Nitro 5 AN515-55-55M1 Motherboard Replacement

Qué necesitas

  1. Acer Nitro 5 AN515-55-55M1 Motherboard Replacement, Bottom Cover: paso 1, imagen 1 de 1
    • Make sure the device is off and unplugged from power.

    • Flip the device so the bottom is facing up.

    • Remove 11 screws from the bottom case using a Phillips #1 screwdriver.

  2. Acer Nitro 5 AN515-55-55M1 Motherboard Replacement: paso 2, imagen 1 de 2 Acer Nitro 5 AN515-55-55M1 Motherboard Replacement: paso 2, imagen 2 de 2
    • Lift the top left and right corners up and away from the device.

    • This may require some force and will make harsh clicking sounds. This is normal; it's the plastic tabs separating from each other.

    • Remove the panel from the laptop.

  3. Acer Nitro 5 AN515-55-55M1 Motherboard Replacement, Battery: paso 3, imagen 1 de 3 Acer Nitro 5 AN515-55-55M1 Motherboard Replacement, Battery: paso 3, imagen 2 de 3 Acer Nitro 5 AN515-55-55M1 Motherboard Replacement, Battery: paso 3, imagen 3 de 3
    • Use an opening tool to disconnect the battery from the motherboard.

  4. Acer Nitro 5 AN515-55-55M1 Motherboard Replacement: paso 4, imagen 1 de 2 Acer Nitro 5 AN515-55-55M1 Motherboard Replacement: paso 4, imagen 2 de 2
    • Remove the two screws from the battery with a Phillips #1 screwdriver.

    • Remove the battery by pulling up and out from the left side.

  5. Acer Nitro 5 AN515-55-55M1 Motherboard Replacement, Motherboard: paso 5, imagen 1 de 3 Acer Nitro 5 AN515-55-55M1 Motherboard Replacement, Motherboard: paso 5, imagen 2 de 3 Acer Nitro 5 AN515-55-55M1 Motherboard Replacement, Motherboard: paso 5, imagen 3 de 3
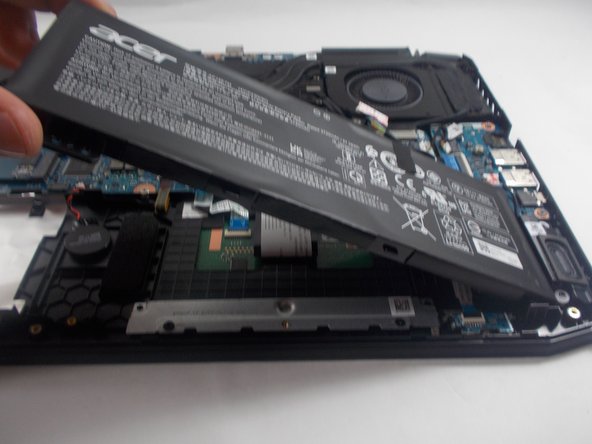
    • Disconnect the seven cables from the motherboard using an iFixit opening tool.

  6. Acer Nitro 5 AN515-55-55M1 Motherboard Replacement: paso 6, imagen 1 de 3 Acer Nitro 5 AN515-55-55M1 Motherboard Replacement: paso 6, imagen 2 de 3 Acer Nitro 5 AN515-55-55M1 Motherboard Replacement: paso 6, imagen 3 de 3
    • Use an iFixit opening tool to lift the two Wi-Fi antenna cables up and away from the Wi-Fi card.

  7. Acer Nitro 5 AN515-55-55M1 Motherboard Replacement: paso 7, imagen 1 de 3 Acer Nitro 5 AN515-55-55M1 Motherboard Replacement: paso 7, imagen 2 de 3 Acer Nitro 5 AN515-55-55M1 Motherboard Replacement: paso 7, imagen 3 de 3
    • Remove the six screws surrounding the fan using a Phillips #1 screwdriver.

    • Remove the two shorter screws from the motherboard using a Phillips #1 screwdriver.

    • Lift the taped wires off of the fans on the right and left sides.

  8. Acer Nitro 5 AN515-55-55M1 Motherboard Replacement: paso 8, imagen 1 de 3 Acer Nitro 5 AN515-55-55M1 Motherboard Replacement: paso 8, imagen 2 de 3 Acer Nitro 5 AN515-55-55M1 Motherboard Replacement: paso 8, imagen 3 de 3
    • Lift up the right side of the motherboard.

    • The cables may need some guidance to leave the management holes on the motherboard.

    • Continue to lift at an angle until there is a give.

    • Remove the motherboard and fans from the laptop.

Conclusión

To reassemble your device, follow these instructions in reverse order.

Una persona más ha completado esta guía.

Samuel Rouillard

Miembro Desde 03/30/21

674 Reputación

5 Guías creadas

Equipo

Un comentario

Where would I go to buy a new motherboard and display?

David Nguyen - Contestar

Agregar Comentario

Ver Estadísticas:

Ultimas 24 horas: 5

Ultimos 7 días: 24

Ultimos 30 días: 136

Todo El Tiempo: 5,324