Saltar al contenido principal

Esta guía ha sufrido modificaciones. Revisa la última versión sin revisar.

Acer Iconia Tab A200 Speaker Replacement

Qué necesitas

  1. Acer Iconia Tab A200 Speaker Replacement, Battery: paso 1, imagen 1 de 2 Acer Iconia Tab A200 Speaker Replacement, Battery: paso 1, imagen 2 de 2
    • With the plastic opening tool pry open the grey plastic siding on both sides of the tablet.

  2. Acer Iconia Tab A200 Speaker Replacement: paso 2, imagen 1 de 2 Acer Iconia Tab A200 Speaker Replacement: paso 2, imagen 2 de 2
    • Using a Phillips #00 screwdriver remove the 4.0 mm screws on the sides of the tablet.

    • There are two screws on each side of the tablet that need to be removed before the back casing can be removed.

  3. Acer Iconia Tab A200 Speaker Replacement: paso 3, imagen 1 de 2 Acer Iconia Tab A200 Speaker Replacement: paso 3, imagen 2 de 2
    • Once the 4 screws have been removed use the plastic opening tool to pry open the device on the side of the device.

    • Be careful prying on the sides where you removed the screw as the plastic casing is not very strong and may break.

    • After prying open the case with the plastic opening tool carefully remove the case from the device and place the device face down on its screen.

  4. Acer Iconia Tab A200 Speaker Replacement: paso 4, imagen 1 de 2 Acer Iconia Tab A200 Speaker Replacement: paso 4, imagen 2 de 2
    • Using a Phillips #00 screwdriver remove the 4.0 mm screws holding the battery in place.

  5. Acer Iconia Tab A200 Speaker Replacement: paso 5, imagen 1 de 2 Acer Iconia Tab A200 Speaker Replacement: paso 5, imagen 2 de 2
    • Lift the battery out of the device, and disconnect the cable attached to the motherboard by pulling it out to the side not lifting it up.

  6. Acer Iconia Tab A200 Speaker Replacement, Speaker: paso 6, imagen 1 de 2 Acer Iconia Tab A200 Speaker Replacement, Speaker: paso 6, imagen 2 de 2
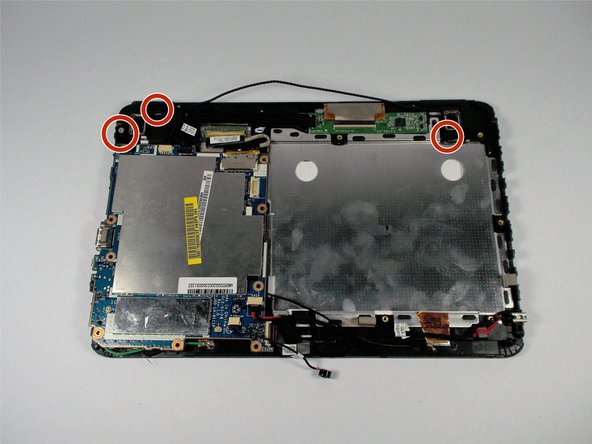
    • After removing the battery use a Phillips head #00 screwdriver to remove the 3.0 mm screws holding the dual speakers in place.

  7. Acer Iconia Tab A200 Speaker Replacement: paso 7, imagen 1 de 1
    • Once the screws are removed, lift up on the speakers to remove them from the case.

  8. Acer Iconia Tab A200 Speaker Replacement: paso 8, imagen 1 de 1
    • Once you have removed the speakers from the case, disconnect the speakers from the motherboard by pulling the cable out horizontally. Do not pull up on the cable.

Conclusión

To reassemble your device, follow these instructions in reverse order.

Steve Chiu

Miembro Desde 03/11/16

253 Reputación

2 Guías creadas

Equipo

0 comentarios

Agregar Comentario

Ver Estadísticas:

Ultimas 24 horas: 0

Ultimos 7 días: 0

Ultimos 30 días: 3

Todo El Tiempo: 268