Saltar al contenido principal

Acer Chromebook cb3-532-c47c Keyboard / Palm Rest Replacement

Qué necesitas

  1. Acer Chromebook cb3-532-c47c Keyboard / Palm Rest Replacement, Back Panel: paso 1, imagen 1 de 2 Acer Chromebook cb3-532-c47c Keyboard / Palm Rest Replacement, Back Panel: paso 1, imagen 2 de 2
    • Power off the laptop before beginning the replacement.

    • Using the Phillips #1 screwdriver, remove eighteen 7 mm screws from the back panel of the device.

  2. Acer Chromebook cb3-532-c47c Keyboard / Palm Rest Replacement: paso 2, imagen 1 de 2 Acer Chromebook cb3-532-c47c Keyboard / Palm Rest Replacement: paso 2, imagen 2 de 2
    • Use a plastic opening tool around the edges of the laptop and remove the back panel from the device.

  3. Acer Chromebook cb3-532-c47c Keyboard / Palm Rest Replacement, Remove the battery cable: paso 3, imagen 1 de 1
    • Push on the sides of the connector with a plastic spudger to separate the cable from the motherboard.

  4. Acer Chromebook cb3-532-c47c Keyboard / Palm Rest Replacement, Battery: paso 4, imagen 1 de 2 Acer Chromebook cb3-532-c47c Keyboard / Palm Rest Replacement, Battery: paso 4, imagen 2 de 2
    • Using the Phillips #1 screwdriver, remove the two black 5.5 mm screws securing the battery.

  5. Acer Chromebook cb3-532-c47c Keyboard / Palm Rest Replacement: paso 5, imagen 1 de 1
    • Remove the battery from the laptop.

  6. Acer Chromebook cb3-532-c47c Keyboard / Palm Rest Replacement, Unplug the WiFi Antenna Connectors: paso 6, imagen 1 de 2 Acer Chromebook cb3-532-c47c Keyboard / Palm Rest Replacement, Unplug the WiFi Antenna Connectors: paso 6, imagen 2 de 2
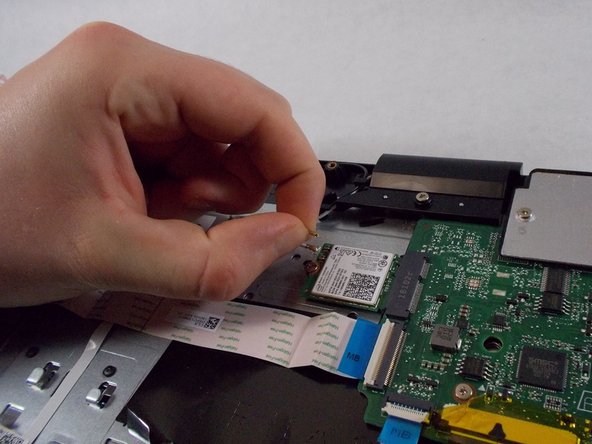
    • Firmly pull the end of the black wire attached to the Wi-Fi card upwards and remove it from the device.

    • Repeat with the white wire.

  7. Acer Chromebook cb3-532-c47c Keyboard / Palm Rest Replacement, Deroute the Black WiFi Wire: paso 7, imagen 1 de 2 Acer Chromebook cb3-532-c47c Keyboard / Palm Rest Replacement, Deroute the Black WiFi Wire: paso 7, imagen 2 de 2
    • Deroute the black wifi wire from its slot in the palm rest.

  8. Acer Chromebook cb3-532-c47c Keyboard / Palm Rest Replacement, Deroute the White WiFi Wire: paso 8, imagen 1 de 2 Acer Chromebook cb3-532-c47c Keyboard / Palm Rest Replacement, Deroute the White WiFi Wire: paso 8, imagen 2 de 2
    • Deroute the white wifi wire from the slot in the palm rest.

  9. Acer Chromebook cb3-532-c47c Keyboard / Palm Rest Replacement, Disconnect the Display Cable: paso 9, imagen 1 de 3 Acer Chromebook cb3-532-c47c Keyboard / Palm Rest Replacement, Disconnect the Display Cable: paso 9, imagen 2 de 3 Acer Chromebook cb3-532-c47c Keyboard / Palm Rest Replacement, Disconnect the Display Cable: paso 9, imagen 3 de 3
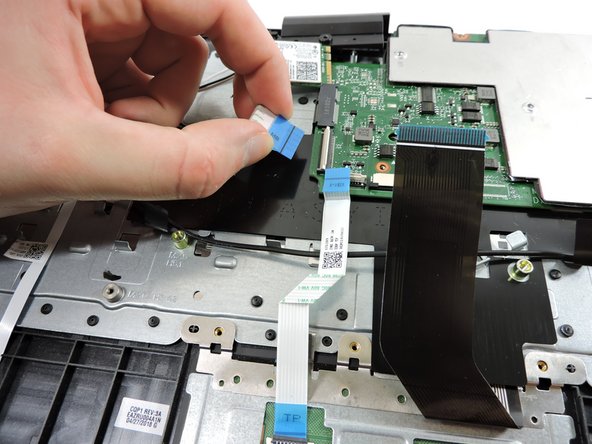
    • Pull the end of the display cable attached to the motherboard straight up to remove.

    • Rotate the cable out away from the motherboard.

  10. Acer Chromebook cb3-532-c47c Keyboard / Palm Rest Replacement, Remove Right Hinge Screws: paso 10, imagen 1 de 1
    • Remove the two screws from the right hinge.

  11. Acer Chromebook cb3-532-c47c Keyboard / Palm Rest Replacement: paso 11, imagen 1 de 2 Acer Chromebook cb3-532-c47c Keyboard / Palm Rest Replacement: paso 11, imagen 2 de 2
    • Insert a screwdriver or spudger under the hinge to get it started then rotate it open by hand as far as possible.

  12. Acer Chromebook cb3-532-c47c Keyboard / Palm Rest Replacement, Remove Left Hinge Screws: paso 12, imagen 1 de 1
    • Remove the two screws from the left hinge.

  13. Acer Chromebook cb3-532-c47c Keyboard / Palm Rest Replacement: paso 13, imagen 1 de 2 Acer Chromebook cb3-532-c47c Keyboard / Palm Rest Replacement: paso 13, imagen 2 de 2
    • Insert a screwdriver or spudger under the hinge to get it started then rotate it open by hand as far as possible.

  14. Acer Chromebook cb3-532-c47c Keyboard / Palm Rest Replacement, Remove the display assembly: paso 14, imagen 1 de 3 Acer Chromebook cb3-532-c47c Keyboard / Palm Rest Replacement, Remove the display assembly: paso 14, imagen 2 de 3 Acer Chromebook cb3-532-c47c Keyboard / Palm Rest Replacement, Remove the display assembly: paso 14, imagen 3 de 3
    • Lift the palm rest assembly from the front then slide it away from the hinges slightly to remove the assembly from the display.

  15. Acer Chromebook cb3-532-c47c Keyboard / Palm Rest Replacement, Touchpad: paso 15, imagen 1 de 2 Acer Chromebook cb3-532-c47c Keyboard / Palm Rest Replacement, Touchpad: paso 15, imagen 2 de 2
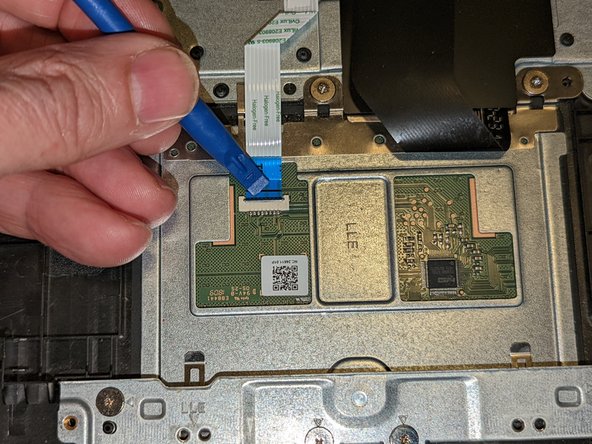
    • Flip up the retaining latch securing the touchpad cable to the motherboard.

  16. Acer Chromebook cb3-532-c47c Keyboard / Palm Rest Replacement: paso 16, imagen 1 de 1
    • Pull the ribbon from the motherboard laterally off the touchpad.

  17. Acer Chromebook cb3-532-c47c Keyboard / Palm Rest Replacement: paso 17, imagen 1 de 1
    • Using the Phillips #1 screwdriver, remove the three 3.2 mm screws holding the touchpad to the laptop.

  18. Acer Chromebook cb3-532-c47c Keyboard / Palm Rest Replacement: paso 18, imagen 1 de 3 Acer Chromebook cb3-532-c47c Keyboard / Palm Rest Replacement: paso 18, imagen 2 de 3 Acer Chromebook cb3-532-c47c Keyboard / Palm Rest Replacement: paso 18, imagen 3 de 3
    • Carefully lift up on the keyboard ribbon cable and the insulating sheet immediately below it so the touchpad can clear them.

    • Lift the touchpad slightly from the top.

    • Pull the touchpad toward the motherboard as you continue to lift it, sliding it out from under the retaining fingers at the bottom.

  19. Acer Chromebook cb3-532-c47c Keyboard / Palm Rest Replacement: paso 19, imagen 1 de 3 Acer Chromebook cb3-532-c47c Keyboard / Palm Rest Replacement: paso 19, imagen 2 de 3 Acer Chromebook cb3-532-c47c Keyboard / Palm Rest Replacement: paso 19, imagen 3 de 3
    • Remove the touchpad.

    • When reinstalling:

    • Make sure the touchpad goes underneath the two retaining fingers when reinstalling it.

    • The touchpad is correctly aligned when the guide pins next to the left and right screws are inserted in the holes.

  20. Acer Chromebook cb3-532-c47c Keyboard / Palm Rest Replacement, Disconnect the Speakers: paso 20, imagen 1 de 2 Acer Chromebook cb3-532-c47c Keyboard / Palm Rest Replacement, Disconnect the Speakers: paso 20, imagen 2 de 2
    • Pull the black ribbon attached to the speakers out of the motherboard.

  21. Acer Chromebook cb3-532-c47c Keyboard / Palm Rest Replacement, Speakers: paso 21, imagen 1 de 1
    • Pry the right speaker up with your hand to remove.

  22. Acer Chromebook cb3-532-c47c Keyboard / Palm Rest Replacement: paso 22, imagen 1 de 2 Acer Chromebook cb3-532-c47c Keyboard / Palm Rest Replacement: paso 22, imagen 2 de 2
    • Thread the speaker under the black ribbon towards the left to allow removal of the left speaker.

  23. Acer Chromebook cb3-532-c47c Keyboard / Palm Rest Replacement: paso 23, imagen 1 de 1
    • Pry up the left speaker to remove it.

    • Remove both speakers.

  24. Acer Chromebook cb3-532-c47c Keyboard / Palm Rest Replacement, Keyboard Cable: paso 24, imagen 1 de 3 Acer Chromebook cb3-532-c47c Keyboard / Palm Rest Replacement, Keyboard Cable: paso 24, imagen 2 de 3 Acer Chromebook cb3-532-c47c Keyboard / Palm Rest Replacement, Keyboard Cable: paso 24, imagen 3 de 3
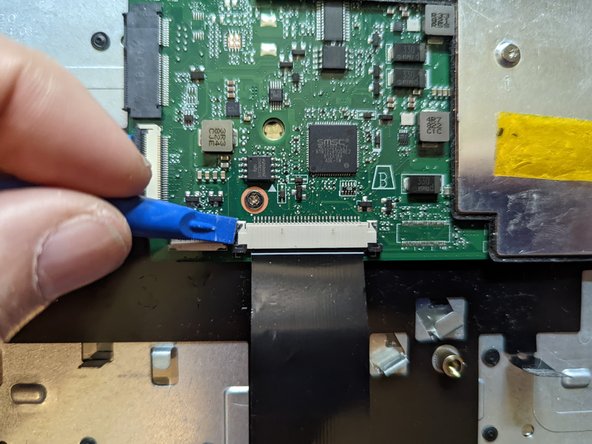
    • Peel the yellow tape off the black keyboard ribbon cable on the motherboard.

    • Use a spudger to slide the black tabs on either side of the connector forward slightly.

    • Pull the black ribbon straight towards you to remove it from the motherboard.

  25. Acer Chromebook cb3-532-c47c Keyboard / Palm Rest Replacement: paso 25, imagen 1 de 3 Acer Chromebook cb3-532-c47c Keyboard / Palm Rest Replacement: paso 25, imagen 2 de 3 Acer Chromebook cb3-532-c47c Keyboard / Palm Rest Replacement: paso 25, imagen 3 de 3
    • Flip up the tabs over the two white ribbons on the left using your finger.

    • For more information on Zero Insertion Force (ZIF) connectors, please visit this guide.

    • Pull the ribbons out of the motherboard by the blue tabs.

  26. Acer Chromebook cb3-532-c47c Keyboard / Palm Rest Replacement: paso 26, imagen 1 de 1
    • Using the Phillips #1 screwdriver, remove four 6 mm screws.

    • Using the same Phillips #1 screwdriver, remove five 3 mm screws securing the metal plate to the motherboard.

  27. Acer Chromebook cb3-532-c47c Keyboard / Palm Rest Replacement, Remove Motherboard: paso 27, imagen 1 de 1
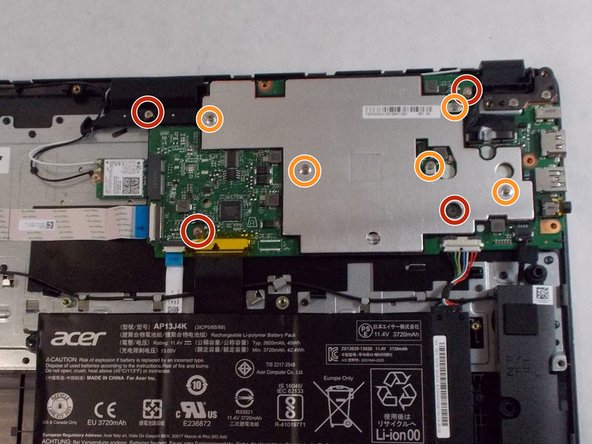
    • Remove the metal plate over the motherboard.

    • Remove the motherboard.

  28. Acer Chromebook cb3-532-c47c Keyboard / Palm Rest Replacement, Remove the LED Cable: paso 28, imagen 1 de 2 Acer Chromebook cb3-532-c47c Keyboard / Palm Rest Replacement, Remove the LED Cable: paso 28, imagen 2 de 2
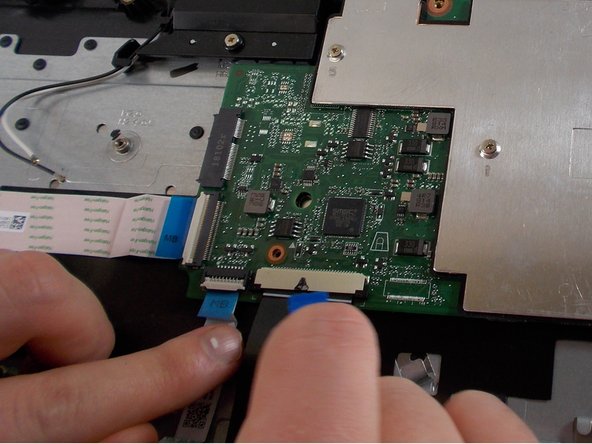
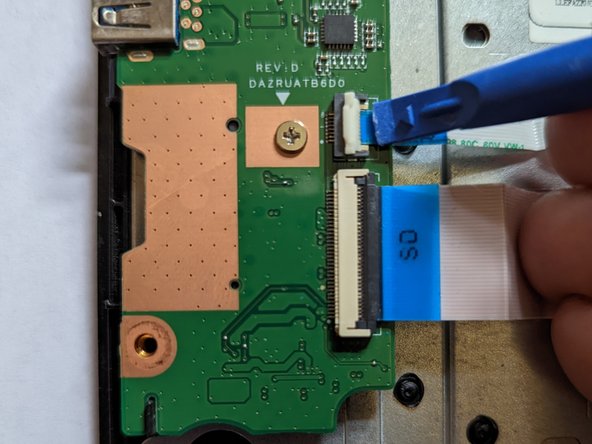
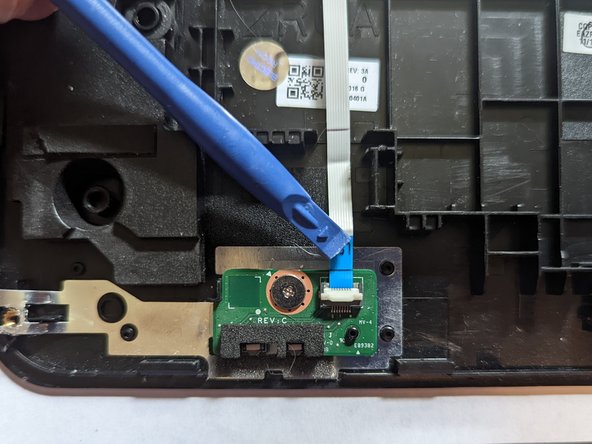
    • Flip up the latch on the cable going from the I/O board to the LED board.

  29. Acer Chromebook cb3-532-c47c Keyboard / Palm Rest Replacement: paso 29, imagen 1 de 2 Acer Chromebook cb3-532-c47c Keyboard / Palm Rest Replacement: paso 29, imagen 2 de 2
    • Grasp the ribbon cable and pull it straight out to the right.

  30. Acer Chromebook cb3-532-c47c Keyboard / Palm Rest Replacement, Remove the Motherboard Cable: paso 30, imagen 1 de 2 Acer Chromebook cb3-532-c47c Keyboard / Palm Rest Replacement, Remove the Motherboard Cable: paso 30, imagen 2 de 2
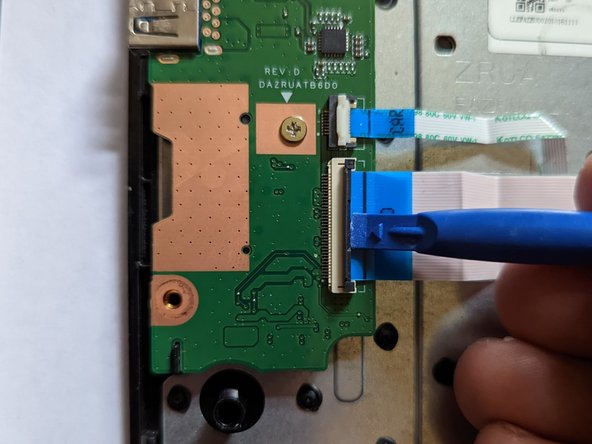
    • Flip up the latch on the cable from the I/O board to the motherboard.

  31. Acer Chromebook cb3-532-c47c Keyboard / Palm Rest Replacement: paso 31, imagen 1 de 2 Acer Chromebook cb3-532-c47c Keyboard / Palm Rest Replacement: paso 31, imagen 2 de 2
    • Grasp the ribbon cable by the blue plastic reinforcement and pull the cable straight out to the right.

  32. Acer Chromebook cb3-532-c47c Keyboard / Palm Rest Replacement, Remove the Retaining Screw: paso 32, imagen 1 de 1
    • Remove the single screw securing the I/O board.

  33. Acer Chromebook cb3-532-c47c Keyboard / Palm Rest Replacement: paso 33, imagen 1 de 1
    • Remove the I/O board.

    • When reinstalling, be sure the hinge goes above the I/O board, not below it.

  34. Acer Chromebook cb3-532-c47c Keyboard / Palm Rest Replacement, Disconnect the LED board: paso 34, imagen 1 de 2 Acer Chromebook cb3-532-c47c Keyboard / Palm Rest Replacement, Disconnect the LED board: paso 34, imagen 2 de 2
    • Flip the retaining latch up with a spudger.

  35. Acer Chromebook cb3-532-c47c Keyboard / Palm Rest Replacement: paso 35, imagen 1 de 2 Acer Chromebook cb3-532-c47c Keyboard / Palm Rest Replacement: paso 35, imagen 2 de 2
    • Pull the cable straight out away from the front of the computer.

  36. Acer Chromebook cb3-532-c47c Keyboard / Palm Rest Replacement, Remove the LED board: paso 36, imagen 1 de 3 Acer Chromebook cb3-532-c47c Keyboard / Palm Rest Replacement, Remove the LED board: paso 36, imagen 2 de 3 Acer Chromebook cb3-532-c47c Keyboard / Palm Rest Replacement, Remove the LED board: paso 36, imagen 3 de 3
    • Remove the single retaining screw securing the LED board.

    • Remove the board.

    • When reassembling, ensure the board is seated on the guide pin before reinstalling the retaining screw.

  37. Acer Chromebook cb3-532-c47c Keyboard / Palm Rest Replacement, Remove the I/O board cable: paso 37, imagen 1 de 3 Acer Chromebook cb3-532-c47c Keyboard / Palm Rest Replacement, Remove the I/O board cable: paso 37, imagen 2 de 3 Acer Chromebook cb3-532-c47c Keyboard / Palm Rest Replacement, Remove the I/O board cable: paso 37, imagen 3 de 3
    • The cable between the I/O board and the motherboard is lightly adhered to the plastic insulator on the keyboard. Pull up from the right to free the cable from the adhesive.

  38. Acer Chromebook cb3-532-c47c Keyboard / Palm Rest Replacement, Remove the LED cable: paso 38, imagen 1 de 2 Acer Chromebook cb3-532-c47c Keyboard / Palm Rest Replacement, Remove the LED cable: paso 38, imagen 2 de 2
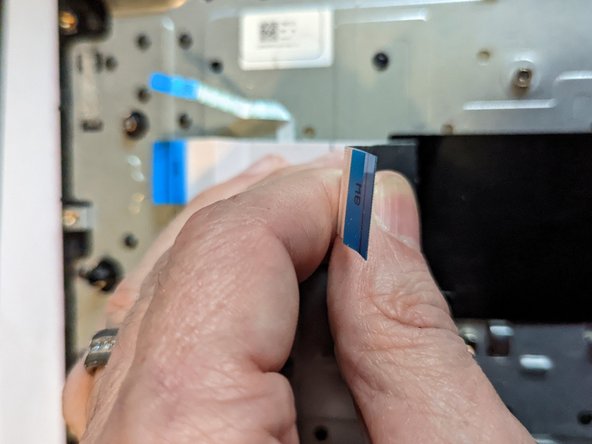
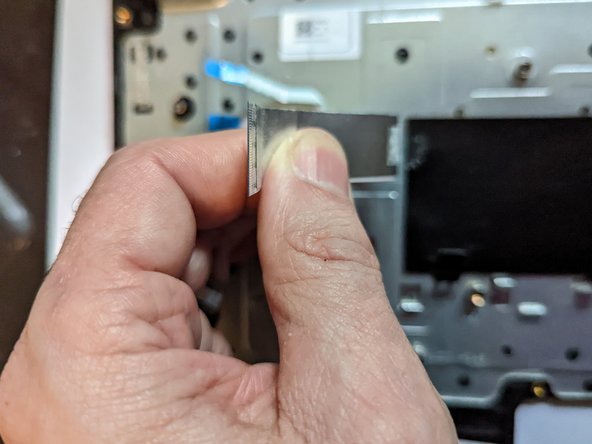
    • The LED cable runs from the LED board to the I/O daughter card. It is lightly adhered to the keyboard. Remove it by gently pulling it away from the keyboard.

  39. Acer Chromebook cb3-532-c47c Keyboard / Palm Rest Replacement, Keyboard has been removed: paso 39, imagen 1 de 1
    • All components have now been removed from the keyboard / palm rest assembly.

Conclusión

To reassemble your device, follow these instructions in reverse order.

Jerry Wheeler

Miembro Desde 03/21/22

58,488 Reputación

69 Guías creadas

Equipo

Oregonians Miembro de Oregonians

Community

8 Miembros

176 Guías creadas

0 comentarios

Agregar Comentario

Ver Estadísticas:

Ultimas 24 horas: 1

Ultimos 7 días: 3

Ultimos 30 días: 7

Todo El Tiempo: 216