Saltar al contenido principal

Acer Chromebook Spin 15 CP315-1H-P1K8 Display Screen Replacement

Qué necesitas

  1. Acer Chromebook Spin 15 CP315-1H-P1K8 Display Screen Replacement, Back Cover: paso 1, imagen 1 de 2 Acer Chromebook Spin 15 CP315-1H-P1K8 Display Screen Replacement, Back Cover: paso 1, imagen 2 de 2
    • Make sure the device is fully powered off.

    • Flip the computer over so that the back is facing up.

    • Remove the twelve 6mm Phillips #1 screws from the bottom of the laptop.

  2. Acer Chromebook Spin 15 CP315-1H-P1K8 Display Screen Replacement: paso 2, imagen 1 de 3 Acer Chromebook Spin 15 CP315-1H-P1K8 Display Screen Replacement: paso 2, imagen 2 de 3 Acer Chromebook Spin 15 CP315-1H-P1K8 Display Screen Replacement: paso 2, imagen 3 de 3
    • Use the iFixit opening tools as wedges to pry the back of the laptop off.

    • Go slow, making sure not to snap the plastic. With enough of a gap made, you can use your hand to finish taking off the back.

  3. Acer Chromebook Spin 15 CP315-1H-P1K8 Display Screen Replacement, Display Screen: paso 3, imagen 1 de 2 Acer Chromebook Spin 15 CP315-1H-P1K8 Display Screen Replacement, Display Screen: paso 3, imagen 2 de 2
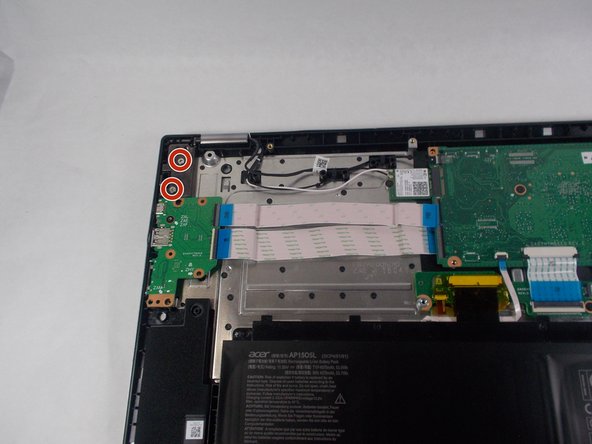
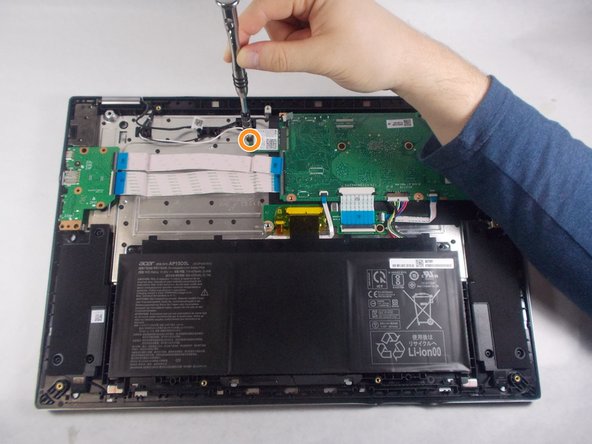
    • Remove the five 6mm Phillips #1 screws from the hinges on either side of the laptop.

  4. Acer Chromebook Spin 15 CP315-1H-P1K8 Display Screen Replacement: paso 4, imagen 1 de 3 Acer Chromebook Spin 15 CP315-1H-P1K8 Display Screen Replacement: paso 4, imagen 2 de 3 Acer Chromebook Spin 15 CP315-1H-P1K8 Display Screen Replacement: paso 4, imagen 3 de 3
    • Unplug the camera/microphone ribbon cable from the circuit board.

    • Remove the single 3mm Phillips #1 screw from the Intel core.

    • Unplug the cable from the circuit board.

  5. Acer Chromebook Spin 15 CP315-1H-P1K8 Display Screen Replacement: paso 5, imagen 1 de 3 Acer Chromebook Spin 15 CP315-1H-P1K8 Display Screen Replacement: paso 5, imagen 2 de 3 Acer Chromebook Spin 15 CP315-1H-P1K8 Display Screen Replacement: paso 5, imagen 3 de 3
    • Use the plastic opening tool, create a gap between the back and front of the display.

    • Lift the front out with your hands.

Conclusión

To reassemble your device, follow these instructions in reverse order.

3 personas más completaron esta guía.

Evan Costa

Miembro Desde 10/29/19

503 Reputación

3 Guías creadas

Equipo

2 comentarios

I just want to say that I’ve used this guide several times. My kid dropped the laptop and broke the hinge which is located inside the top cover behind the LCD panel. When this happened, it caused the grommets to come out of the plastic. But for about $45 we replaced the hinge and the top cover and I was able to fix it and put it all back together. I appreciate having this guide to remind me. Thank you!

Christopher Rayment - Contestar

Thank you so much for these instructions! The connections were the hardest part for me and the pictures were a great help.

Wendy Brooks - Contestar

Agregar Comentario

Ver Estadísticas:

Ultimas 24 horas: 0

Ultimos 7 días: 8

Ultimos 30 días: 31

Todo El Tiempo: 2,155