Saltar al contenido principal

Acer Chromebook 14 CB3-431-C7EX Headphone Jack Replacement

Qué necesitas

  1. Acer Chromebook 14 CB3-431-C7EX Headphone Jack Replacement, Headphone Jack: paso 1, imagen 1 de 3 Acer Chromebook 14 CB3-431-C7EX Headphone Jack Replacement, Headphone Jack: paso 1, imagen 2 de 3 Acer Chromebook 14 CB3-431-C7EX Headphone Jack Replacement, Headphone Jack: paso 1, imagen 3 de 3
    • Use a Phillips #0 screwdriver to unscrew the eight 4mm screws.

    • Use a Phillips #0 screwdriver to unscrew the two 7mm screws.

    • iFixit's magnetic project mat is great for keeping the screws organized.

    • Remove the cover of the device by prying up from one of the edges with a spudger or plastic opening tool.

    • If the back cover is hard to remove, carefully use a metal spudger to remove the back cover.

  2. Acer Chromebook 14 CB3-431-C7EX Headphone Jack Replacement: paso 2, imagen 1 de 3 Acer Chromebook 14 CB3-431-C7EX Headphone Jack Replacement: paso 2, imagen 2 de 3 Acer Chromebook 14 CB3-431-C7EX Headphone Jack Replacement: paso 2, imagen 3 de 3
    • Use a spudger to disconnect the speaker connector from the bottom of the sound card. The connector should slide out toward the left speaker's housing.

    • Be sure to remove the connector evenly from the port.

  3. Acer Chromebook 14 CB3-431-C7EX Headphone Jack Replacement: paso 3, imagen 1 de 2 Acer Chromebook 14 CB3-431-C7EX Headphone Jack Replacement: paso 3, imagen 2 de 2
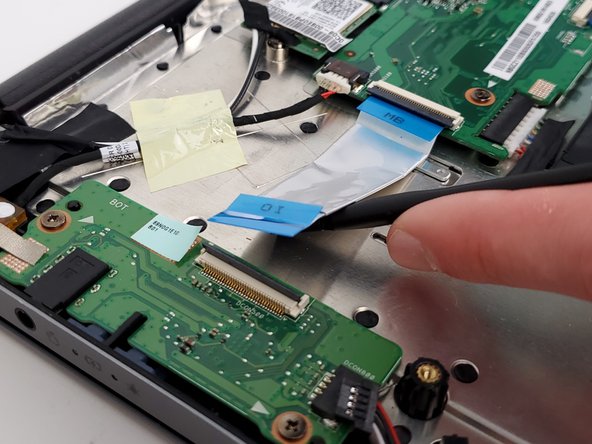
    • Use a spudger to carefully disconnect the ribbon connector from the right side of the sound card. The connector should slide out toward the motherboard.

    • Be sure to remove the connector evenly from the port, as the ribbon connector may be fragile.

  4. Acer Chromebook 14 CB3-431-C7EX Headphone Jack Replacement: paso 4, imagen 1 de 2 Acer Chromebook 14 CB3-431-C7EX Headphone Jack Replacement: paso 4, imagen 2 de 2
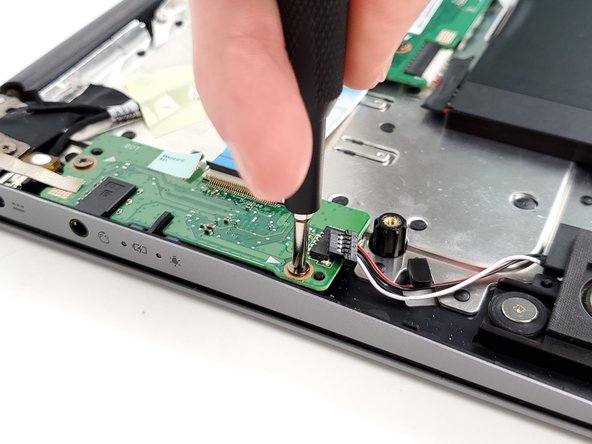
    • Use a Phillips #0 screwdriver to unscrew the two 4mm screws.

  5. Acer Chromebook 14 CB3-431-C7EX Headphone Jack Replacement: paso 5, imagen 1 de 1
    • Slide the sound card towards the motherboard until the headphone jack is out of its hole on the side of the laptop.

    • Lift the sound card directly up from the laptop to remove it.

Conclusión

To reassemble your device, follow these instructions in reverse order.

Una persona más ha completado esta guía.

0 comentarios

Agregar Comentario

Ver Estadísticas:

Ultimas 24 horas: 1

Ultimos 7 días: 7

Ultimos 30 días: 16

Todo El Tiempo: 599