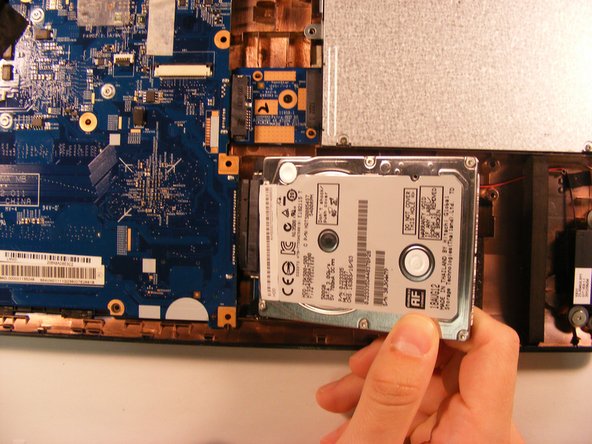
Saltar al contenido principal

Acer Aspire V5-571-6891 Hard Disk Drive (HDD) Replacement

Qué necesitas

  1. Acer Aspire V5-571-6891 Hard Disk Drive (HDD) Replacement, Battery: paso 1, imagen 1 de 1
    • Use the pointed end of the spudger to slide the battery lock until the battery pops loose.

  2. Acer Aspire V5-571-6891 Hard Disk Drive (HDD) Replacement: paso 2, imagen 1 de 2 Acer Aspire V5-571-6891 Hard Disk Drive (HDD) Replacement: paso 2, imagen 2 de 2
    • Slide the battery out of the battery slot.

  3. Acer Aspire V5-571-6891 Hard Disk Drive (HDD) Replacement, Keyboard: paso 3, imagen 1 de 1
    • Remove the two 6mm PH1 screws from the bottom of the laptop.

  4. Acer Aspire V5-571-6891 Hard Disk Drive (HDD) Replacement: paso 4, imagen 1 de 1
    • Use the spudger, push the two tabs, located in the battery slot, through their slots to release the keyboard.

    • Do this with the computer slightly open for ease.

  5. Acer Aspire V5-571-6891 Hard Disk Drive (HDD) Replacement: paso 5, imagen 1 de 2 Acer Aspire V5-571-6891 Hard Disk Drive (HDD) Replacement: paso 5, imagen 2 de 2
    • Open the laptop.

    • Start top of the keyboard and use the opening tool to pop the remaining tabs around the keyboard loose.

    • The keyboard can be flipped onto its face once removed.

  6. Acer Aspire V5-571-6891 Hard Disk Drive (HDD) Replacement: paso 6, imagen 1 de 1
    • Use the spudger and slide the grey tabs on either side of the keyboard wires away from the white plastic.

  7. Acer Aspire V5-571-6891 Hard Disk Drive (HDD) Replacement: paso 7, imagen 1 de 1
    • Disconnect the keyboard by pulling the blue tape on the wire strip.

  8. Acer Aspire V5-571-6891 Hard Disk Drive (HDD) Replacement, Hard Disk Drive (HDD): paso 8, imagen 1 de 1
    • Remove the five 6mm PH1 screws beneath the keyboard.

  9. Acer Aspire V5-571-6891 Hard Disk Drive (HDD) Replacement: paso 9, imagen 1 de 2 Acer Aspire V5-571-6891 Hard Disk Drive (HDD) Replacement: paso 9, imagen 2 de 2
    • Use the spudger to pop the gray tab up and away from the far left wire strip.

    • Disconnect the wire strip by pulling the blue tab loose.

  10. Acer Aspire V5-571-6891 Hard Disk Drive (HDD) Replacement: paso 10, imagen 1 de 2 Acer Aspire V5-571-6891 Hard Disk Drive (HDD) Replacement: paso 10, imagen 2 de 2
    • Use the spudger to pop the white tab up away from the wire strip located at the top left corner of the mouse pad.

    • Disconnect the wire strip by pulling the blue tab.

  11. Acer Aspire V5-571-6891 Hard Disk Drive (HDD) Replacement: paso 11, imagen 1 de 1
    • Close the laptop.

    • Remove the remaining 18 6mm PH1 screws from the bottom cover of the laptop.

  12. Acer Aspire V5-571-6891 Hard Disk Drive (HDD) Replacement: paso 12, imagen 1 de 3 Acer Aspire V5-571-6891 Hard Disk Drive (HDD) Replacement: paso 12, imagen 2 de 3 Acer Aspire V5-571-6891 Hard Disk Drive (HDD) Replacement: paso 12, imagen 3 de 3
    • Use the opening tool to separate the back of the laptop from the inside cover.

    • Open the computer and remove the inside cover.

  13. Acer Aspire V5-571-6891 Hard Disk Drive (HDD) Replacement: paso 13, imagen 1 de 3 Acer Aspire V5-571-6891 Hard Disk Drive (HDD) Replacement: paso 13, imagen 2 de 3 Acer Aspire V5-571-6891 Hard Disk Drive (HDD) Replacement: paso 13, imagen 3 de 3
    • Lift the HDD out of the base and use the opening tool to disconnect the HDD from the motherboard wire.

Conclusión

To reassemble your device, follow these instructions in reverse order.

Una persona más ha completado esta guía.

0 comentarios

Agregar Comentario

Ver Estadísticas:

Ultimas 24 horas: 1

Ultimos 7 días: 3

Ultimos 30 días: 10

Todo El Tiempo: 534