Saltar al contenido principal

Acer Aspire E1-531-2438 Screen Replacement

Qué necesitas

  1. Acer Aspire E1-531-2438 Screen Replacement, Battery: paso 1, imagen 1 de 2 Acer Aspire E1-531-2438 Screen Replacement, Battery: paso 1, imagen 2 de 2
    • Unplug and power down the device before removing the battery.

    • Turn the device over so the back side is facing up.

    • Using a spudger, slide the orange latch to the right. This will release the battery, which should pop up from the device.

    • Use two hands tilt the side of the battery closest to the orange latch upward as shown in the images.

  2. Acer Aspire E1-531-2438 Screen Replacement: paso 2, imagen 1 de 1
    • Tilt the side of the battery closest to the orange latch upward.

    • Lift the battery up and out of the device.

  3. Acer Aspire E1-531-2438 Screen Replacement, Hard Drive: paso 3, imagen 1 de 2 Acer Aspire E1-531-2438 Screen Replacement, Hard Drive: paso 3, imagen 2 de 2
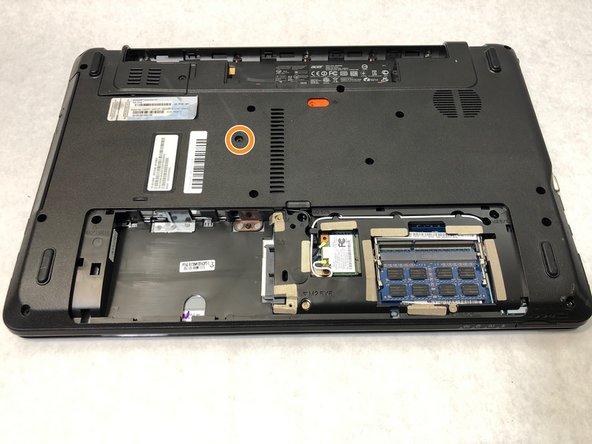
    • Using a Phillips #0 screwdriver, remove the two 9mm screws on the access panel.

  4. Acer Aspire E1-531-2438 Screen Replacement: paso 4, imagen 1 de 3 Acer Aspire E1-531-2438 Screen Replacement: paso 4, imagen 2 de 3 Acer Aspire E1-531-2438 Screen Replacement: paso 4, imagen 3 de 3
    • Using the indentation, pry open the access panel with your fingers or a spudger.

    • Remove the access panel to expose the hard drive, WiFi chip, and RAM modules.

  5. Acer Aspire E1-531-2438 Screen Replacement: paso 5, imagen 1 de 3 Acer Aspire E1-531-2438 Screen Replacement: paso 5, imagen 2 de 3 Acer Aspire E1-531-2438 Screen Replacement: paso 5, imagen 3 de 3
    • Grip the plastic tab on the hard drive, then pull to the left to unplug the drive from its socket.

    • Once free from the socket, lift the hard drive up and out of the device.

  6. Acer Aspire E1-531-2438 Screen Replacement, Screen: paso 6, imagen 1 de 3 Acer Aspire E1-531-2438 Screen Replacement, Screen: paso 6, imagen 2 de 3 Acer Aspire E1-531-2438 Screen Replacement, Screen: paso 6, imagen 3 de 3
    • Using a Phillips #0 screwdriver, remove all of the following screws:

    • Fifteen 9mm screws

    • One 6mm screw

    • Three 3.5mm screws

  7. Acer Aspire E1-531-2438 Screen Replacement: paso 7, imagen 1 de 3 Acer Aspire E1-531-2438 Screen Replacement: paso 7, imagen 2 de 3 Acer Aspire E1-531-2438 Screen Replacement: paso 7, imagen 3 de 3
    • Remove the optical drive by sliding it out of its slot on the side of the laptop.

  8. Acer Aspire E1-531-2438 Screen Replacement: paso 8, imagen 1 de 2 Acer Aspire E1-531-2438 Screen Replacement: paso 8, imagen 2 de 2
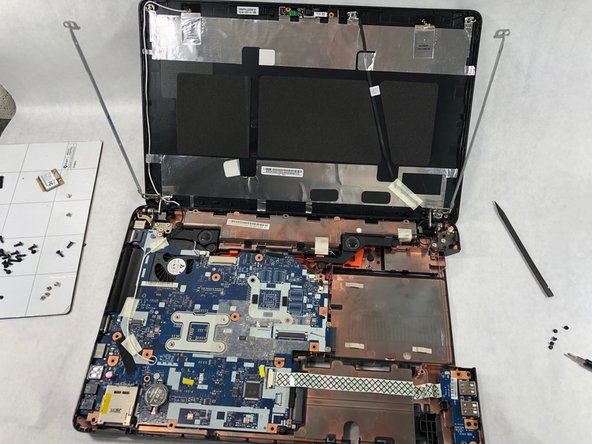
    • Using a plastic opening tool, pry along the seam running the perimeter of the laptop to separate the bottom case from the palmrest assembly.

    • Flip the device over and open the laptop so that the keyboard is visible.

    • Lift up the palmrest assembly just far enough to access the connectors underneath.

  9. Acer Aspire E1-531-2438 Screen Replacement: paso 9, imagen 1 de 2 Acer Aspire E1-531-2438 Screen Replacement: paso 9, imagen 2 de 2
    • Using a pair of tweezers, disconnect the small white ribbon cable from the connector near the left side of the device.

    • Disconnect the large black ribbon cable near the middle of the device. Gently pull on the cable away from you.

  10. Acer Aspire E1-531-2438 Screen Replacement: paso 10, imagen 1 de 2 Acer Aspire E1-531-2438 Screen Replacement: paso 10, imagen 2 de 2
    • Lift and remove the palmrest assembly and the attached keyboard.

  11. Acer Aspire E1-531-2438 Screen Replacement: paso 11, imagen 1 de 1
    • Using two hands, push toward the screen to disconnect the screen connector.

  12. Acer Aspire E1-531-2438 Screen Replacement: paso 12, imagen 1 de 2 Acer Aspire E1-531-2438 Screen Replacement: paso 12, imagen 2 de 2
    • Using a spudger, remove the circular plastic screw cover on the screws on the lower left and right of the screen.

    • Using a Phillips #0 screwdriver, remove the two 3mm screws hidden under the circular plastic screw covers.

  13. Acer Aspire E1-531-2438 Screen Replacement: paso 13, imagen 1 de 3 Acer Aspire E1-531-2438 Screen Replacement: paso 13, imagen 2 de 3 Acer Aspire E1-531-2438 Screen Replacement: paso 13, imagen 3 de 3
    • Using a plastic opening tool, go around the edge of the display to remove the plastic bezel.

  14. Acer Aspire E1-531-2438 Screen Replacement: paso 14, imagen 1 de 2 Acer Aspire E1-531-2438 Screen Replacement: paso 14, imagen 2 de 2
    • Using a Phillips #0 screwdriver, remove the three screws in the mounting bracket along the right edge of the screen.

    • Remove the three screws in the mounting bracket along the left edge of the screen in the same manner.

    • Lift the screen out of the device.

Conclusión

To reassemble your device, follow these instructions in reverse order.

Una persona más ha completado esta guía.

Jakob Rinkus

Miembro Desde 03/21/19

965 Reputación

7 Guías creadas

Equipo

0 comentarios

Agregar Comentario

Ver Estadísticas:

Ultimas 24 horas: 1

Ultimos 7 días: 4

Ultimos 30 días: 13

Todo El Tiempo: 844