Saltar al contenido principal

Acer Aspire 3 A315-21-92FX Battery Replacement

Qué necesitas

  1. Acer Aspire 3 A315-21-92FX Battery Replacement, RAM: paso 1, imagen 1 de 1
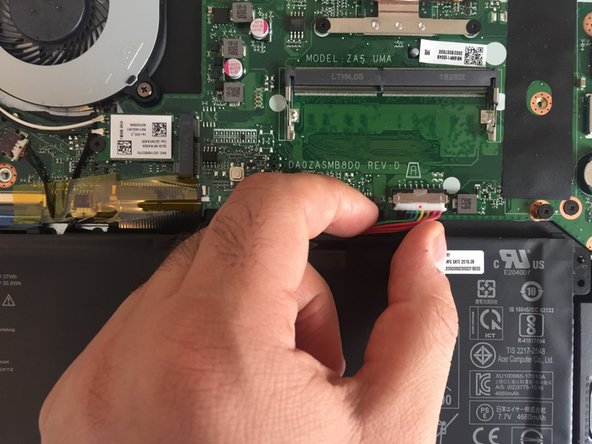
    • Flip the Acer Aspire 3 A315-21-92FX over so the back-side is oriented to the upward position.

  2. Acer Aspire 3 A315-21-92FX Battery Replacement: paso 2, imagen 1 de 2 Acer Aspire 3 A315-21-92FX Battery Replacement: paso 2, imagen 2 de 2
    • Remove the single 2.5mm Phillips #0 screw.

  3. Acer Aspire 3 A315-21-92FX Battery Replacement: paso 3, imagen 1 de 1
    • Use the iFixit opening tool to remove the small cover.

  4. Acer Aspire 3 A315-21-92FX Battery Replacement: paso 4, imagen 1 de 3 Acer Aspire 3 A315-21-92FX Battery Replacement: paso 4, imagen 2 de 3 Acer Aspire 3 A315-21-92FX Battery Replacement: paso 4, imagen 3 de 3
    • Press the tabs on each side of the RAM outwards, and the memory module will pop up at an angle.

  5. Acer Aspire 3 A315-21-92FX Battery Replacement: paso 5, imagen 1 de 2 Acer Aspire 3 A315-21-92FX Battery Replacement: paso 5, imagen 2 de 2
    • Pull the RAM slowly out of the Acer Aspire 3 A315-21-92FX.

  6. Acer Aspire 3 A315-21-92FX Battery Replacement, Hard Drive: paso 6, imagen 1 de 1
    • Please make sure that there is no external access to the battery, and the battery is out of power.

    • Flip the Acer Aspire 3 A315-21-92FX over, so the back-side is oriented to the upward position.

  7. Acer Aspire 3 A315-21-92FX Battery Replacement: paso 7, imagen 1 de 2 Acer Aspire 3 A315-21-92FX Battery Replacement: paso 7, imagen 2 de 2
    • Remove the single 2.5mm Phillips #0 screw.

  8. Acer Aspire 3 A315-21-92FX Battery Replacement: paso 8, imagen 1 de 1
    • Use the iFixit opening tool to remove the cover of the hard disk.

  9. Acer Aspire 3 A315-21-92FX Battery Replacement: paso 9, imagen 1 de 2 Acer Aspire 3 A315-21-92FX Battery Replacement: paso 9, imagen 2 de 2
    • Pull the hard disk out of the Acer Aspire 3 A315-21-92FX slightly and slowly.

    • This laptop is missing the hard drive.

  10. Acer Aspire 3 A315-21-92FX Battery Replacement, Battery: paso 10, imagen 1 de 1
    • Remove fourteen 2.5mm Phillips #0 screws from the back of the laptop.

    • There may be two additional screws under the hard drive cover that must be removed before attempting to remove the back cover.

  11. Acer Aspire 3 A315-21-92FX Battery Replacement: paso 11, imagen 1 de 3 Acer Aspire 3 A315-21-92FX Battery Replacement: paso 11, imagen 2 de 3 Acer Aspire 3 A315-21-92FX Battery Replacement: paso 11, imagen 3 de 3
    • Use the iFixit opening tool to remove the back cover.

  12. Acer Aspire 3 A315-21-92FX Battery Replacement: paso 12, imagen 1 de 2 Acer Aspire 3 A315-21-92FX Battery Replacement: paso 12, imagen 2 de 2
    • Pull out the plug connecting the battery to the motherboard.

  13. Acer Aspire 3 A315-21-92FX Battery Replacement: paso 13, imagen 1 de 2 Acer Aspire 3 A315-21-92FX Battery Replacement: paso 13, imagen 2 de 2
    • Pull the battery out of the groove.

Conclusión

To reassemble your device, follow these instructions in reverse order.

5 personas más completaron esta guía.

ShengKun Lu

Miembro Desde 01/14/20

639 Reputación

3 Guías creadas

Equipo

Un comentario

Thanks for this tutorial ! You just forgot 3 screws: 2 on the right of the hard drive, and 1 on the top left =)

Troublicious - Contestar

Agregar Comentario

Ver Estadísticas:

Ultimas 24 horas: 7

Ultimos 7 días: 37

Ultimos 30 días: 204

Todo El Tiempo: 10,813