Saltar al contenido principal

Accessing LEDs and Switches in Razer Blackwidow Ultimate 2013

Qué necesitas

  1. Accessing LEDs and Switches in Razer Blackwidow Ultimate 2013, Accessing LEDs and Switches in Razer Blackwidow Ultimate 2013: paso 1, imagen 1 de 1
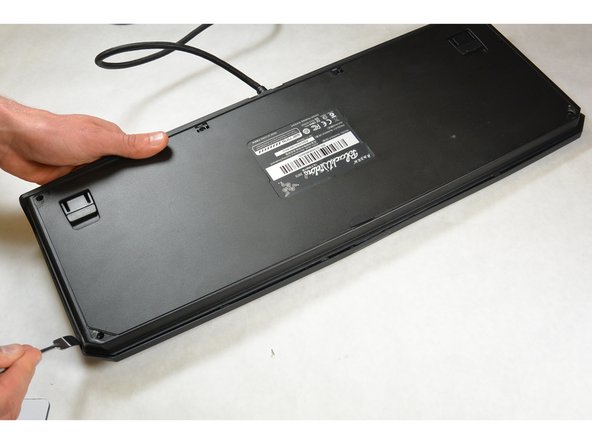
    • There are two tabs on both sides of where the cable enters the back of the keyboard. Use the metal spudgers to gently pull up the tabs. These are circled in red on the picture.

  2. Accessing LEDs and Switches in Razer Blackwidow Ultimate 2013: paso 2, imagen 1 de 3 Accessing LEDs and Switches in Razer Blackwidow Ultimate 2013: paso 2, imagen 2 de 3 Accessing LEDs and Switches in Razer Blackwidow Ultimate 2013: paso 2, imagen 3 de 3
    • Use the plastic opening tool to remove the rubber pads at each corner.

    • Once removed, there are 10mm screws below each pad. Remove the screws using the phillips-head screwdriver.

  3. Accessing LEDs and Switches in Razer Blackwidow Ultimate 2013: paso 3, imagen 1 de 3 Accessing LEDs and Switches in Razer Blackwidow Ultimate 2013: paso 3, imagen 2 de 3 Accessing LEDs and Switches in Razer Blackwidow Ultimate 2013: paso 3, imagen 3 de 3
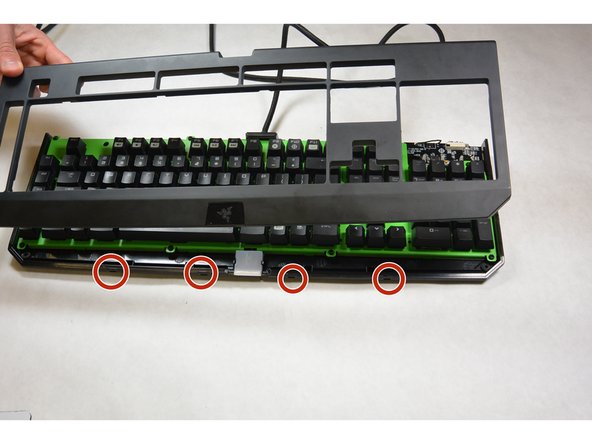
    • Utilizing your broad metal spudger, begin to pry off the faceplate of the keyboard.

    • There are small tabs between the faceplate and the keyboard's base that must be released. There are four tabs along the front of the keyboard and two along each side. Examples of the tabs you are looking for are circled in the third image.

  4. Accessing LEDs and Switches in Razer Blackwidow Ultimate 2013: paso 4, imagen 1 de 1
    • Find where the cable enters the back of the keyboard. There are two screws on either side of the tab holding the cable in. Once removed, the tab should slide out of the keyboard.

  5. Accessing LEDs and Switches in Razer Blackwidow Ultimate 2013: paso 5, imagen 1 de 1
    • Lift the covering of the LED logo vertically out of the slot.

  6. Accessing LEDs and Switches in Razer Blackwidow Ultimate 2013: paso 6, imagen 1 de 3 Accessing LEDs and Switches in Razer Blackwidow Ultimate 2013: paso 6, imagen 2 de 3 Accessing LEDs and Switches in Razer Blackwidow Ultimate 2013: paso 6, imagen 3 de 3
    • Remove the remaining eight 10 mm screws using the Phillips Head screwdriver.

    • To remove the board from the case pull the board up and away from the audio jack holes to allow the audio jacks to slide out of their holes in the side of the backing.

  7. Accessing LEDs and Switches in Razer Blackwidow Ultimate 2013: paso 7, imagen 1 de 3 Accessing LEDs and Switches in Razer Blackwidow Ultimate 2013: paso 7, imagen 2 de 3 Accessing LEDs and Switches in Razer Blackwidow Ultimate 2013: paso 7, imagen 3 de 3
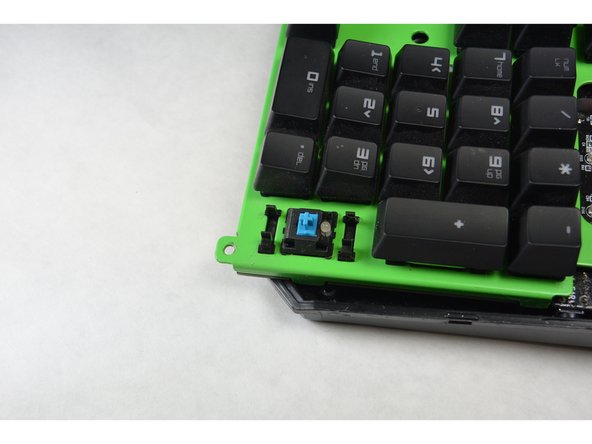
    • Keys can be removed from the board by pulling them upward with your fingers.

    • Larger keys can be removed by lifting the key away to expose the metal pin underneath for added support. Detach the pin by pulling out from the plastic tabs holding the pin using tweezers.

  8. My board just cut off (random keys inputting random chars ,double chars , or nothing at all. Now most keys don't work but lights up. The first time this happened the board just died leds too. Was rma'd anyway, is there anything you know that I can place to fix this in the keyboard?

    Zombiexm - Contestar

Conclusión

To reassemble your keyboard, follow these instructions in reverse order. There are no special steps to put this back together and it is just as easy to put it back together.

13 personas más completaron esta guía.

Jacob Scoles

Miembro Desde 09/17/15

549 Reputación

2 Guías creadas

Equipo

IUPUI, Team 2-3, Harley Fall 2015 Miembro de IUPUI, Team 2-3, Harley Fall 2015

IUPUI-HARLEY-F15S2G3

4 Miembros

4 Guías creadas

6 comentarios

Can I use this guide for my Razer Blackwidow Ultimate 2014 Tournament edition?

Boogeyman - - Contestar

Yeah it’s pretty much the same procedure. I don’t know about the 2013, but the 2014 faceplate has two points on each of the sides where you have to get the spudger in and pry outwards a bit to release two tabs. They’re pretty stiff.

Randy - Contestar

Yeah, it’s pretty much the same procedure. I don’t know about this model, but the 2014 has two spots on each side where you have to pry out with the spudger to release some pretty stiff tabs.

Randy - Contestar

Thank you so much, this guide was great in helping me fix my keyboard. I really appreciate it

B P - Contestar

how to put key-macro into the Razer flash–memory?

ein Stein - Contestar

It would be great to have a similar one for replacing a damaged key. My "A" has some issues...

sebastien lautie - Contestar

Agregar Comentario

Ver Estadísticas:

Ultimas 24 horas: 3

Ultimos 7 días: 15

Ultimos 30 días: 86

Todo El Tiempo: 32,482