Saltar al contenido principal

ACER Aspire V5-571P-6609 Fan Cleaning

Qué necesitas

  1. ACER Aspire V5-571P-6609 Fan Cleaning, ACER Aspire V5-571P-6609 Fan Cleaning: paso 1, imagen 1 de 1
    • Place the laptop on a non-static surface and power it off completely. Strap the static-resistant wristband on to either of your wrists.

  2. ACER Aspire V5-571P-6609 Fan Cleaning: paso 2, imagen 1 de 3 ACER Aspire V5-571P-6609 Fan Cleaning: paso 2, imagen 2 de 3 ACER Aspire V5-571P-6609 Fan Cleaning: paso 2, imagen 3 de 3
    • Close the laptop and flip over. Locate the battery slide release. This guide marks the location with a red circle

    • Use a pointed tool (we used a screwdriver) to slide the release to the left when facing the laptop from the non-battery side.

    • Gently pull the battery away from the laptop with the slide release held open.

  3. ACER Aspire V5-571P-6609 Fan Cleaning: paso 3, imagen 1 de 2 ACER Aspire V5-571P-6609 Fan Cleaning: paso 3, imagen 2 de 2
    • Remove all twenty 6.7 mm Phillips #0 screws from the bottom side of the laptop.

    • Once all necessary screws are removed, turn the laptop over and open.

  4. ACER Aspire V5-571P-6609 Fan Cleaning: paso 4, imagen 1 de 3 ACER Aspire V5-571P-6609 Fan Cleaning: paso 4, imagen 2 de 3 ACER Aspire V5-571P-6609 Fan Cleaning: paso 4, imagen 3 de 3
    • Now it's time to remove the keyboard. Use the Jimmy Tool to slide between the keyboard and the top panel. Gently pop the tabs out of their slots and the keyboard will come loose. DO NOT PULL THE KEYBOARD OUT YET.

    • Before you lift the keyboard out of place, note the two flat flex cables for the key input and keyboard backlights. One is larger than the other. Lift the keyboard just high enough to gently release them from the two ports seen here with a pair of non-static tweezers.

    • Once the cables are safely detached, lift the keyboard off of the laptop and place it on a safe, non-static surface.

  5. ACER Aspire V5-571P-6609 Fan Cleaning: paso 5, imagen 1 de 3 ACER Aspire V5-571P-6609 Fan Cleaning: paso 5, imagen 2 de 3 ACER Aspire V5-571P-6609 Fan Cleaning: paso 5, imagen 3 de 3
    • Beneath the keyboard, remove the undercarriage panel to access the motherboard. Remove the six screws marked in this image.

    • Detach the two cables marked in this picture by pulling upwards on the plastic lock mechanism above the flex cable with the tweezers.

    • Gently pull the cable out with tweezers.

  6. ACER Aspire V5-571P-6609 Fan Cleaning: paso 6, imagen 1 de 3 ACER Aspire V5-571P-6609 Fan Cleaning: paso 6, imagen 2 de 3 ACER Aspire V5-571P-6609 Fan Cleaning: paso 6, imagen 3 de 3
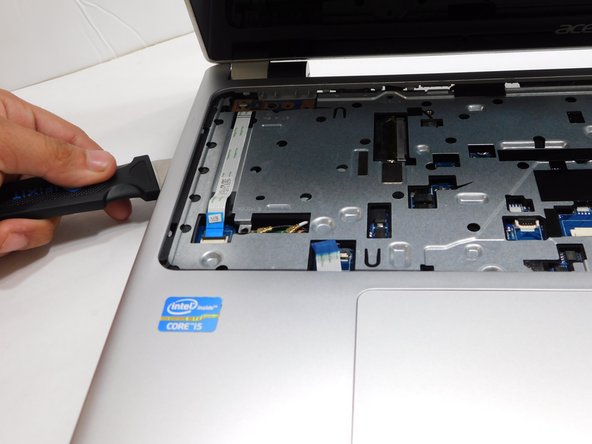
    • Slide Jimmy Tool in between front and back panel of the laptop as demonstrated in this photo.

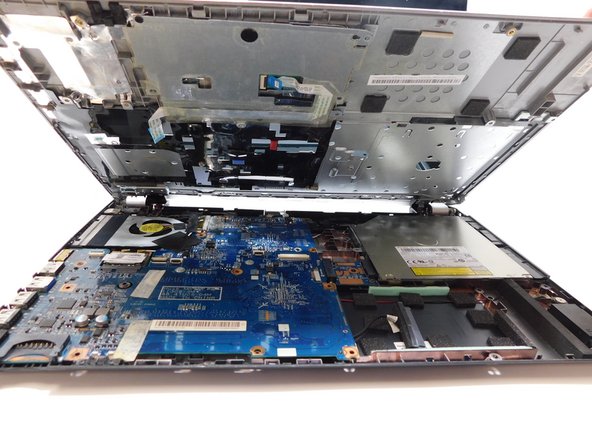
    • Slowly rotate the Jimmy Tool in hand until the top panel pops loose. repeat on all sides until the top panel is free of the main body.

    • Gently lift the top panel free of the main body. You now have access to the Motherboard.

  7. ACER Aspire V5-571P-6609 Fan Cleaning: paso 7, imagen 1 de 1
    • Using Compressed Air, spray a few short bursts of the pressured air until the fan is clean or no dust is visible.

Conclusión

To reassemble your device, follow these instructions in reverse order.

occiel

Miembro Desde 08/25/22

145 Reputación

1 Guía escrita

Equipo

Gateway, Team 1-1, Pee Fall 2022 Miembro de Gateway, Team 1-1, Pee Fall 2022

GCC-PEE-F22S1G1

4 Miembros

6 Guías creadas

0 comentarios

Agregar Comentario

Ver Estadísticas:

Ultimas 24 horas: 0

Ultimos 7 días: 0

Ultimos 30 días: 6

Todo El Tiempo: 309