Saltar al contenido principal

ACER Aspire V5-571P-6609 Display Replacement

Qué necesitas

  1. ACER Aspire V5-571P-6609 Display Replacement, Display Replacement: paso 1, imagen 1 de 1
    • Start by placing laptop on non-static surface and powering off completely. Apply static resistant wristband.

  2. ACER Aspire V5-571P-6609 Display Replacement: paso 2, imagen 1 de 3 ACER Aspire V5-571P-6609 Display Replacement: paso 2, imagen 2 de 3 ACER Aspire V5-571P-6609 Display Replacement: paso 2, imagen 3 de 3
    • Use a pointed tool (we used a screwdriver) to slide release to the right when facing laptop from non-battery side.

    • Gently pull battery away from laptop with slide release held open.

  3. ACER Aspire V5-571P-6609 Display Replacement: paso 3, imagen 1 de 2 ACER Aspire V5-571P-6609 Display Replacement: paso 3, imagen 2 de 2
    • Remove all twenty 6.7 mm Phillips #0 screws from the bottom side of the laptop.

    • Turn the laptop over and open the lid.

  4. ACER Aspire V5-571P-6609 Display Replacement: paso 4, imagen 1 de 3 ACER Aspire V5-571P-6609 Display Replacement: paso 4, imagen 2 de 3 ACER Aspire V5-571P-6609 Display Replacement: paso 4, imagen 3 de 3
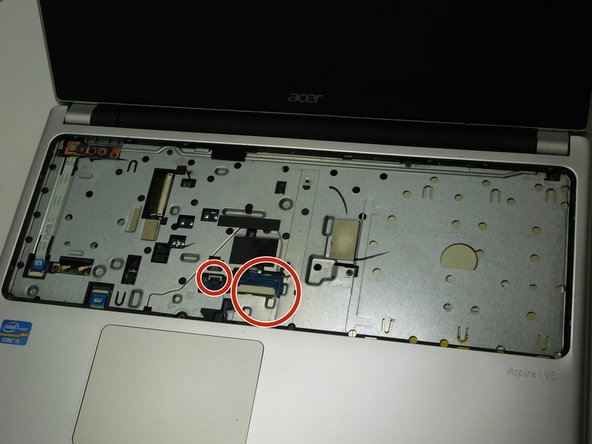
    • Use a Jimmy tool to slide between the keyboard and top panel. Gently pop the tabs out of their slots and the keyboard will come loose. DO NOT PULL KEYBOARD OUT YET.

    • Before you lift the keyboard out of place, note the two flat flex cables for the key input and keyboard backlights. One is larger that the other. Lift keyboard just high enough to gently release them from the two ports seen here with a non-static tweezers.

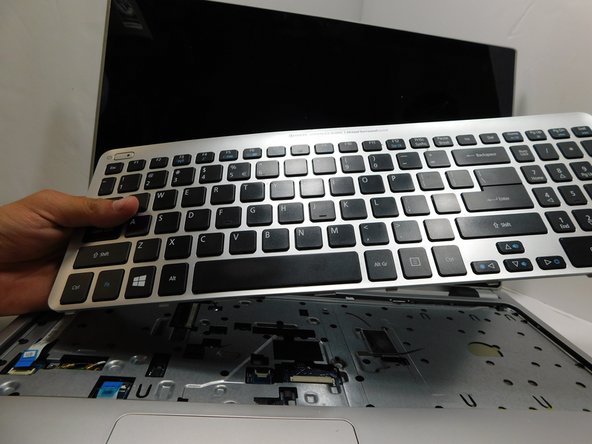
    • Once cables are safely detached, lift keyboard off of laptop and place on safe, non-static surface.

  5. ACER Aspire V5-571P-6609 Display Replacement: paso 5, imagen 1 de 3 ACER Aspire V5-571P-6609 Display Replacement: paso 5, imagen 2 de 3 ACER Aspire V5-571P-6609 Display Replacement: paso 5, imagen 3 de 3
    • Use a Phillips #0 screwdriver to remove the six screws.

    • Flip up the block lock bars on the two ZIF connectors, then gently disconnect the two ribbon cables.

  6. ACER Aspire V5-571P-6609 Display Replacement: paso 6, imagen 1 de 3 ACER Aspire V5-571P-6609 Display Replacement: paso 6, imagen 2 de 3 ACER Aspire V5-571P-6609 Display Replacement: paso 6, imagen 3 de 3
    • Slide the Jimmy Tool in between front and back panel of the laptop.

    • Slowly rotate the Jimmy tool, prying until the top panel pops loose. Repeat on all sides until the top panel is free of main body.

    • Gently lift top panel free of main body. You now have access to the Motherboard.

  7. ACER Aspire V5-571P-6609 Display Replacement: paso 7, imagen 1 de 3 ACER Aspire V5-571P-6609 Display Replacement: paso 7, imagen 2 de 3 ACER Aspire V5-571P-6609 Display Replacement: paso 7, imagen 3 de 3
    • Once the top panel is removed, lift the tape that holds the power cable for the fan.

    • Gently pull fan power cable out.

    • Use tweezers to gently pull charging port out of place.

  8. ACER Aspire V5-571P-6609 Display Replacement: paso 8, imagen 1 de 3 ACER Aspire V5-571P-6609 Display Replacement: paso 8, imagen 2 de 3 ACER Aspire V5-571P-6609 Display Replacement: paso 8, imagen 3 de 3
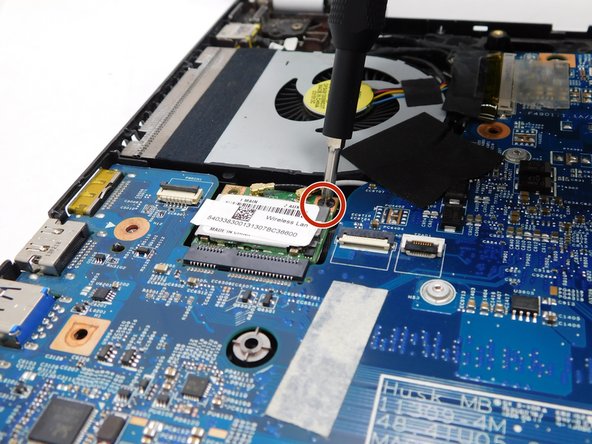
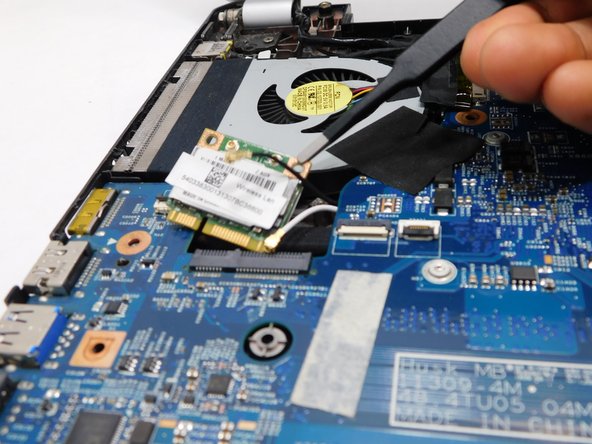
    • Use tweezers to gently detach black and white Wi-Fi card cables shown here by lifting up until they pop off.

    • Once both cables are detached, unscrew the single screw holding Wireless LAN card in place.

    • The Wi-Fi card should lift up slightly on its own. Use tweezers to gently lift the Wi-Fi card out at a 45 degree angle to prevent damage.

  9. ACER Aspire V5-571P-6609 Display Replacement: paso 9, imagen 1 de 1
    • Remove the two Phillips #0 screws that hold in the battery port.

  10. ACER Aspire V5-571P-6609 Display Replacement: paso 10, imagen 1 de 1
    • Gently pull the optical drive out.

    • This should slide out easily by gently sliding the disc drive outwards on its rails.

  11. ACER Aspire V5-571P-6609 Display Replacement: paso 11, imagen 1 de 3 ACER Aspire V5-571P-6609 Display Replacement: paso 11, imagen 2 de 3 ACER Aspire V5-571P-6609 Display Replacement: paso 11, imagen 3 de 3
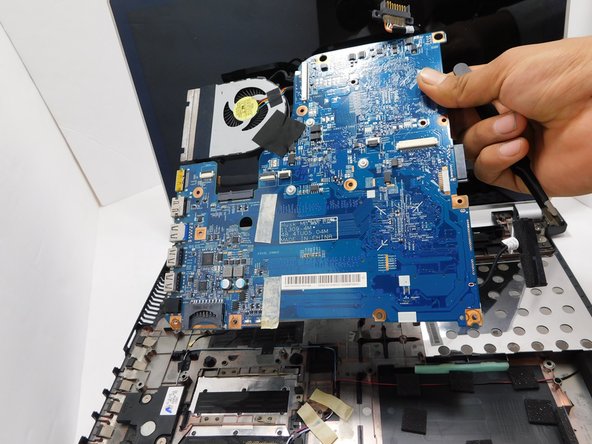
    • Place fingertips on edges of motherboard to prevent damage to the circuitry.

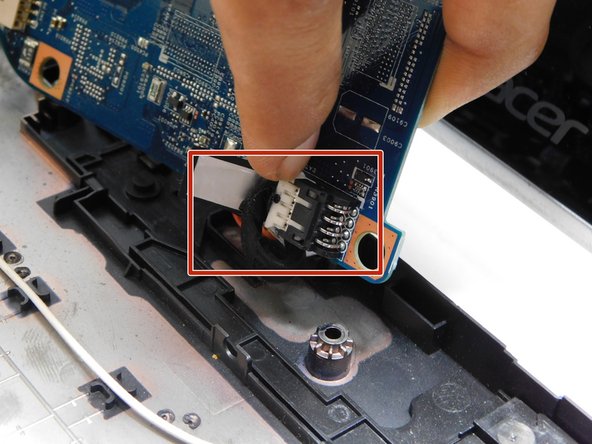
    • Remember to disconnect this RAM cable on the bottom of the laptop. This can also be accessed and disconnected from the RAM ports on the backside.

    • Using your fingertips, grip the edges of the motherboard to prevent damage to the circuitry.

    • The motherboard should lift out easily.

  12. ACER Aspire V5-571P-6609 Display Replacement: paso 12, imagen 1 de 3 ACER Aspire V5-571P-6609 Display Replacement: paso 12, imagen 2 de 3 ACER Aspire V5-571P-6609 Display Replacement: paso 12, imagen 3 de 3
    • Use tweezers to gently lift the tape holding down the white cable until tape is unstuck. Unthread black and white cables until free of the bottom panel.

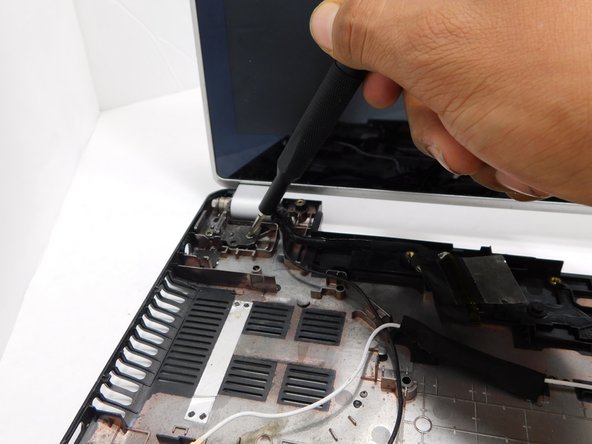
    • Unscrew the Phillips #0 left side screws until left side of display is now lose.

    • Do the same for the two flat screws on the right side.

  13. ACER Aspire V5-571P-6609 Display Replacement: paso 13, imagen 1 de 1
    • Display should now lift free of the main body of the Laptop.

    • Safely dispose of broken display and replace with new display.

Conclusión

To reassemble your device, follow these instructions in reverse order.

Una persona más ha completado esta guía.

Kevin Sipple

Miembro Desde 08/25/22

355 Reputación

2 Guías creadas

Equipo

Gateway, Team 1-1, Pee Fall 2022 Miembro de Gateway, Team 1-1, Pee Fall 2022

GCC-PEE-F22S1G1

4 Miembros

6 Guías creadas

0 comentarios

Agregar Comentario

Ver Estadísticas:

Ultimas 24 horas: 0

Ultimos 7 días: 0

Ultimos 30 días: 7

Todo El Tiempo: 169