Introducción
La primera versión de la SN30 Pro y la SF30 Pro usaba tapas de sticks analógicos recubiertas de goma. Si bien la elección del material lo hacía muy adherente, también hacía que la superficie de la tapa se desgastara fácilmente. Puedes comprar tapas de recambio para la 8BitDo (solían enviarlas "gratis"), pero deberás instalarlas tú mismo. Usa esta guía.
Qué necesitas
-
-
Coloca el controlador boca abajo sobre una superficie sólida.
-
Quita los cinco tornillos Torx T6 que sujetan el panel posterior en su lugar.
-
-
-
Levanta el panel posterior, empezando por el borde superior del controlador.
-
Hay dos muescas a lo largo del borde inferior, que ayudan a mantener juntos los paneles frontal y posterior. Esto te será útil durante el reensamblaje.
-
-
-
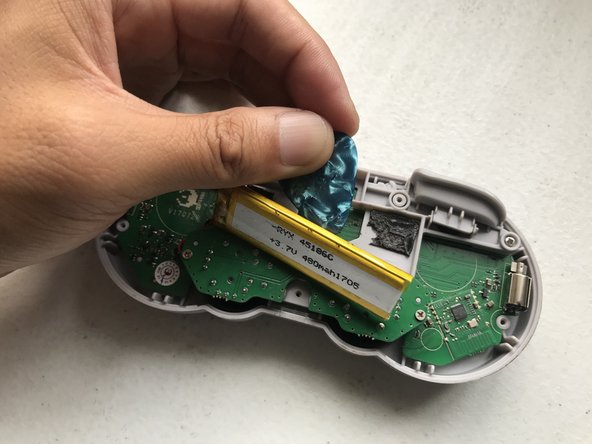
Usa un spudger para sacar la batería de su compartimiento.
-
Deja la batería a un lado.
-
Ahora ya puedes acceder a la cinta que conecta la placa analógica a la placa del controlador principal.
Word of warning! The analog board ribbon cable is long and is barely visible at the top of the battery. I foolishly assumed this was a battery pull tab and destroyed it.
-
-
-
-
Desatornilla los cuatro tornillos Phillips #0 que sujetan la placa analógica.
-
-
-
Levanta el conjunto de la placa analógica sujetándola por los bordes.
-
Puede que tengas que guiar los sticks analógicos, para despejar los agujeros del panel frontal mientras levantas el ensamblaje.
-
Dale la vuelta a la placa, para que los sticks analógicos queden hacia arriba. Y colócalos en la parte superior del controlador.
-
-
-
Sujeta el conjunto de la placa analógica por los bordes y extrae con cuidado las tapas de los sticks analógicos antiguos, una por una.
-
-
-
Ten en cuenta la forma del orificio que hay bajo la tapa del stick analógico de repuesto y cómo coincide con la forma del eje del stick analógico. Y oriéntalos correctamente para un ajuste adecuado.
-
Coloca las tapas nuevas sobre el eje y empújalas.
-
Empuja la tapa completamente hacia abajo, hasta que escuches un "clic", que indica que el stick analógico se está anclando.
-


Para volver a montar el dispositivo, sigue estas instrucciones en orden inverso.
Para volver a montar el dispositivo, sigue estas instrucciones en orden inverso.
Cancelar: No complete esta guía.
13 personas más completaron esta guía.
Un agradecimiento especial a estos traductores:
100%


Estos traductores nos están ayudando a reparar el mundo! ¿Quieres contribuir?
Empezar a traducir ›

15 comentarios
Thanks for the comment! Yes, you can get away with not removing the battery, but you’ll need to be extra careful with that ribbon. I just didn’t want to introduce that risk of accidentally tugging (and potentially damaging) the ribbon, especially since it’s not in plain view unless the battery is removed.
Thanks for this but do you know how to unclip the stick mechanism from the board? I seemed to have broken one. The button is not “clicking” on press right. I have reached out to 8bitdo on how to order replacements. I figured I would try and see if I could just reseat it and maybe that would fix the issue but can’t get the stick off the board.
Thanks.
I haven’t tried it myself, but from what I’ve seen, you may need to desolder the metal casing to get to the stick itself. If 8BitDo did send replacements, I would assume they’d send a whole assembly (both sticks + the board they’re soldered to). Please let us know if they get back to you; i’m very much curious. Thanks!
Great tutorial thanks!
I don’t know if they’re still sending out parts for free. I didn’t try when mine recently started falling apart (I suspect baby was chewing on them). I ripped off the flaking rubber covers from the SF30 Pro, bought some xbox stick caps, filled them with hot glue, and slapped them on the sticks, and it works great. Seller shipped the wrong color so it looks a little weird, but it works fine. I’m satisfied with it.
Several caveats:
You want to overfill the caps with glue. Squirt into the edges first, then fill almost to the top (leave room for the stick). It will probably overflow. Overflow is better than empty space. If you overflow, it may cause the stick to stick at the edges, and may block some travel. Once the glue has hardened, you can use a hobby knife to cut off the excess and pry it loose..
Push the caps down level while the glue is still hot.
The glue should go in as hot as possible. If the glue goes in cool, it will kind of work, but will come loose relatively easily.
I’ve seen posts on some Facebook groups I manage that confirm 8BitDo still sends them out for free, even for their newer models (Pro+, Pro 2).
How you DIY’d yours is interesting. That makes me wonder how other thumbstick replacements (Wii, Gamecube, Dualshock, etc.) will fit.
I asked about the analog stick caps, they sent me links to their shop, Amazon UK and AliExpress to buy from, so not free haha. Actually, not cheap either as most of those solutions involve expensive shipping to my country, plus I'm not sure if shipping from AliExpress (Chinese warehouse, the seemingly better economic deal) will prompt the courier to ask me for customs taxes on arrival.
Yeah, they stopped giving away the replacement caps for free quite a while ago. I should update the guide to reflect that new information.
Thank you : ) , i do want to add; that you need to remove T6 Torx screws not T5. (at least for the Gameboy version of the SN30 Pro, probably the same)
Great tutorial, thank you! Just ran through this on two different SN30 Pro controllers with similar issues. However, I needed a T6 screwdriver for both the vintage SN30 Pro and new one I just purchased.
Jose Olarte III T5 is the incorrect screw driver. thanks for providing the wrong info. it's smaller than the screws. i should have listened to amazon instead of you. you owe me the shipping cost for the screw driver.
Hi, just managed to do this, but i don't know if the battery remains in 100% shape, seems i might made some small "dents" while using the spudger to remove it from the battery slot. Still seems to be working so far.
On my controller I found the screws holding on the back plate to be T7.
Andy Klappert - Contestar