Introducción
This guide will walk you through the process of removing and installing a new headlight assembly for a 2013 Honda Fit. This guide works with all 2013 Honda Fit models and should apply to the second-generation Honda Fit (2009-2013) as well.
Warning:
- If you're replacing a broken headlight assembly after a car accident, look out for broken pieces of the old headlight as they can be sharp. Remove them carefully.
Tips:
- I highly recommend picking up a ratchet set, it's a useful toolset that can be used in plenty of other places, and they're not all that expensive.
- I also recommend putting down a mat or a towel to lay on when you're under the car.
- When you've reached the step that your headlight has been screwed in, check to make sure the lights are functioning. It'll be a lot of work to have to remove the bumper again so check the lights before complete reassembly.
Before you begin the repair, put your car in park and turn it off. For extra safety, engage the parking brake.
Qué necesitas
-
-
With someone spotting you, drive the front wheels of the car onto your vehicle ramps. Make sure to put the parking brake on!
-
Place jack stands underneath the car as an additional measure of protection for when you're under the car.
-
-
-
Under the hood of the car you'll find the radiator cover at the front of the car, just above the Honda Emblem.
-
Using a fastener removal tool, pry up the fasteners. Depending on how embedded the fastener is, you can go under the outer ring if it's already loose. Otherwise, pry from under the pin inside the fastener ring.
-
Lift off the radiator shield.
-
-
-
Above the front tires, use a Phillips #2 screwdriver or a socket wrench with a Phillips screwdriver extension to remove the screw located below the point where the bumper meets the side panels of the car.
-
Use a Phillips #2 screwdriver or a socket wrench with a Phillips screwdriver extension to remove the screws from both the driver's side and the passenger's side.
-
-
-
-
Use a socket wrench to remove the four 10 mm bolts securing the headlight. The first is easy to find right above the headlight near the side paneling.
-
The next is toward the inner corner at the top of the light. The third is underneath that.
-
The final bolt is on the side of the light below the first bolt and next to the side paneling.
-
-
-
Once the headlight is free from the vehicle, locate the three electrical connectors that power the bulbs.
-
Remove the connectors starting from the bottom and working your way to the top.
-
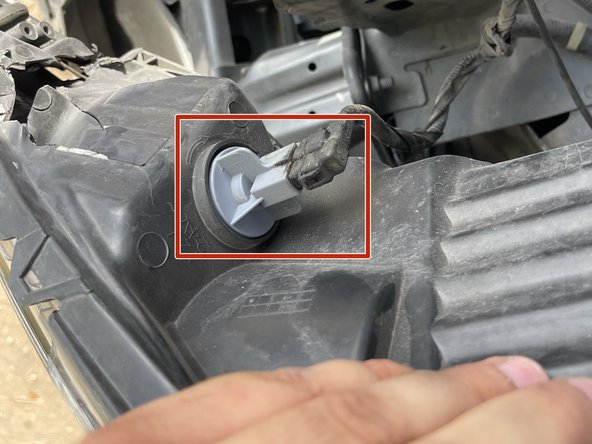
To remove the first connector, squeeze down on the clip holding it in.
-
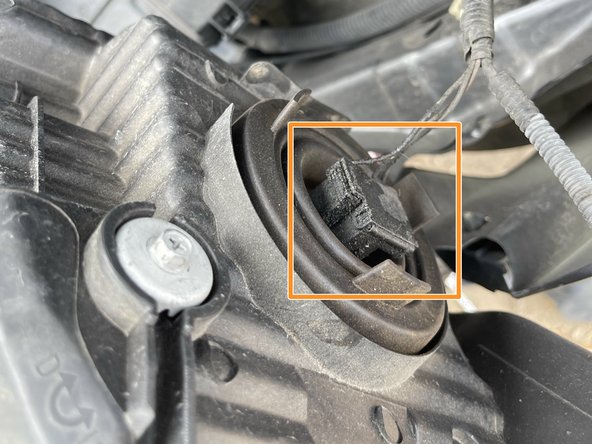
Pull the next connector straight out of the socket.
-
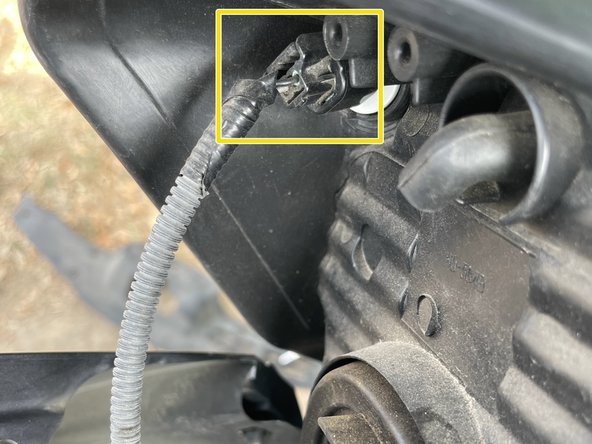
For the last one, squeeze down on the clip holding it in and pull it out.
-


This guide specifically shows the steps to replace the headlight on the driver's side. However, the process is the same on the passenger's side.
To reassemble your device, follow the above steps in reverse order.
This guide specifically shows the steps to replace the headlight on the driver's side. However, the process is the same on the passenger's side.
To reassemble your device, follow the above steps in reverse order.

Equipo

Austin Community College, Team 1-2, Watkins Fall 2023 Miembro de Austin Community College, Team 1-2, Watkins Fall 2023
AUSTINCC-WATKINS-F23S1G2
1 Miembro
1 Guía escrita