Saltar al contenido principal

Qué necesitas

Este desmontaje no es una guía de reparación. Para reparar tu Hp Pavilion dv9363ea, utiliza nuestros manuales de servicio .

  1. hp laptop dv9000 serie dv9363ea Teardown, hp laptop dv9000 serie dv9363ea Teardown: paso 1, imagen 1 de 2 hp laptop dv9000 serie dv9363ea Teardown, hp laptop dv9000 serie dv9363ea Teardown: paso 1, imagen 2 de 2
    • first of all, if you start to work on your laptop make a plane of the screws. Use an magnetic project board. or just paper and tape and draw the plan.

    • remove the battery, and the 3 panels.

  2. hp laptop dv9000 serie dv9363ea Teardown: paso 2, imagen 1 de 2 hp laptop dv9000 serie dv9363ea Teardown: paso 2, imagen 2 de 2
    • remove the RAM and the HDD.

    • to remove the hdd just lift it up. ( its an sata hdd but they use an IDE adapter.

  3. hp laptop dv9000 serie dv9363ea Teardown: paso 3, imagen 1 de 1
    • remove the wifi pci-e card and the antennas.

    • it will come out of the screw sockets when you remove the srews.

  4. hp laptop dv9000 serie dv9363ea Teardown: paso 4, imagen 1 de 3 hp laptop dv9000 serie dv9363ea Teardown: paso 4, imagen 2 de 3 hp laptop dv9000 serie dv9363ea Teardown: paso 4, imagen 3 de 3
    • now we will remove the dvd rw drive.

    • first remove the screw at the back of the laptop (bottom) see first picture

    • than use a spudger to slide the dvd drive away of the laptop.

  5. hp laptop dv9000 serie dv9363ea Teardown: paso 5, imagen 1 de 3 hp laptop dv9000 serie dv9363ea Teardown: paso 5, imagen 2 de 3 hp laptop dv9000 serie dv9363ea Teardown: paso 5, imagen 3 de 3
    • in this step we will remove the keyboard.

    • there are 10 screws to remove in total. 1 screw on the botoom plate , 6 screws in the battery compartment and 3 under the grey plastic board above the keyboard.

    • first remove the black screw on the bottom , it's next to the screw of the dvd drive.

    • than remove the 6 grey little screws of the battery compartment.

    • then remove the grey plastic board above the keyboard. see picture 3, to be continued in the next step

  6. hp laptop dv9000 serie dv9363ea Teardown: paso 6, imagen 1 de 3 hp laptop dv9000 serie dv9363ea Teardown: paso 6, imagen 2 de 3 hp laptop dv9000 serie dv9363ea Teardown: paso 6, imagen 3 de 3
    • if you remove the grey plastic board be carefull for the wire and socket

    • than remove the other screws from the keyboard. see picture 2

    • now you can remove the keyboard.

  7. hp laptop dv9000 serie dv9363ea Teardown: paso 7, imagen 1 de 3 hp laptop dv9000 serie dv9363ea Teardown: paso 7, imagen 2 de 3 hp laptop dv9000 serie dv9363ea Teardown: paso 7, imagen 3 de 3
    • remove the rest of the screws of the bottom plate.

    • like i said before, make a plan of the screws and parts. it's easier to put it back together

  8. hp laptop dv9000 serie dv9363ea Teardown: paso 8, imagen 1 de 3 hp laptop dv9000 serie dv9363ea Teardown: paso 8, imagen 2 de 3 hp laptop dv9000 serie dv9363ea Teardown: paso 8, imagen 3 de 3
    • now remove all the other screws on the upper case. (under the keyboard)

    • also remove the cables/wires.

    • the power board is in the left upper corner. be carefull with the sockets.

    • some wires are taped or glued so be carefull.

  9. hp laptop dv9000 serie dv9363ea Teardown: paso 9, imagen 1 de 2 hp laptop dv9000 serie dv9363ea Teardown: paso 9, imagen 2 de 2
    • if every screw and wire is loose then you are ready to remove the grey plastic board (arround the keyboard)

    • slide the spudger arround the case. it's very easy to remove. just hear the clicks.

    • after removing this plastic frame , the main board is visible.

  10. hp laptop dv9000 serie dv9363ea Teardown: paso 10, imagen 1 de 1
    • now we will remove the power PCB

    • first remove the connectors but be carefull they are very breakable. and remove the screw, than remove the PCB

    • then remove the red circled screw

    • the yellow and 3 blue screws are from the screen henges.

  11. hp laptop dv9000 serie dv9363ea Teardown: paso 11, imagen 1 de 2 hp laptop dv9000 serie dv9363ea Teardown: paso 11, imagen 2 de 2
    • remove usb boards and sd card reader.

    • the yellow circkled PCB below is the Bluetooth PCB. watch out for the connector.

    • the blue circkled connector is the connector of the sd card reader PCB; be carefull if you remove.

  12. hp laptop dv9000 serie dv9363ea Teardown: paso 12, imagen 1 de 1
    • remove the wifi PCB. be carefull for the connectors.

  13. hp laptop dv9000 serie dv9363ea Teardown: paso 13, imagen 1 de 3 hp laptop dv9000 serie dv9363ea Teardown: paso 13, imagen 2 de 3 hp laptop dv9000 serie dv9363ea Teardown: paso 13, imagen 3 de 3
    • remove the PCB for the sound at the side of the frame.

    • remove the loudspeakers and the attached black frame.

  14. hp laptop dv9000 serie dv9363ea Teardown: paso 14, imagen 1 de 3 hp laptop dv9000 serie dv9363ea Teardown: paso 14, imagen 2 de 3 hp laptop dv9000 serie dv9363ea Teardown: paso 14, imagen 3 de 3
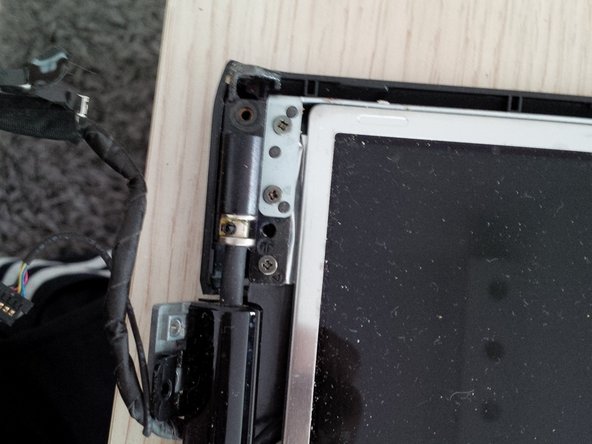
    • before we go further with the PCB's , we will remove the screen.

    • remove the screws of the henges at the 2 sides.

    • be carefull with the connectors. i broke the connector of the webcam PCB.

  15. hp laptop dv9000 serie dv9363ea Teardown: paso 15, imagen 1 de 1
    • remove the second power PCB.

  16. hp laptop dv9000 serie dv9363ea Teardown: paso 16, imagen 1 de 3 hp laptop dv9000 serie dv9363ea Teardown: paso 16, imagen 2 de 3 hp laptop dv9000 serie dv9363ea Teardown: paso 16, imagen 3 de 3
    • remove the DC jack and usb PCB.

    • again be carefull with the connectors.

    • arround the dc jack is a metal frame. remove it before you remove the PCB

  17. hp laptop dv9000 serie dv9363ea Teardown: paso 17, imagen 1 de 3 hp laptop dv9000 serie dv9363ea Teardown: paso 17, imagen 2 de 3 hp laptop dv9000 serie dv9363ea Teardown: paso 17, imagen 3 de 3
    • remove the DVD Drive PCB.

    • 2 screws are hidden under the black tape.

  18. hp laptop dv9000 serie dv9363ea Teardown: paso 18, imagen 1 de 1
    • now remove the last screws of the mainboard. I dont have a picture of the screws .. mea culpa..

    • remove the main board.

    • there are litlle black screws arround the fan.

  19. hp laptop dv9000 serie dv9363ea Teardown: paso 19, imagen 1 de 3 hp laptop dv9000 serie dv9363ea Teardown: paso 19, imagen 2 de 3 hp laptop dv9000 serie dv9363ea Teardown: paso 19, imagen 3 de 3
    • in this step we will begin at the main board or motherboard..

    • we will remove the fan and cpu cooler.

    • the cpu koeler is in 2 pieces. 1 for the cpu and another chip. than a fan for the Nvidia chip.

  20. hp laptop dv9000 serie dv9363ea Teardown: paso 20, imagen 1 de 3 hp laptop dv9000 serie dv9363ea Teardown: paso 20, imagen 2 de 3 hp laptop dv9000 serie dv9363ea Teardown: paso 20, imagen 3 de 3
    • remove and clean the pcu fan. in this laptop was a lot of cat hear, that caused a blocked fan.

    • also put new cpu cooling paste on the chips. ( and processor)

  21. hp laptop dv9000 serie dv9363ea Teardown: paso 21, imagen 1 de 3 hp laptop dv9000 serie dv9363ea Teardown: paso 21, imagen 2 de 3 hp laptop dv9000 serie dv9363ea Teardown: paso 21, imagen 3 de 3
    • now the lcd screen...

    • i don't have to tell you that you have to be careful...

    • remove the black dots ( the screws are under the black dots)

    • if you removed all the screws than use the spudger or isesamo to open the frame. you will hear the clicks..

  22. hp laptop dv9000 serie dv9363ea Teardown: paso 22, imagen 1 de 3 hp laptop dv9000 serie dv9363ea Teardown: paso 22, imagen 2 de 3 hp laptop dv9000 serie dv9363ea Teardown: paso 22, imagen 3 de 3
    • remove the microphone module and the webcam PCB.

    • remove the wifi antennas.

  23. hp laptop dv9000 serie dv9363ea Teardown: paso 23, imagen 1 de 3 hp laptop dv9000 serie dv9363ea Teardown: paso 23, imagen 2 de 3 hp laptop dv9000 serie dv9363ea Teardown: paso 23, imagen 3 de 3
    • remove all the other screws and henges , so you can remove the lcd screen from the frame.

  24. hp laptop dv9000 serie dv9363ea Teardown: paso 24, imagen 1 de 1
    • remove the mouse or touchpad module.

Kevin D

Miembro Desde 05/02/14

7,294 Reputación

21 Guías creadas

0 comentarios

Agregar Comentario

Ver Estadísticas:

Ultimas 24 horas: 0

Ultimos 7 días: 1

Ultimos 30 días: 14

Todo El Tiempo: 2,937