Saltar al contenido principal

Qué necesitas

Este desmontaje no es una guía de reparación. Para reparar tu Scotch TL901, utiliza nuestros manuales de servicio .

  1. Scotch TL901 Teardown, The Laminator: paso 1, imagen 1 de 1
    • The Scotch TL901 Laminator

  2. Scotch TL901 Teardown, Unscrewing the Case: paso 2, imagen 1 de 1
    • Using a small Phillips screwdriver, remove the screws from the bottom of the plastic case.

    • Rubber feet in the four corners must be removed first to gain access to the screws underneath. A sticker may also be covering the middle screw on the left.

  3. Scotch TL901 Teardown, The Opened Laminator: paso 3, imagen 1 de 1
    • Pull off the silver plastic cover and gain access to the internal components.

    • The rollers, motor, circuit board, and LEDs are all visible now.

  4. Scotch TL901 Teardown, The Circuit Board: paso 4, imagen 1 de 1
    • First unplug all three wire headers connected to the circuit board.

    • Unscrew the two screws holding down the circuit board by its corners and remove the board from the laminator.

  5. Scotch TL901 Teardown, The Spring: paso 5, imagen 1 de 1
    • Unhook the spring from the plastic surrounding the motor.

  6. Scotch TL901 Teardown, The Rollers: paso 6, imagen 1 de 1
    • Hold the roller enclosure from both sides, indicated by the markers, and pull upwards and slightly out.

    • Free access to the motor and rollers is now possible.

  7. Scotch TL901 Teardown, The Motor: paso 7, imagen 1 de 1
    • Remove the motor from the rollers by unscrewing the three screws holding them together.

  8. Scotch TL901 Teardown, The Sensor: paso 8, imagen 1 de 1
    • Remove the sensor from the roller enclosure by unscrewing the two spring-loaded screws.

  9. Scotch TL901 Teardown, The Other Side: paso 9, imagen 1 de 1
    • Unscrew the two screws and the bar on the other.

  10. Scotch TL901 Teardown, The Gears: paso 10, imagen 1 de 1
    • Pull the black washers sideways off the metal rod of the roller.

    • Pull the gears off.

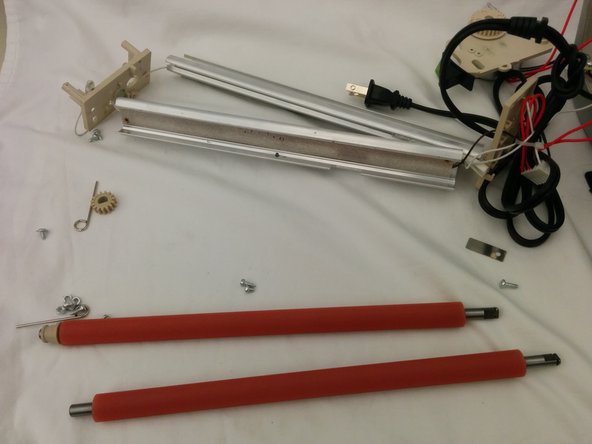
  11. Scotch TL901 Teardown, The Disassembled Rollers: paso 11, imagen 1 de 2 Scotch TL901 Teardown, The Disassembled Rollers: paso 11, imagen 2 de 2
    • With the gears off, the plastic panel falls off and the rollers come out of the enclosure.

    • The laminator is now disassembled.

Calvin Xu

Miembro Desde 04/18/13

202 Reputación

1 Guía escrita

Equipo

F14BraunReverseEng Miembro de F14BraunReverseEng

Community

2 Miembros

8 Guías creadas

16 comentarios

Why is the screw on the left side so hard to get out?

Teri L Geist - Contestar

Thank you..

Putting it back together is more of a challenge.

Frank - Contestar

You're right Frank. For me, getting it to stay together after the tear down and reassembly required superglue and two extra screws. ;) But at least it's working again. Thanks for the great instructions.

pjcall975 - Contestar

Thank you! Just needed to open and remove a jam. Followed your guide and all is well.

KQuinn

Kate Quinn - Contestar

Thank you for posting these instructions. I was able to remove a quarter that got trapped inside.

seanretzloff - Contestar

Agregar Comentario

Ver Estadísticas:

Ultimas 24 horas: 6

Ultimos 7 días: 24

Ultimos 30 días: 150

Todo El Tiempo: 29,212