Introducción
Ya fue hace exactamente un año que desmontamos el Galaxy S5, pero Samsung ha dado un salto adelante con el diseño del Galaxy S6 Edge. Solo un desmontaje nos dirá si su construcción de cristal y aluminio y su pantalla de bordes curvados vienen con garantía de futuro y si es futurista. Únete para aventurarnos al Galaxy más nuevo .
Manténte al tanto de nuestras noticias de reparación en
únete a nuestro círculo en
Facebook y fíjate en nuestro
Instagram para ver nuestras tomas que son de otro mundo.
Qué necesitas
Resumen del Video
-
-
Este nuevo móvil tiene muchos atractivos. Las actualizaciones más notables son:
-
Pantalla táctil capacitiva 5.1" Super AMOLED (1440 x 2560, ~577 ppi, 16M colores)
-
Procesador Samsung Exynos 7 Octa 7420 con Mali-T760 GPU integrado y 3 GB de memoria.
-
Cámara trasera de 16 MP con HDR, LED flash y 4K de grabación de vídeo.
-
Soporte integrado par a Qi y carga inalámbrica Powermat.
-
Opciones de almacenamiento 32/64/128 GB (pero no tiene ranura para microSD)
-
Soporte Corning Gorilla Glass 4
-
-
-
El Edge está encendido, y hasta ahora, estamos impresionados. Con sus curvas elegantes y pantalla nítida, el S6 es como una piscina infinita en la palta de tu mano...
-
excepto que se siente bastante menos ergonómico y es un imán total para huellas digitales.
-
Una rápida mirada de cada lado nos muestras la función de transmisión de información de Edge que te trae todas tus noticias importantes, el tiempo y las notificaciones a un lado de tu pantalla.
-
Vemos por un segundo los sensores de gestos y proximidad, así como también la cámara frontal—todo sellado detrás del Gorilla Glass del Edge.
-
-
-
Viviendo en el borde del nuevo Galaxy, están el altavoz y el micrófono, así como también la toma de audio y el puerto USB 2.0.
-
El monitor de frecuencia cardíaca ya familiar es visible debajo del flash LED, al lado de la cámara trasera.
-
Desafortunadamente, la gente ya está teniendo problemas con el sensor.
-
Un segundo micrófono reside en el borde superior del teléfono junto al puerto infrarrojo y la bandeja SIM.
-
-
-
Ahora miremos la parte trasera de este dispositivo de avanzada. Notamos que el número de modelo es SM-G925T— y nos ponemos a trabajar para despachar la tapa trasera.
-
El panel trasero está pegado de forma sólida y está muy ajustado dentro del marco. Aún con el iOpener sobre el adhesivo, tuvimos que usar nuestra ventosa resistente para romper poder deslizar una púa de apertura. Definitivamente, no fue mu divertido.
-
Un salto atrás cuando Samsung tenía puertas para reemplazo de batería fácil de usar. Descansa en paz.
-
-
-
Nuestras púas de apertura son instrumentales para reverla lo que hay dentro del Edge.
-
Hasta nuestra púas más pequeñas tienen problemas para vencer los bordes de este cristal.
-
Con mucha ayuda de nuestro amigo iOpener—y montón de paciencia— nos movemos alrededor del perímetro.
-
Se remueve el panel (bueno, casi todo) Debajo, encontramos una situación muy pegajosa... pero no es nada de lo que no nos podamos encargar.
-
-
-
Con un par de palabras mágicas ( y algo de fuerza bien aplicada), el panel adherido se separa del resto del teléfono.
-
Con el panel finalmente despegado, el adhesivo se despega del cristal fácilmente, pero deja un residuo pegajoso en el marco medio de metal.
-
Cuando escuchamos que el S6/S6 Edge venía con un panel de cristal, caímos en la tierra de flashback del 2011; pero luego de nuestros test de estrés sofisticados, parece que el cristal ha progresado mucho en cuatro años.
-
-
-
En cada previo teléfono Galaxy, incluso hasta el desafiante para reparaciones de Galaxy S5 del año pasado, esta es la parte donde sacamos la batería con una uña.
-
Nuestros viejos amigos, destornillador y herramienta de apertura de plástico, saltan a la lucha para ayudar. Al menos, parece que hemos terminado con el adhesivo—el marco medio sale bastante fácil, mostrando todas las "golosinas" bajo la cubierta.
-
-
-
-
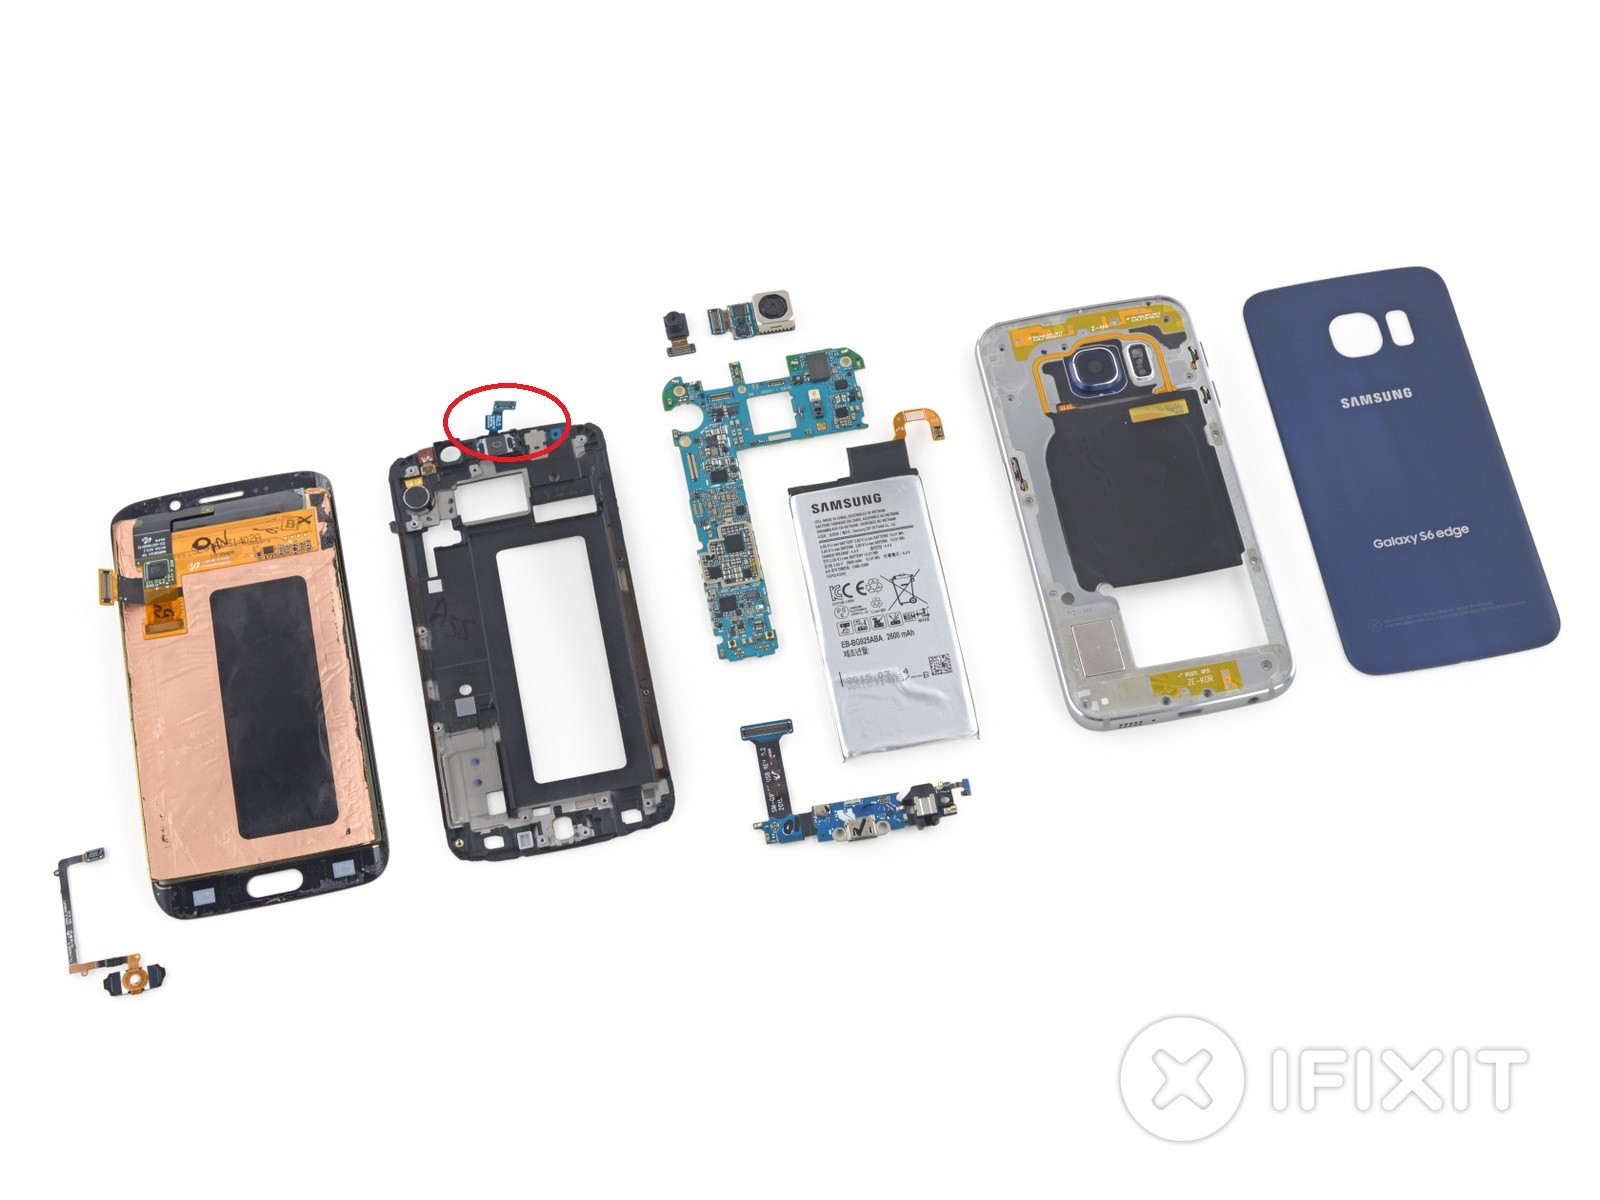
Con el marco medio despachado, finalmente tenemos la oportunidad de ver la batería y la placa madre.
-
Hasta ahora, también estamos acostumbrados a poder remover la memoria expansible, en forma de una tarjeta MicroSD. ¿Dónde está? Si necesitas almacenamiento adicional, mejor págalo anticipadamente; no podrás agregarlo más adelante.
-
El marco medio está lleno de cosas buenas—toneladas de contactos de muelle, una bobina de carga inalámbrica/NFC y un altavoz.
-
Nos encantaría sacar la batería y echarle un vistazo, pero por ahora, vamos a tener que conformarnos con desconectarla de la placa madre.
I fix phones for a living, and today I ran across what seems to be a later revision of this phone that has BIG PROBLEMS here. The screws on either side of the charging port are missing from this one - the antenna runs straight across and the screw holes are gone. On the inside, the plastic part of the speaker includes an extra bracket that basically has the charging port sandwiched between the housing and the speaker. There's also a screw holding the headset jack to the front housing that can't be removed until the rear housing is off.
The end result is that taking this other version apart will probably result in the charging port flex destroying itself and the need to replace the back housing and speaker.
The model number on this one was SMG925VZWA, a US Verizon version. I didn't have any other ones handy to compare the model number, but you can definitely see the difference once the back glass is off. If those screw holes are missing, be VERY careful taking it apart, and expect to need more parts.
-
-
-
Antenas etiquetadas en el marco medio... qué bonito.
-
Según Samsung, las antenas están soldadas al marco medio a través de una soldadura ultrasónica para proporcionar estabilidad y ahorrar espacio.
-
También encontramos un orificio en el marco medio para el botón de encendido.
Space continuum cracked me up.
Me too! I had to do a double read it made me laugh out loud!
whats the function of the golden belt lining that touches the black cover on 2 ends and goes round the camera
-
-
-
Con todos sus conectores fuera, la placa madre está casi libre de la pantalla —comparte la misma conexión de placa E/S del lado equivocado que vimos primero en el Galaxy S5.
-
Arrancamos la cámara principal de la placa madre para ver mejor el hardware del PCB.
-
Memoria Flash Serial Winbond W25Q32FW
-
Giroscopio de doble eje para estabilización de imagen óptica InvenSense IDG-2030
-
La cámara trasera de 16 MP OIS empequeñece la cámara selfie de 5 MP.
-
-
-
Como ChipWorks lo había notado en su análisis del Galaxy S6, más y más de los chips en los teléfonos principales de Samsung parecen originarse internamente. En la parte frontal de la placa madre, encontramos:
-
Procesador de ocho núcleos Exynos Samsung 7420 - 64 bits, 2.1 GHz Quad + 1.5 GHz Quad con Samsung K3RG3G30MM-DGCH 3 GB LPDDR4 RAM en capas.
-
Samsung KLUBG4G1BD 32GB NAND Flash
-
Módulo Front-End (FEM) multibanda multimodo híbrido (MMMB) Skyworks 78041
-
Avago AFEM-9020 PAM
-
Amplificador de Audio Class DG Maxim MAX98505 y Audio Codec Wolfson Microelectronics WM1840
-
Samsung N5DDPS3 - Similar al N5DDPS2 en el Galaxy S6, posiblemente controlador NFC
-
InvenSense MP65M 6-Axis Accel + Gyro, y Samsung C2N89U (posiblemente procesador de imágen)
Does the phone support MHL? I did not see the chip for MHL like S5
-
-
-
¿Una tapa trasera de cristal y una batería pegada obstinadamente? Samsung ¿estuviste juntándote con Apple?
-
Alas, las tácticas de Apple terminan demasiado pronto. No hay lengüetas de extracción prácticas a la vista, lo que significa que este desagradable adhesivo debe ser recogido una tira a la vez.
HAHAHAHAHAHA now THAT was hilarious :D
I loved the jokes. Thanks guys for making this article so fun
-
-
-
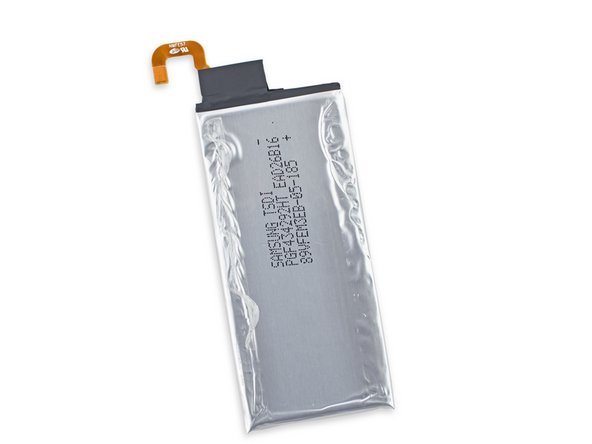
Libre de su mucílago pegajoso, obtenemos una mejor visión de la batería 3.85 V, 10.01 Wh
-
Samsung se ha alejado de la batería de 2800 mAh que se encuentra en el Galaxy S5 y ha vuelto a una batería de 2600 mAh, como el S4.
-
Samsung afirma que la batería del Edge proporcionará 12 horas de navegación web LTE, 26 horas de conversación 3G WCDMA y hasta 58 horas de reproducción de música.
-
¡Y está recién salido del horno! En serio, mira la fecha.
-
-
-
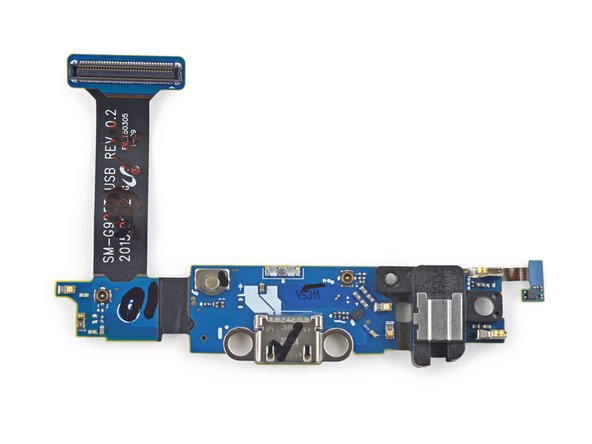
En lo que parece ser otro importante paso hacia atrás, el S6 Edge descarga el puerto USB 3.0 Micro-B súper rápido que se encuentra en el Galaxy S5 a favor de un puerto microUSB (2.0).
-
Bienvenidos al año 2000.
With the very least frame modding and loss of headphone jack. If you use the s5 modular cable. If it will even plug in or work.
-
-
-
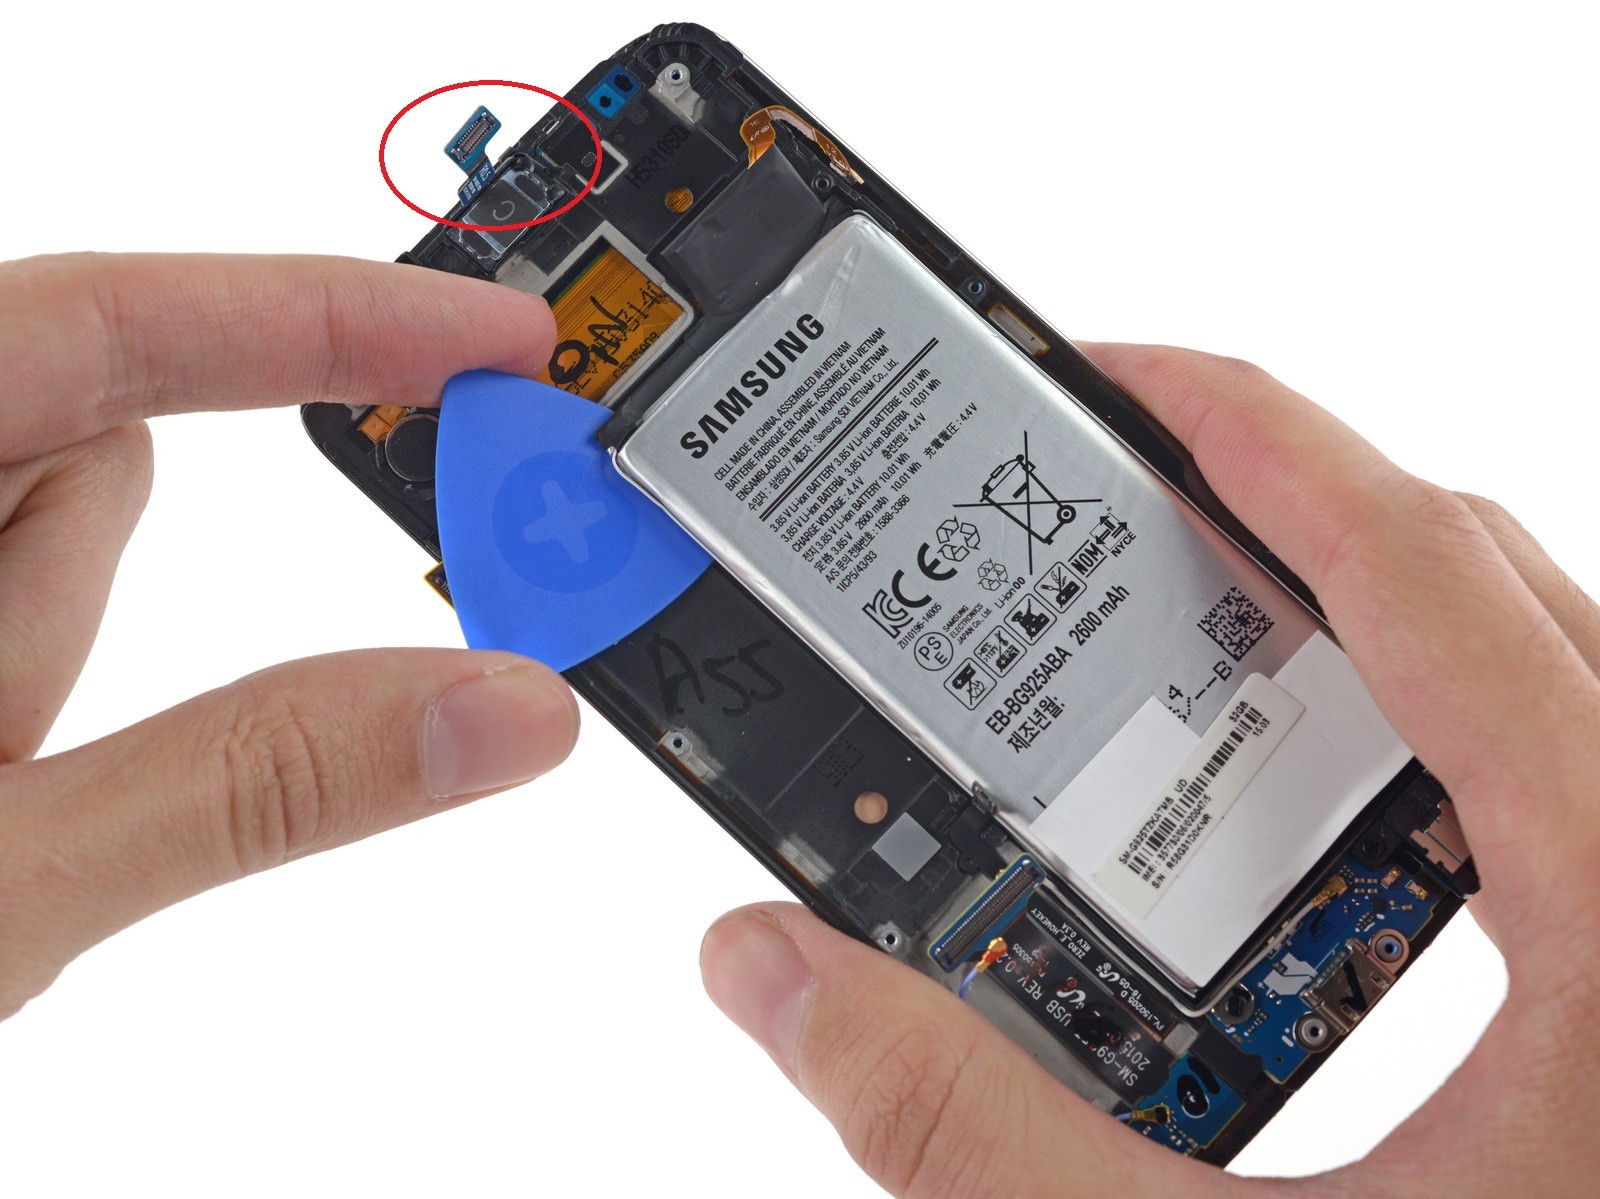
Ponemos el Edge en la cama en un nido iOpener, con suerte se despierta renovado, con adhesivo liberado.
-
Levantar el vaso y ... esperar, ¿es eso normal?
-
Parece que al entrometerse en la pantalla curva separamos la pantalla un poco. ¡Ups!
Did you just break the screen? Does it still work? If it doesn't is there any way to replace the home button without breaking the display?
My screen is cracked and I really don't want to pay 200 dollars for it to be fixed. Is it really impossible to replace just the glass without breaking the digitizer?
repair-ability is a 3 when the apple watch got a 5 where the majority of the apple watch is "unrepairable". Something needs to be done with yalls scale as currently it looks like your an apple supporter and Samsung basher. Having to mod your tool with a file just to remove the screws on the apple watch trumps a glued back or glued battery in my opinion of repair-ability. Not trying to create any waves just pointing out the lack on continuity across your repair-ability ratings. Thanks for giving me a heads up look at the teardown for these devices as it's much appreciated.
Look at what you have to do to replace the screen on both devices. the edge needs to have complete disassembly the watch just pops off. the battery on the edge requires removing the back glass and a complete teardown, the watch just remove the screen and there sits the battery
wesley burson, the phone doesn't need a full disassembly. At stage 8 you can remove the LCD.
Point taken for screen and battery replacements... what about everything else tho? On the apple watch jut about everything else was "unrepairable". How is a device with multiple components "unrepairable" ranked higher then a device that is reparable regardless of the difficulty. I would think "unrepairable" would have a lower score for the simple fact that if one of those components have an issue there is no repair option where with the S6 at least it's possible to repair. We are talking repairability here on an over all scale not just screens and batteries.
I believe there should be subcategories like:
1. Openability
2. Repraceability
3. Destructibility
4. Separability/Removability
Then the average will give the Repairability score. :)
dyanro -
Is the glass able to separate from lcd?
there is a missing part you didn't mentioned on top of the phone named "Ear Speaker & RCV Sensor - GH96-08091A" which controls proximty, front led and also speaker voice. why? http://i.hizliresim.com/BPLWZQ.jpg http://i.hizliresim.com/Zk9jLo.jpg
-
-
-
¡Se dobla! Al pelar la pantalla nos muestra cómo se curva la pantalla de Samsung alrededor de los lados del teléfono.
-
En la parte posterior de la pantalla se encuentra el controlador de pantalla táctil habitual, esta vez un STMicro FT6BH.
Hi
When removing the glass did you break the digitizer... from what I know the digitizer is glued to the screen glass but yet is connected to the lcd.. so when you remove the glass from the lcd you inadvertently break the digitizer in the process.. did you have any issues with this...
Many thanks
Steven Steward
Hi...I actually have a problem with the reciver of the phone and also the aux isn't working..which part should I buy to get it fixed..
Jayesh -
My phones voice reciver and the aux ain't working which paet do I need to buy to fix it...
Jayesh -
S6 egde voice reciver and the aux isnt working which part do I need to replace for it...model no g925t
Charge port handled all of those features
Wow! 50% yield. That's terrible. Very interesting reading iFixit! Thank you.
That's insane. That just gave me a reason to not buy a galaxy. They need to figure out a better way of manufacturing the screens. Which also explains why Samsung parts are so expensive compared to Apple. The yield. You are actually layig Samsung for 2 screens that's ridiculous.
-
-
-
El último componente que sale del ensamblaje de la pantalla es el botón de inicio modular.
-
También a diferencia del S5, no hay necesidad de ninguna trampa secreta.
-
Gracias a que se eliminaron las travesuras de la pantalla sale primero del año pasado , recibimos un camino totalmente diferente al botón de inicio. ¿Mejor? Meh. Probablemente no peor.
-
-
-
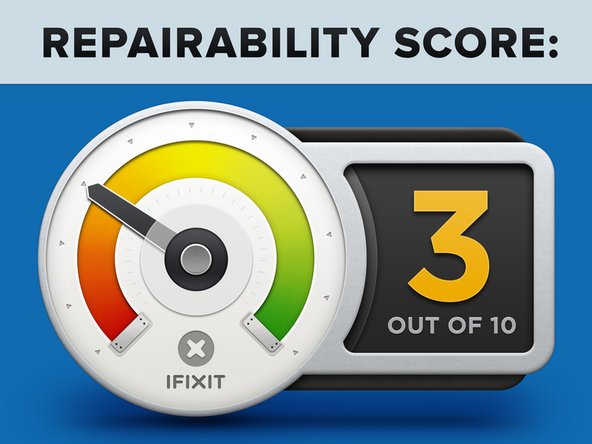
Clasificación de reparabilidad de Samsung Galaxy S6 Edge: 3 de 10 (10 es lo más fácil de reparar)
-
Muchos componentes son modulares y pueden reemplazarse independientemente.
-
En una mejora sobre el diseño del S5, ya no tiene que quitar la pantalla para entrar en el teléfono y reemplazar la placa madre.
-
Los cristales delanteros y traseros tienen el doble de capacidad de ruptura, y el fuerte adhesivo en el cristal trasero hace que sea muy difícil ingresar al dispositivo.
-
La batería está muy adherida a la parte posterior de la pantalla y está enterrada debajo del marco medio y la placa madre.
-
Reemplazar el vidrio sin destruir la pantalla va a ser muy difícil.
Buongiorno,
complimenti per una guida così chiara.
Il punto è che avendola seguita, ho cambiato la scheda madre del mio S6 Egde (925F).
Funziona tutto egregiamente ma la ricezione e soprattutto l’invio dati sotto copertura 3G, 4G, LTE è lentissima.
Lo Speedtest spesso dice che la velocità di upload è zero. Ho anche fatto un factory reset, ma niente…
Cosa posso aver sbagliato? Cosa devo controllare?
Grazie mille in anticipo per la risposta
-


Un agradecimiento especial a estos traductores:
95%

Estos traductores nos están ayudando a reparar el mundo! ¿Quieres contribuir?
Empezar a traducir ›

24 comentarios
Holy He11 you guys got the phone that says "A S S" in it. I wouldn't rate this a "3" this is more like a 5 in my book. You guys rate a m7 as a "1" which is one of the more difficult phones out there but its still easier than some of the older Motorolas.
Do I know you??????
That sure looks like a MicroSD receptacle on image "Step 11" on the bottom left corner of the board. Is that the Simm Card receptacle or a MicroSD receptacle?
That's the SIM card receptacle.
Ryan -
SD Card Yeah Nelson Bush, that is an SD card slot. Everybody in Samsung forgot they put it there. Ooops.
Hi,
I've just replaced a broken screen, everything went well, but soft keys (Back and Recent apps) not working on new screen ! Are those keys being controlled by screens digitizer of the daughter board that has the LEDs for them ?! should I send back the new screen as faulty ?! or sth happened to daughter board when I opened it (which I doubt).
Any suggestion ?!
Thanks
The soft keys are part
Of the screen on the s6 edge. The standard s6
Soft keys are on the charge port. So faulty screen
Incorrect. The touch buttons on the S6 Edge are also on the daughterboard, but are not ribbons that attach to the screen frame (as with the S6). Instead, they are on the opposite side of the daughterboard and are pressed into place by the natural pressure of the board against the screen. This makes the replacement of a charging port much easier due to not having to remove the LCD from the frame, which is tedious. Replacing the home button is the same as on the S6 - you will have to remove the screen frame from the LCD to access it.
mbrulla -
UPSM ON
UPSM OFF
Work?
would the main motherboard from a G925T work with the parts from a G925i
i dropped my phone in water. is there any way to recover the data or fix the phone?
How To Remove The Wi-Fi Adapter? (For Kid-Safe Phone)
It's much easier to root the phone and disable the wifi chip in the build.prop file. Google that.
I would be more worried about disabling cellular than disabling wifi.
Hello! Where can one get a genuine battery replacement. Samsung in my country won't replace my faulty battery saying I didn't buy the phone from the region.
I have my s6edge+ all in pc's I need digitizer LCD battery. And the main belt wire front face glass weird mine was plexiglass and I'm ready to assemble.
Hello Guys i have probleme in my phone samsung galaxy s6 edge the probleme is many stop in work and many time i restard my phone his stopped in samsung logo of depart please help me when probleme hardware or software thanks.
Hi, I replaced the sim card reader (not the tray) and now the phone does not turn on wifi. It attempts to turn on wifi for about 10 minutes and gives up. Would appreciate if you can suggest any solutions. Thanks
Why have a fake picture of the phone for this??
iliketurtuls - Contestar
Yeah omg i just noticed it!
allafman5 -
Good question.
HakanEr -
Wait, what? Which picture?
Lucas Gallindo -
I am so sick of being told no by manufacturers when it comes to repairs. The argument about needing to design a device this way to make it thin is a big fat lie.
gallardo - Contestar
Isn't the reversion to usb 2.0 for the rapid charging to work?
codycowgill - Contestar