Qué necesitas
-
-
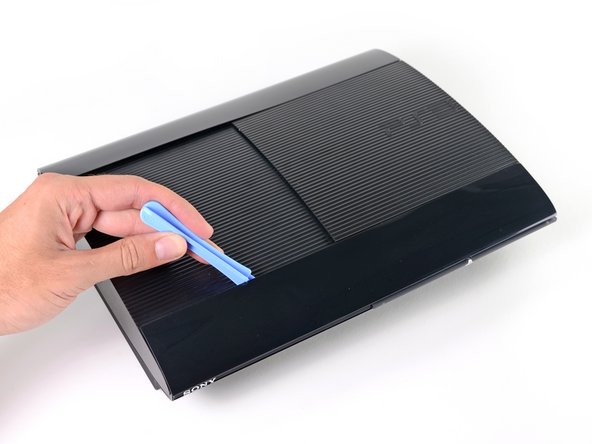
Preparado y listo para mostrar todo y demostrar su valía, la PlayStation 3 Super Slim tiene mucha potencia en un factor de forma súper compacto. Las especificaciones notables incluyen:
-
Salida HD 1080p, 1080i, 720p, 480p y 480i
-
Sonido envolvente LPCM de 7.1 canales, Dolby Digital, Dolby Digital Plus, Dolby TrueHD, DTS, DTS-HD, AAC
-
Cell Broadband Engine ™
-
GPU RSX®
-
256 MB de RAM principal XDR y 256 MB de VRAM GDDR3
-
Disponible con 12 (memoria flash), 250 o 500 GB (¡actualizable!) De almacenamiento interno
-
-
-
Insertar traducNo es que nos quejemos, pero teníamos que conseguir nuestra PlayStation 3 Super Slim en un paquete. Parece que después de innumerables aventuras, Nathan Drake finalmente encontró un tesoro digno de elogio. ción aquí
-
¿Qué se incluye exactamente en este paquete? Me alegro de que hayas preguntado:
-
Sistema PlayStation 3 Super Slim de 250 GB
-
Controlador inalámbrico DualShock 3
-
Insertar traducciónCable compuesto AV (lamentablemente no se incluye ningún cable HDMI en este paquete) aquí
-
Cable de alimentación de CA
-
Cable USB (necesario para cargar el controlador DualShock)
-
Uncharted 3: Drake's Deception (Edición Juego del año) + Dust 514 (Contenido descargable incluido)
-
-
-
Queríamos ver cómo la PS3 Super Slim se compara con el modelo delgado estándar, la consola a la que reemplaza.
-
Llámenos tontos, pero nuestra prueba nos dio los resultados que esperábamos. El Super Slim podría haber ganado un nombre más grande, pero perdió un tamaño serio.
-
Aunque las partes traseras de ambas consolas parecen similares, nos dan mucha información sobre algunas de las revisiones realizadas para la Super Slim.
-
Para empezar, las rejillas de ventilación son considerablemente más pequeñas, lo que probablemente signifique que el ventilador en sí es más pequeño y tiene menos calor que tratar.
-
En segundo lugar, el diseño del puerto se cambia ligeramente, respondiendo a una pregunta que recibimos mucho sobre la compatibilidad de la placa base: No, no puede intercambiar placas base Slim y Super Slim.
-
-
-
Quizás el mayor cambio en el nuevo modelo, y la mayor queja de los consumidores, es el cambio a una unidad de disco de carga superior manual.
-
La puerta es de plástico delgado y de apariencia barata, lo que significa que esta PS3 ahora requiere espacio libre para cambiar el disco. No más meter la PS3 en un estante pequeño.
-
Sospechamos que fue necesario deshacerse de la bandeja para reducir los costos y el tamaño en el Super Slim. Sin embargo, es una elección de diseño que ha recibido muchas críticas, recordándonos otro cambio reciente relacionado con el tamaño.
-
Además del beneficio inmediato para los márgenes de Sony, la reducción de los costos de producción también prepara la PS3 para el futuro. Cuando finalmente se lance la Playstation 4, es casi seguro que la PlayStation 3 Super Slim todavía se venderá junto con la nueva consola, pero a un precio mucho más bajo.
-
-
-
La sección inferior del Super Slim se ve similar a su predecesor, con la excepción de una luz indicadora de Wi-Fi que falta.
-
Todavía están presentes en la parte frontal del Super Slim dos puertos USB 2.0, una luz indicadora de disco duro y una gran cantidad de logotipos compatibles, incluido el logotipo típico de Blu-ray Disc.
-
-
-
La cubierta de la bahía del disco duro de la PS3 Super Slim aparece enseguida y revela un tornillo Phillips azul brillante.
-
Después de retirar dicho tornillo, el disco duro Hitachi TravelStar Z5K320 2.5 "SATA II 3.0Gbps 250 GB 5400 RPM sale directamente.
-
Quizás lo mejor del disco duro de la PlayStation es que Sony le permite actualizar su consola con cualquier disco duro portátil de 2.5 ". No hay firmware sofisticado, ni recintos extravagantes, solo usted, su consola y todo el almacenamiento que pueda.
The cover SLIDES off to the rear! NOT pop off. Do not pull on it or you will break some tabs
Wow, I wish I would have looked at the comments BEFORE I attempted this!
Thanks for the warning Todd. Looks like all the tabs on the back half of mine are now shored off. I’ve been coming here to ifixit.com for years and this is the only walk-through that i’ve come across that does a CRAP job of telling where the actual screws are or where the tabs are. Poorly done.
-
-
-
-
Las patas de goma pequeñas esconden tres de los tornillos de la carcasa exterior y proporcionan a la PlayStation 3 Super Slim un poco de agarre.
-
No creemos que estos pies sean una gran molestia; son fáciles de eliminar, agregar funciones y limpiar el aspecto de la consola.
-
Al bloquear el acceso al cuarto tornillo, aparece una calcomanía Wild Warranty Void. Y se ha ido.
-
Creemos que los adhesivos como este son falsos, y creemos que también debes hacerlo.
There is only 4 screws and nothing under the two pads on the long left side
-
-
-
Una herramienta de apertura de plástico hace que los biseles exteriores funcionen rápidamente.
-
Localizado debajo del bisel externo frontal, encontramos la pegatina de advertencia láser cada vez más tentadora.
-
Quitar los marcos también proporciona acceso a los tornillos que necesitamos quitar para entrar al Super Slim.
On my unit, there's a T8 security screw holding the front bezel in place on one corner.
There are two secure torx screws securing the case at the dvd/bdrom drive; they are visible by opening the dvd/bdrom sliding cover.
Yep, more tabs broken for me.
Wow, I wish I would have looked at the comments BEFORE I attempted this!
I’ve been coming here to ifixit.com for years and this is the only walk-through that i’ve come across that does a CRAP job of telling where the actual screws are or where the tabs are. Poorly done.
Two Screws on the side next to the hard disc holder. One is a security I think T8 but don’t have
.
Definitely poorly written instructions that strides more along a hip selling point than an actual step by step tear down.
I followed these instructions and now I have two bezels with three broken tabs on each one. I am SO ANGRY with iFixit right now for destroying my PS3. I also had a torx screw holding down one of the bezels and now that’s broken too. It has been SIX YEARS, Why haven’t these instructions been updated, iFixit?!? There are also two torx screws down by the hard drive and 5 screws that were under the bezels. How do you fail to miss instructing us to remove eight screws? The bezels don’t pop off. They slide off. They slide to the side and then come off. Following your instructions DESTROYS them!
Guys, as stated in the banner at the top of the page, this is NOT a repair guide and should not be used as instructions. There’s a link right there to detailed step-by-step instructions if you need them.
-
-
-
Después de retirar la cubierta superior, continuamos nuestra exploración retirando la bandeja del disco de carga superior manual.
-
Di lo que quieras sobre el cargador de discos sin bandeja en el Super Slim, pero definitivamente es un diseño amigable para las reparaciones.
-
La lente láser está etiquetada como KEM-850 PHA 0672 23020A.
-
Leímos algunos informes contradictorios sobre el nivel de ruido de la unidad de disco de la PS3 Super Slim e incluimos una mirada a los esfuerzos de reducción de ruido de Sony:
-
Descubrimos que la unidad está montada en paragolpes de goma súper blandos y rodeada por una bandeja de plástico que reduce el ruido, lo que debería amortiguar las vibraciones.
-
Sin embargo, esto no ayudará mucho a amortiguar los sonidos que vienen directamente del disco a través de la delgada puerta de plástico de la bandeja.
Hi, i have a ps3 super slim CECH-4201C and it stopped playing any disk i put in it. So i wanna change it but my lens is a single lens and all the ones i can find is double, will it still work for mine? Also where can i get a single lens and which is better. The console is 500gb came with "The last of us". Thanks. Hope to hear from you soon.
-
-
-
El módulo de fuente de alimentación se retira fácilmente del lado posterior de la carcasa.
-
A pesar de la disposición limpia de los componentes, las partes internas de la fuente de alimentación son muy difíciles de alcanzar, ya que su carcasa interna se mantiene unida mediante cuatro tornillos y varios clips de plástico resistentes.
-
De forma similar a la PS3 Slim, la fuente de alimentación está diseñada para entradas que van desde 100 V a 240 V de CA, lo que la hace utilizable en todo el mundo.
-
Parece que el consumo general de energía también se ha reducido. Mientras que el PS3 Slim fue calificado con 12 V y 18 A DC, el Super Slim tiene una potencia de 12 V y 13 A DC.
Is the CECH 4001B bivolt too? Its sign just say 120V and i'm in Brasil so I have 220 V..... very afraid to fry my PS3 :o
Did you got your answer? Or did you try it on 220v?
Hello guys
I bought a ps3 super slim (UC2 Cech-4001C GA), it's 120v,1.5A and 190 W,
Can i use it in germany with out power converter?In germany 220V and 50Hz
Hello Guys
I bought a ps3 super slim 500gig god of war bundle(UC2 Cech-4001C GA) in the box just write 120V,1.5A and 190 W.
Can i use it with out power converter in the Germany? in the Germany 220 V and 50Hz
More broken tabs. It would have been VERY helpful to note where the actual locking tabs ARE AT. This thing was so darn hard to get apart.
As stated at the top of the page this is not a repair guide. There is a service manual section for the PS3 Super Slim for actual repairs, this is just taking it apart to see what’s inside.
I can’t reply to Mathieu, so here I am. That’s EXACTLY what we are here to do. I’m trying to completely disassemble it so that I can clean it out. I’m not repairing anything but need to know where all that is in order to get it apart. where else are we supposed to go?
Ember -
-
-
-
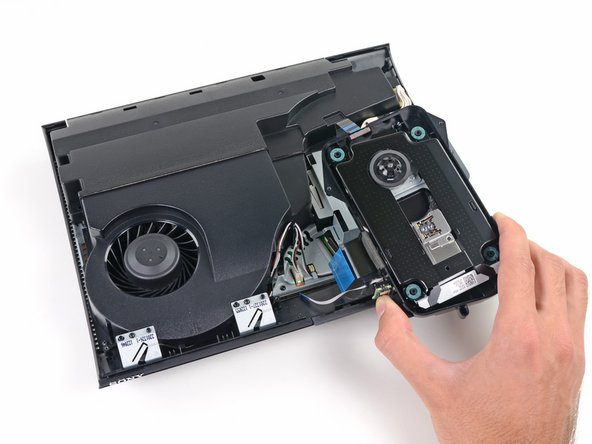
El ensamblaje de la placa base / ventilador se envía desde la minúscula a medida que continuamos nuestra búsqueda.
-
Estábamos un poco molestos al descubrir que se debe quitar todo el conjunto de la placa base para acceder al ventilador o los disipadores de calor, pero tiene un diseño muy compacto y sólido.
-
En la parte frontal del conjunto del ventilador, encontramos las antenas de Wi-Fi y Bluetooth.
-
Grabado en las antenas encontramos el logo de TE Connectivity. Según TE Connectivity, sus "diseños de antenas se han aplicado a una amplia gama de productos inalámbricos que incluyen ... revolucionarias consolas de juegos".
Can I ask which one is the Bluetooth and witch one is the wifi I want to add an external ariel to mine want to make sure I solder to the right wire Ie white or black wire is bluetooth Thanks in advance
It is the white wire that is the Wlan It is written on the motherboard so you cant go wrong
-
-
-
Debajo de la puerta número dos… ¡la placa base!
-
Después de unos momentos tensos, finalmente pudimos levantar el marco de metal de la placa base.
-
Una inspección rápida revela una pasta térmica adecuada en la GPU, pero un trabajo menos que perfecto en la CPU.
-
¿Hay margen de mejora para los hackers felices?
The "CPU" that you are referring to is actually a metal cover that acts like a heatsink. It has thermal paste between it and the actual cpu, as well as thermal paste on top of it. If you decide to pry it off, you will need to buy a heatsink glue/epoxy product to glue it back over the cpu.
-
-
-
Girar la placa base 45 grados nos da un vistazo a algunos de los principales actores detrás de la potencia de procesamiento de la PlayStation 3 Super Slim:
-
Motor de banda ancha celular CXD2996BGB
-
Hynix H5RS5223DFA 512 Megabits GDDR3 VRAM (multiplicado por cuatro chips = 256 MB)
-
Controlador Sony CXM4027R MultiAV
-
Transmisor HDMI Panasonic MN8647091
-
Elpida X1032BBBG-3C-F 1 Gb (en dos chips para un total de 256 MB) XDR DRAM
The nubers on this step dnt make sense(LEss ram on total than in one chip?)
Mega"bit" 8 bits = 1 byte. Raw chips are labeled in megabits, systems and memory sticks go by megabytes.
-
-
-
Algunos de los más ... circuitos integrados cartesianos en la parte superior de la placa base:
-
Sony RSX CXD530 "Sintetizador de realidad"
-
Chip WLAN / Bluetooth Marvell Avastar 88W8781 SoC
-
Controlador de puente de E / S Sony CXD9963GB
-
Línea nueva.Almacenamiento flash Macronix MX29GL128FLT2I
-
Controlador de unidad de Blu-ray Sony CXD5132R SATA / PATA
-
Antena Wi-Fi de PCB integrada
i have short electric under the hard disk connector (122932N)
that make my ps3 super slim not power on (it is light red then when press power button light green then turn of (fan also turn on and turn off, same light )
-
-
-
El Super Slim pierde la calma cuando retiramos el ventilador de jaula de ardilla y dos disipadores de calor.
-
Para esta (¿final?) Iteración de la PS3, Sony ha aprovechado la nueva tecnología para hacer la misma consola más pequeña, más liviana y más silenciosa, en lugar de mejorar significativamente el rendimiento.
-
-
-
InserReparabilidad de PS3 Super Slim: 7 de 10 (10 es el más fácil de reparar)tar traducción aquí
-
El disco duro es de fácil acceso, reparación y actualización.
-
El cargador de discos sin bandeja es modular, lo que facilita su reemplazo.
-
Herramientas estándar, excepto un bit de seguridad T8.
-
Hay un molesto, pero en su mayoría inofensivo, etiqueta "Garantía anulada".
-
La fuente de alimentación se mantiene detrás de muchos clips; sin embargo, no esperamos muchas reparaciones internas a la fuente de alimentación.
-
Se debe quitar todo el conjunto de la placa base para acceder al ventilador o disipadores de calor.
-
La puerta de la bandeja deslizante del disco se siente mal y puede romperse después de un uso repetido.
The lasers are the first to go on most Sony equipment. Just look on eBay for all the "won't read discs" faulty ones, there's loads
As stated above- The main issue with my past 2 PS3's has been the Blu-ray drive going out after about 1500 hours of gaming, a few thousand hours of Netflix and listening to music. Console repair place down the street from me wanted $70.00 to fix it same day and give a 120 day warranty. Glad I read this and can probably do it myself next time there is an issue! :-)
-


Un agradecimiento especial a estos traductores:
90%


Estos traductores nos están ayudando a reparar el mundo! ¿Quieres contribuir?
Empezar a traducir ›
37 comentarios
You write:
> The tray-free disc loader is modular, making it easy to replace.
Are you sure? My best guess would be that the drive assembly is matched against the motherboard so you cannot switch the unit. At least that has been the usual Sony DRM policy. The custom "SW3-302 SCEI 1220EM42E" could well be doing the DRM stuff on the motherboard side, but you didn't disassemble the bluray unit, so it's hard to tell..
You write:
> Power supply is held behind lots of clips; however, we don't expect many internal repairs to the power supply.
With two capacitors (on the left of your picture) right next to the heat sink of two diodes I'd expect a fair amount of capacitor replacing coming in about two years from now..
The tray free loader is modular, and there's no DRM on the mechanism as you wrongly state. The control logic with encryption is built into the motherboard on these, so the whole optical deck including laser can be swapped out and replaced.
The bad thing is, typical Sony style is if the BluRay logic actually goes bad the whole mainboard has got to be replaced unless you know someone who's professional at re-balling (not reflowing) and can replace the circuitry and dump the encryption keys.
Never seen the V-Ram on the substrate before - won't that make GPU replacement pretty expensive?
They used this design since the original PS3
This is how the original 90nm GPU looks like after removing the IHS
I thougt the super slim ps3 super cheaper for sony to make. I am not talking about rubbish bluray top loading. Look at the logic board PCB. Full of smd rat $#$*. Compare that with original ps3 slim logic board. Thanks to proadlizer, the PCB is super clean without rat @!#*
I hate the way sony keeps decreasing the size and efficency of the fans and heatsinks every time they revise it and only concentrate on making it quieter.
Example the original 60gb's had 19 blade fans with massive heatpipe heatsinks, then the 40gb's with the crappy non heatpipe heatinks and a 15 blade fan, if they had kept the original HS they probably wouldn't fail so quickly.
The RSX Chip is based on G70 Chip in turn based on the NV47[6] (GeForce 7800 GTX) but with only 8 ROPs activated[7] and 128 Bit memory interface. This serie serie of gpu had issues with the substrate, which caused solder balls to break from it. This is the reason of the YLOD. Nvidia produced bad chips in the G70, G79, G80, G86, G84 GPU Series. Just to recall the bad Geforce 8600gt-m in the 2007-2008 Macbook pro's story.
Maybe I'm stupid, but where do you need the torx driver? Nothing in the article mentioned torx other than the needed tools section.
The unit turns on (light stays green) only to turn off seconds later. Anyone else have this problem and could possibly point me in the right direction. Thanks@!
I've got the same problem. No fix IO can find. I replaced the PSU and still no go. I'm lost.
im afraid the way i seen it, it most likely had gone kaput from overheating, making it not complete the whole bootup cycle. in short we simply ran out of luck unless you knew someone who could board it up to life again.
Do all the super slim use the same blue ray disk driver like in step 10?
I have a kinda destroyed super slim ps3, the disc reader side is mostly destroyed. Step smashed it up and just curious how much itd cost to fix it, most of it is all good just it didn't turn on fully just light up and shut off, and things pretty bent and wont close, i have lotssss of saved things that i dont wanna lose. Is there any way to retrieve it out or can it be fixed, any advise where to ask? Willing to pay as long as its not past the amount it cost.
I was taking my slim apart when all the gears fell out. Is there a diagram or something I can see to use a reference in putting them back together correctly?
I bought a PS3 console model number CECH-4001C in the States and was using it in Europe without problems with a voltage converter. A few days ago the converter started heating up and it almost burned the flat down. I want to know if I can use the console without the converter, since I do not want to throw away a good 500GB PS3. Thank you!
You can not use it without a converter. Check the bottom of your console for voltage rating, you will see that it's 100V-120V. Some units have a voltage rating of 100-240V, those could be used, but yours needs a converter. Or buy an internal power supply which is european and replace it.
Is it easy to remove the hdmi port and replace with a new one on a super slim ps3 250gb?
i took apart my ps3 super slim and put it back together and now it has no power whatsoever no red light or anything
Did you replace the I/O switch and connect the ribbon
do i can change the motherboard
My super slim will spin it and then make three clicking sounds then do it two more time.what shall I do about it?
any chance of repairing Wifi/Bluetooth (Marvell Avastar 88W8781 SoC WLAN/Bluetooth chip) without replacing MotherBoard ??
really 13 steps because 1 2 3 4 are not teardown info
Gee thanks guide writer, in step 8 a plastic opening tool makes quick work of the outer bezels, if you want to snap them off! Maybe try mentioning those Torx security screws that need removing before you break the bezels instead of writing a spotty, vague fluff piece about all the components.
Yes I found out that too late
Please help me for my PS 3 super slimcause REBalland many technision just trick is' not specializedi see haven't tools and every thingis' not experience,,my best regard,help me
Doesn't show how to get the fan off the metal casing, I found that there are two plastic pins going through the case and onto the base of the fan
I’m not sure folks will see this down here, but the hard drive cover doesn’t “pop right off” as it says in the instructions. It slides to the right and comes out naturally. I followed the instructions and popped it off and broke several clips that hold it in place— don’t be like me and follow the guide here!
Beware of step 8! Failing to remove the torx screws on the side of the console first will result in broken bezels!
Name - Contestar