Esta traducción podría no reflejar los cambios más recientes añadidos a la guía de referencia. Ayúdanos a actualizar la traducción o revisa la guía original.
Introducción
PlayStation 3 Super Slim - Cómo desmontar completamente.
[vídeo|http://www.youtube.com/watch?v=PADgRlE1k...]
Puedes ver también: [guía|10670]
Qué necesitas
-
-
Retira las tres patas de goma, la etiqueta de garantía y los cuatro tornillos.
-
Tira suavemente hacia arriba de la cubierta inferior para quitarla.
-
-
-
-
Mueve el ensamblaje del lector de discos ópticos hacia la izquierda para exponer uno de los tornillos que sujetan la fuente de alimentación.
-
Quita los dos tornillos Phillip n.° 1 que se indican y desconecta con cuidado el cable del lado derecho de la fuente de alimentación.
-
Levanta la fuente de alimentación hacia arriba para quitarla.
-
-
-
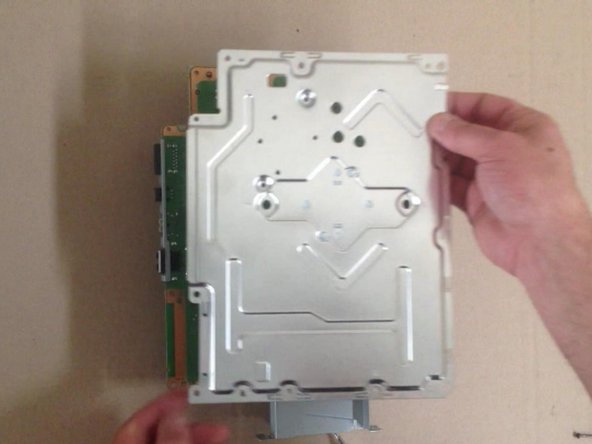
Quita los seis tornillos Phillip n.º 1 que se indican para separar el disipador térmico y el protector de la placa base.
-


Para volver a ensamblar tu dispositivo, sigue estas instrucciones en orden inverso.
Para volver a ensamblar tu dispositivo, sigue estas instrucciones en orden inverso.
Cancelar: No complete esta guía.
41 personas más completaron esta guía.
Un agradecimiento especial a estos traductores:
91%

¡ Ale Mantellini nos está ayudando a reparar el mundo! ¿Quieres contribuir?
Empezar a traducir ›

Equipo

13 comentarios
What's the name of the screwdriver that undo's the star shaped screws?
It is a T8 Torx screwdriver! I'll add the tools to this guide =)
i took apart my ps3 super slim and put it back together but there is no power what so ever no red light at all
Same here did you fix it?
Kriss -
One thing to pay attention to: The T8 Torx screws (at least on my 500GB model) are Tamper Proof TR8 screws, meaning you need a special screwdriver to undo them. A normal T8 wont work.
use a cross-shaped screwdriver (idk the correct name) to tear off the little metal thing, ez
Step 4: “simply remove the front finisher” - are you kidding me? I nearly broke mine!
Thank you, used 1.5mm straight screwdriver to undo the T8 security screws. PS3 completely clogged up with fluff. Used WD40 on a cotton bud to redistribute old heat sink compound on re assembly. Console is like new, video output works again! I keep a stack of those small plastic take away sauce pots, place the screws for the first step in the pot, then stack the second pot on for the second step screws etc.
Where does the Phillips #00 screwdriver come into play? You only used a #1.
I am replacing the optical drive in my console. But didn't note where the drive ribbon was positioned!? Every video I have found, they just pop right in...my original and replacement drives, have larger receptacles than the ribbon it self. There are at least 5 pins, that don't have (potentially) anything connecting them, to the ribbon. I don't want to randomly place the ribbon in one of the possible (7?) positions and fry something in the process...so where do I connect the smaller ribbon?!
Hey, dear community!
I did clean my PS3, because it was running hot and freezing after about 2 hours gameplay I'd say. However it did make the Problem worse, now my PS3 runs its fan like crazy when i boot it up and once i start a game, it sounds like a helicopter taking off.
Anybody know, where the temperature Sensor is located, or if i can just hardwire the fan to a potentiometer and adjust it by hand? (Learned mechatronics, so i could do something myself).
Thanks in advance,
Felix